- Get Started
- Image & Video APIs overview
- Developer kickstart
- SDK quick starts
- Try it!
- MCP servers and LLM tools (Beta)
- VS Code Extension (Beta)
- Video tutorial library
- Programmatic asset management
- Programmatic upload
- Upload programmatically
- Create upload presets
- Auto upload
- Moderate images with AI
- Use AI to generate image captions
- Upload images in Flutter
- Upload images in Node.js
- Auto-tag images in Node.js
- Upload multiple files in Node.js
- Upload videos in Node.js
- Upload images in Python
- Auto-tag images in Python
- Upload videos in Python
- Upload images in PHP
- Upload images in Go
- Upload assets in a React app
- Upload assets in a Vue.js app
- Drag-and-drop uploads in React
- Upload assets in a Next.js app
- Upload assets with Server Actions
- Upload assets in Svelte
- Upload assets in a SvelteKit app
- Upload assets in a Remix app
- Upload images in Hono
- Use webhooks to remove backgrounds
- Upload images in Laravel
- Interaction with Cloudinary APIs
- Cloudinary SDKs
- Find your credentials
- Configure the JavaScript SDK
- Configure the React SDK
- Configure the Angular SDK
- Configure the Flutter SDK
- Configure Svelte Cloudinary
- Configure the Javascript SDK in Svelte
- Getting started with Cloudinary in Node.js
- Configure the Node.js SDK
- Configure the Python SDK
- Configure the PHP SDK
- Configure the Go SDK
- Configure the Vue.js SDK
- Configure the Next.js SDK
- List images in Next.js
- Lazy load images with Next.js
- Image fallbacks in JavaScript
- Captioning on upload with Node.js
- Delete assets with Node.js
- Manage images in a Django app
- Cloudinary CLI
- Widgets and tools
- Programmatic upload
- Optimization and delivery
- Transformations
- Get started with transformations
- Advanced transformation features
- Text overlay transformations
- Complex transformations
- Named transformations
- Named transformations using TX Builder
- Advanced image components
- Trim videos in Node.js
- Splice videos in Node.js
- Zoompan effect
- Video transformations
- Crop and resize images in React
- Crop and resize videos in React
- Crop and resize images in Python
- Remove backgrounds and add drop shadows
- AI generative fill in Next.js
- Color accessibility in JavaScript
- Transformations for social media
- Dev Hints on YouTube
- Dev Hints en Español
- Cloudinary Café Training Sessions
- Programmatic asset management
- Additional onboarding resources
- Guides
- Cloudinary Image
- Product overview
- Image transformations
- Image transformations overview
- Resizing and cropping
- Placing layers on images
- Effects and enhancements
- Background removal
- Generative AI transformations
- Face-detection based transformations
- Custom focus areas
- Transformation refiners
- Animated images
- Transformations on 3D models
- Conditional transformations
- User-defined variables and arithmetic transformations
- Custom functions
- Image optimization and delivery
- Programmatic image creation
- Product Gallery widget
- Media Editor widget
- Image add-ons
- Cloudinary Video
- Upload
- Asset management
- Account management
- Retail and e-commerce
- User-generated content
- Accessible media
- AI in action
- Native mobile
- Add-ons
- Advanced Facial Attributes Detection
- Amazon Rekognition AI Moderation
- Amazon Rekognition Video Moderation
- Amazon Rekognition Auto Tagging
- Amazon Rekognition Celebrity Detection
- Aspose Document Conversion
- Cloudinary AI Background Removal
- Cloudinary AI Content Analysis
- Cloudinary AI Vision
- Cloudinary Duplicate Image Detection
- Google AI Video Moderation
- Google AI Video Transcription
- Google Auto Tagging
- Google Automatic Video Tagging
- Google Translation
- Imagga Auto Tagging
- Imagga Crop and Scale
- Perception Point Malware Detection
- Microsoft Azure Video Indexer
- OCR Text Detection and Extraction
- Pixelz - Remove the Background
- URL2PNG Website Screenshots
- VIESUSTM Automatic Image Enhancement
- WebPurify Image Moderation
- Cloudinary Image
- References
- SDKs
- Release Notes
Transformation refiners
Last updated: Dec-17-2025
Many of our transformations harness AI to transform your images in creative ways. While AI typically produces high-quality results, you may sometimes want to refine these results to perfectly match your creative vision. Our refinement tools make it easy to iterate until you achieve exactly the look you want.
The Background Removal Refiner gives you full control over every detail in your background-removed image.
The generative AI refiners help you achieve your desired result by creating a number of variations for the same transformation and letting you choose which variation to associate with that transformation for a particular image.
The Focus Area Refiner lets you fine-tune face coordinates that are automatically detected on upload, in addition to letting you specify custom coordinates and custom regions.
Updating AI-based transformations
The refiners are available from Studio, which you can access from an image in your Media Library by clicking Edit from the (3-dots) options menu on the asset card.
Background Removal Refiner
You can access the Background Removal Refiner through Studio when you've built a transformation that contains background removal. Select the Background Removal button to the right of the preview.
In the Background Removal Refiner, you can zoom in to the area that you want to touch up, choose a brush size, and paint over the area of the image that you want to remove.
You can use the opacity slider to view the original image underneath the background-removed image.
If you choose the Restore tool, anything you paint over will be restored to the original image.
When you're happy with your changes, click Update Transformation. Any changes that you've made will apply to any existing and future derived images for this asset when delivered with the e_background_removal parameter.
Generative AI refiners
When using transformations powered by generative AI like Generative Fill and Generative Background Replace, you might want to refine the results to better match your vision. There are two ways to do this:
Using the seed parameter: To generate different variations of the same transformation, you can manually modify the
seedparameter in your transformation URL. While this gives you immediate results, this process can be time-consuming and affects the URL (learn more).Using the Generative AI refiner tools: The refiner tools provide an intuitive interface for generating and selecting variations while maintaining clean, simple URLs. When you select your preferred variation, it becomes the standard result for that transformation URL.
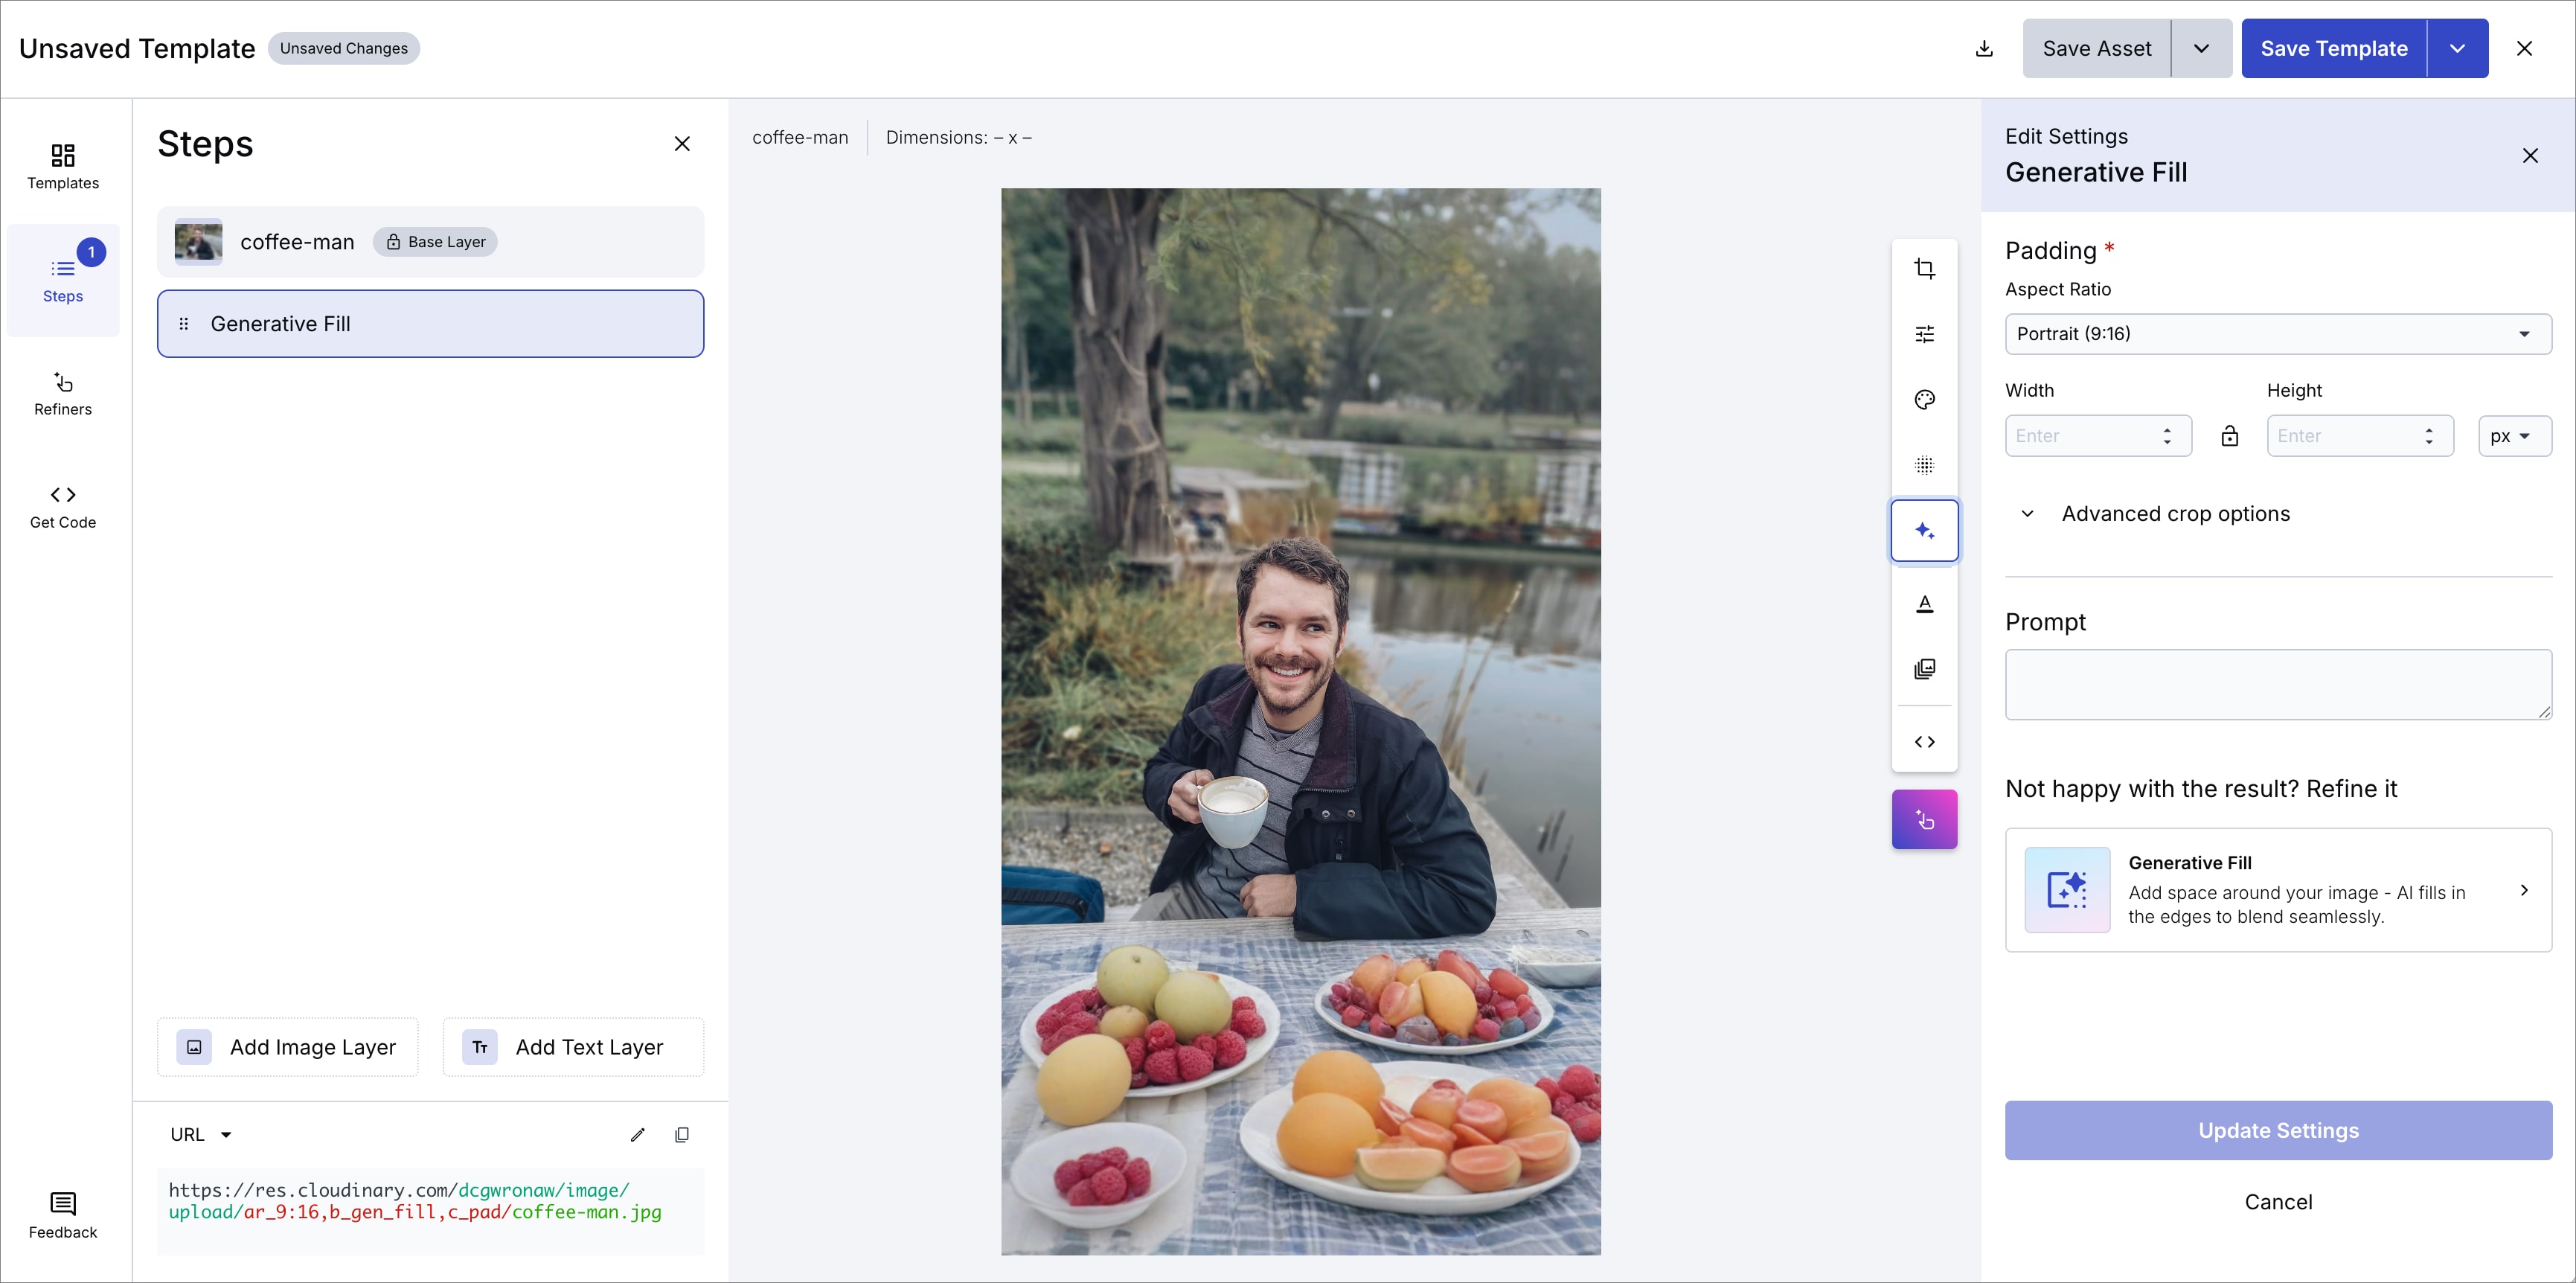
The following example shows how to use the Generative Fill Refiner, accessed through Studio.
In Studio, select Generative Fill from AI Transformations and set an aspect ratio or a width and height different from the original. Optionally, add a prompt to guide the AI-generated padding.
If you're not happy with the generative fill result, open the Generative Fill Refiner by selecting the Generative Fill button to the right of the preview.
Studio with an image transformed using c_pad and gen_fill
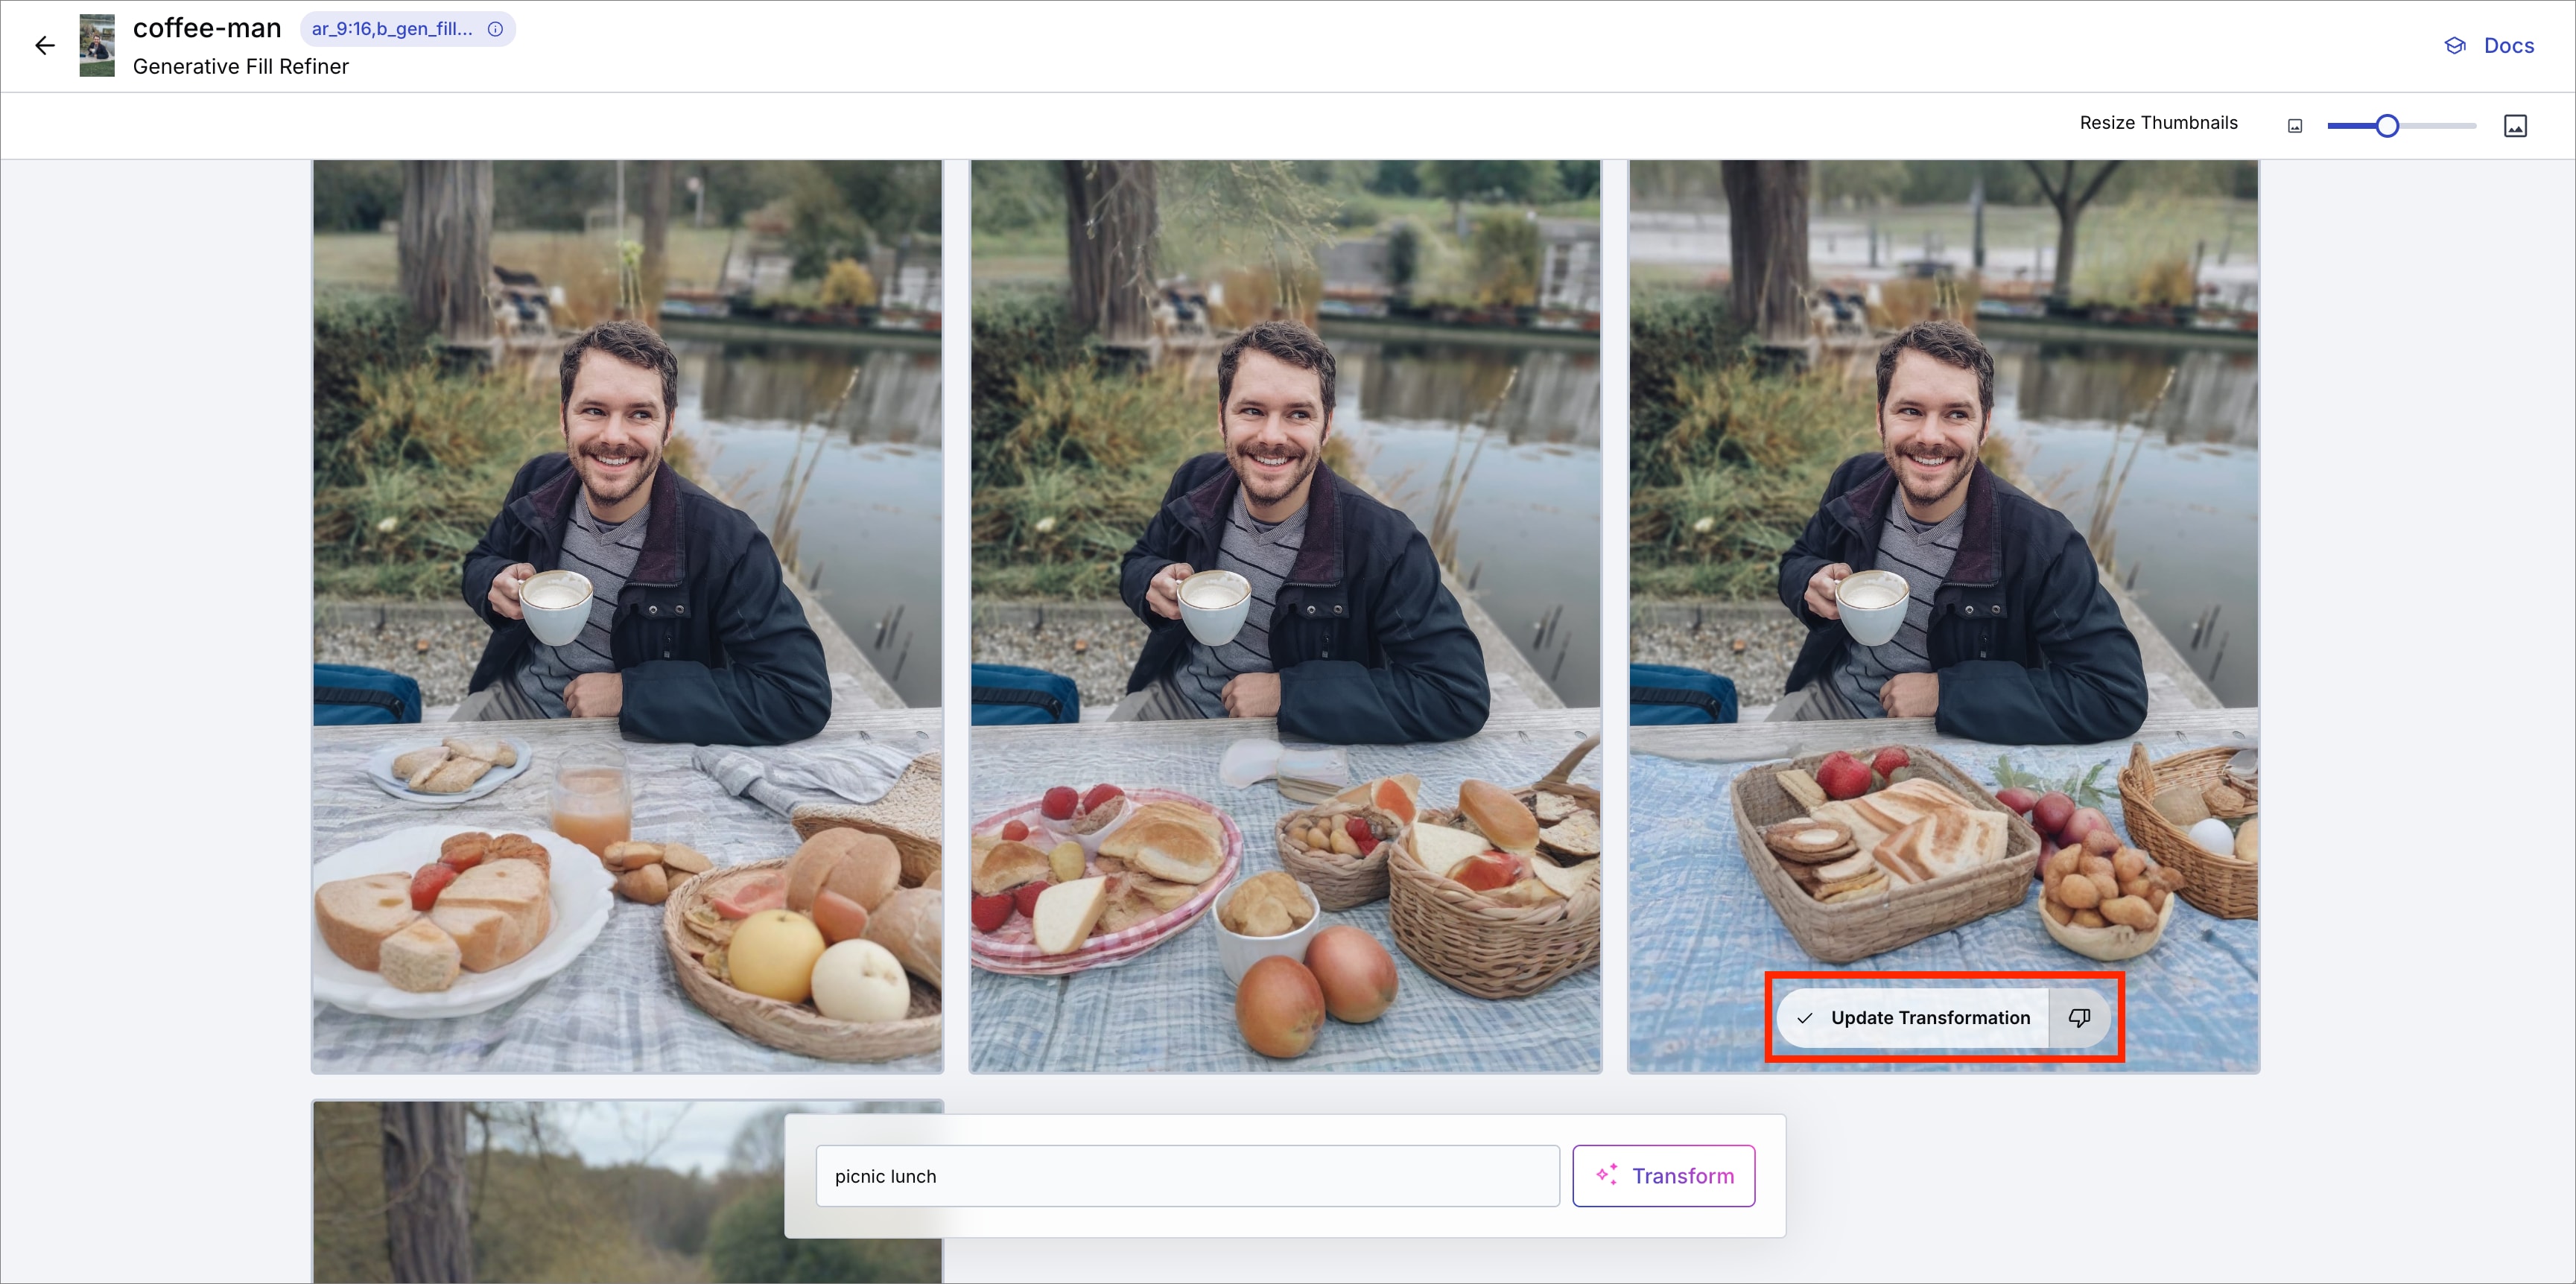
You can then choose how many different variations you want to generate, and optionally provide a prompt to guide the generation to meet your expectations.
For example, in the generated picture the table looks empty, so you could set the prompt to picnic lunch to generate variations with picnic items on the table.
Generative fill refiner interface
Click Transform to generate the variations.
You can hover over the icon in the top left of each image to compare the original transformation with that variation. If you don't like it, you can click the "thumbs down" icon towards the bottom of the image, removing it from the view.
Generative fill refiner showing thumbs down button
If none of the variations meet your needs, you can refine the prompt to be more specific about what you want to see. This will generate additional variations for you to review.
Generative fill refiner with additional variations
When you find a variation you like, click Update Transformation to apply your choice. This selected variation will now be the standard result delivered by your transformation URL.
On returning to Studio, you'll see the updated image, which is what the same transformation URL now delivers.
In this case the transformation is ar_9:16,b_gen_fill,c_pad.
Understanding refined transformations
When you click Update Transformation, your selected variation becomes the standard result for that transformation. Any delivery URL that begins with the same transformation string (in this case ar_2:3,b_gen_fill,c_pad) will now deliver your chosen variation instead of generating a new one. This applies to:
- Direct use of the transformation string
- Longer transformation chains that begin with this string
-
Named transformations that exactly match this string
When refined variations won't be used
Your refined variation won't be delivered in the following cases:
-
Different transformation order
The transformation parameters must appear in the exact same order. For example, movingb_gen_fillafterc_padwill generate a new variation. -
Added parameters before the transformation
Adding effects or other transformations before the refined transformation string will generate a new variation. -
Changed original image
If you overwrite the original image, all refined variations are lost. Using variables
User defined variables are not supported in refined transformations.
Focus Area Refiner
When cropping images, or placing layers, you may have certain areas of interest in the composition of the picture that you want to focus on. Although there are AI-based ways to focus on areas of an image, sometimes you need to ensure accuracy and consistency, so Cloudinary provides the capability to define and refine custom areas of an image.
The Focus Area Refiner lets you fine-tune or specify new custom focus areas in an image.
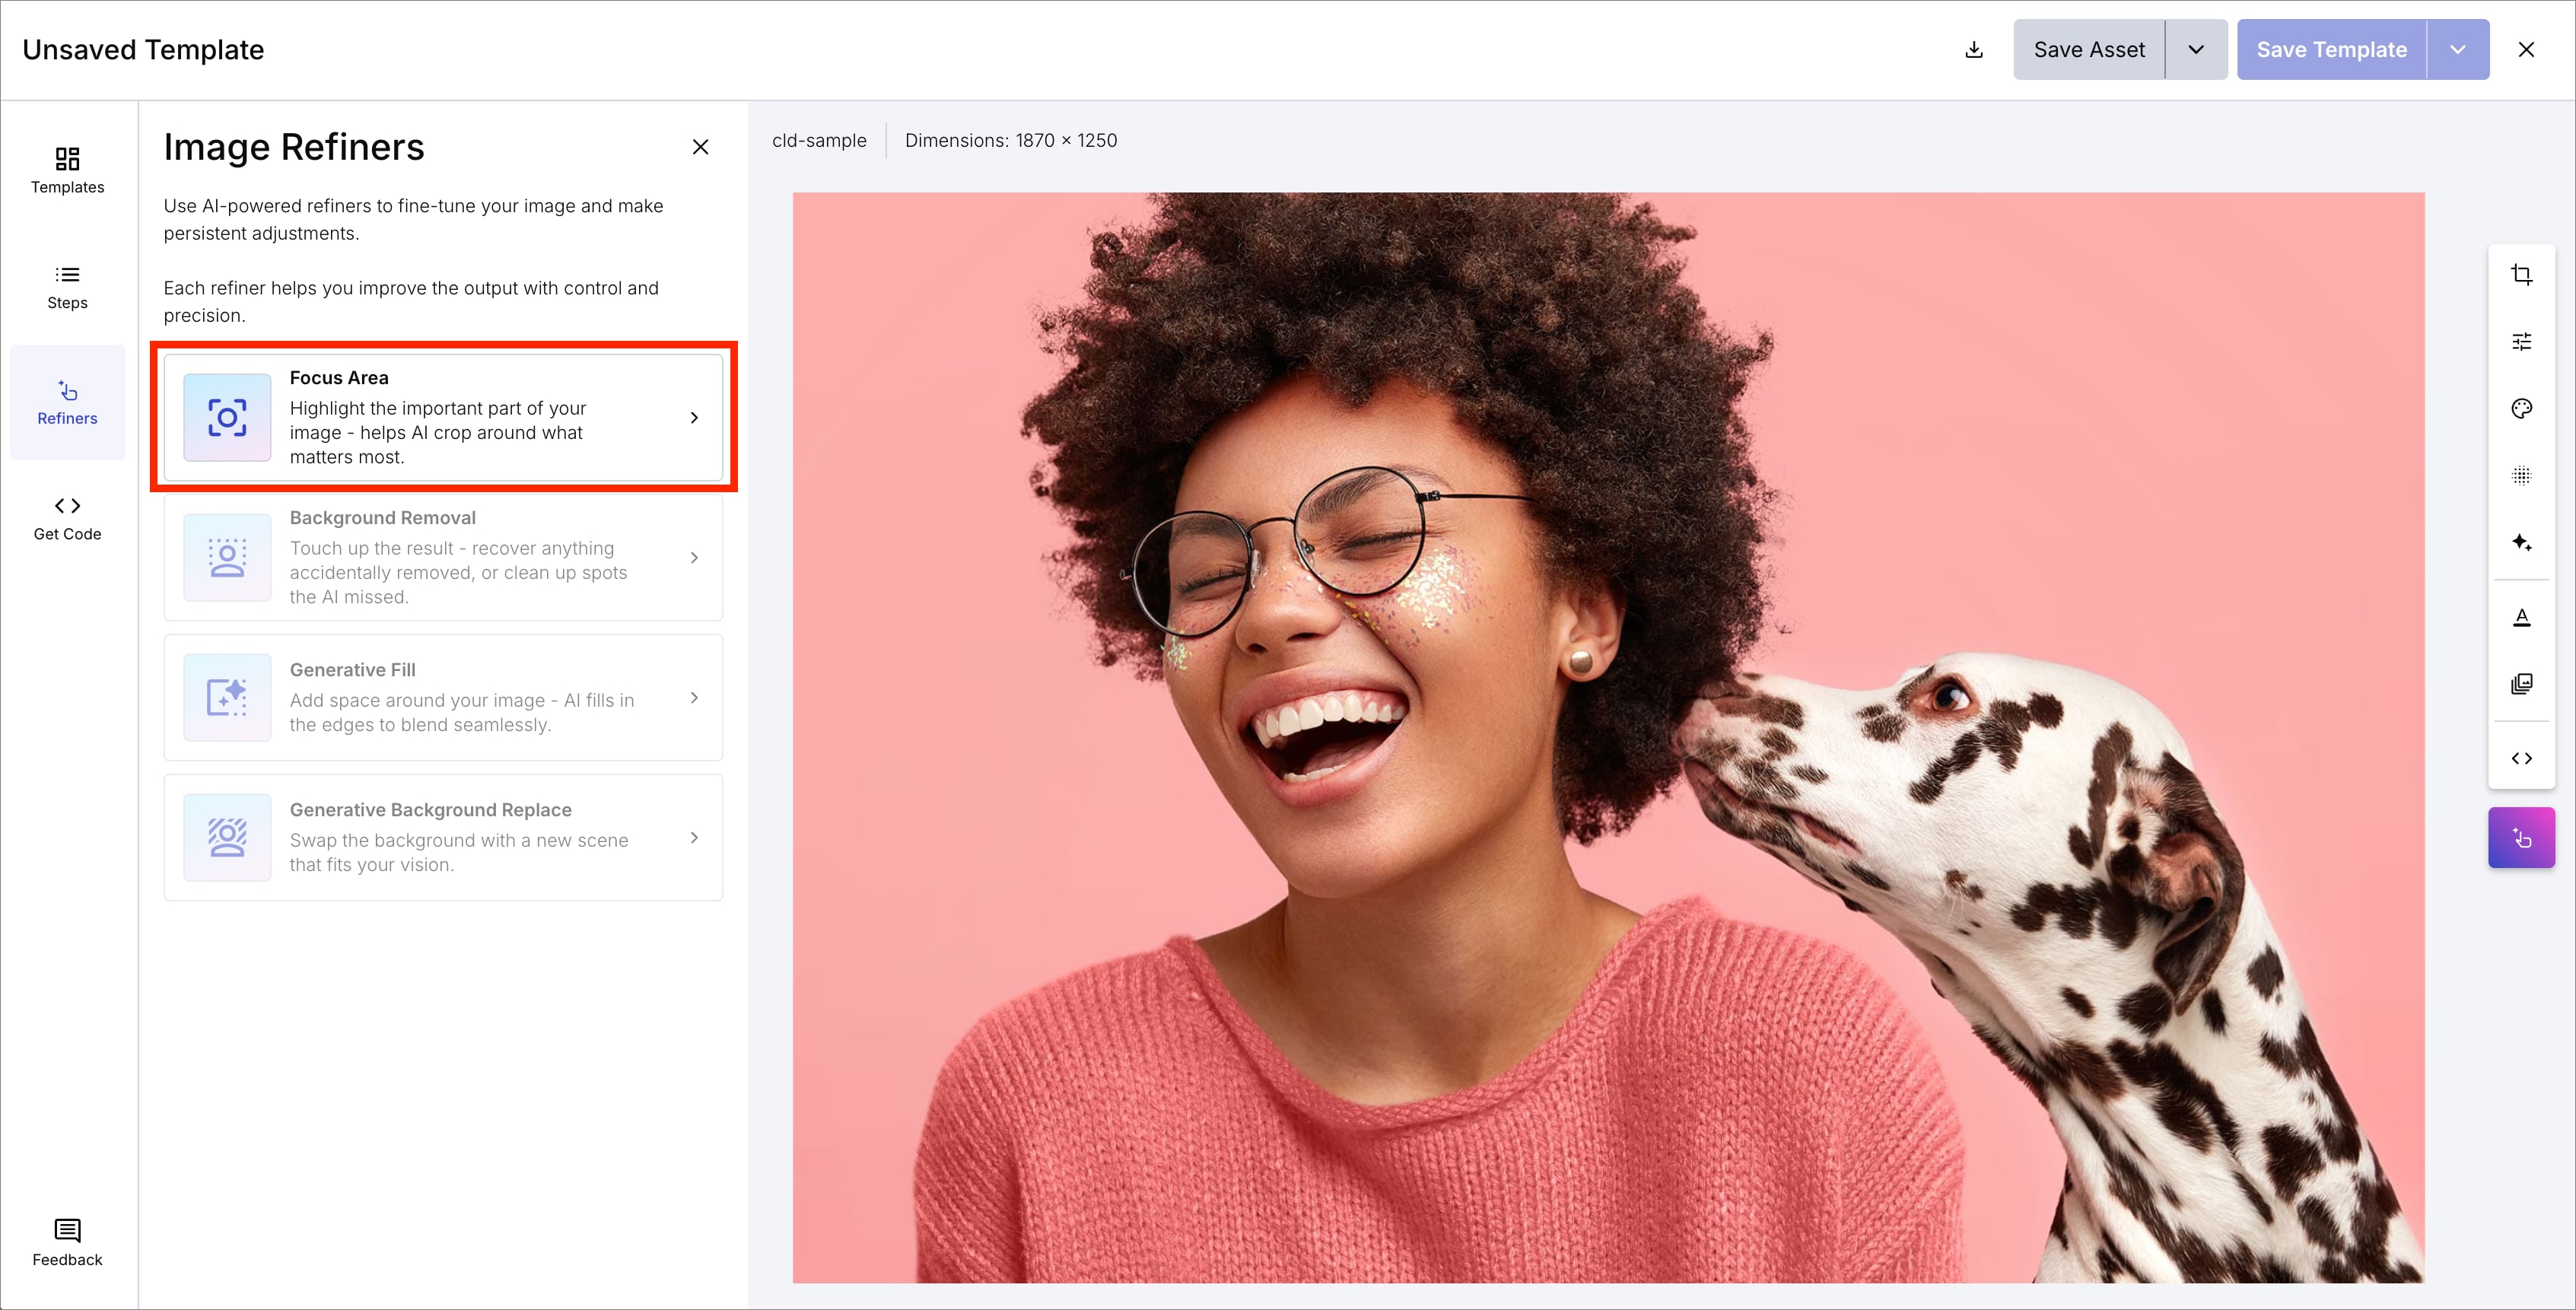
You can open the Focus Area Refiner for any image from Studio. Click Refiners in the left panel, then select the Focus Area button.
Thumbnail of the image with the Select Focus Areas option
The Focus Area Refiner contains three tabs:
- Face: lets you adjust the areas automatically detected as faces on upload, in addition to adding new ones.
- Custom: lets you define or edit a custom region for the image.
- Region: lets you define or edit multiple named regions for the image.
You can either enter exact coordinates for the focus areas, or drag your mouse to select the desired region on the displayed image, which automatically populates the coordinates.
Learn more about using custom focus areas.