- Get Started
- Image & Video APIs overview
- Developer kickstart
- SDK quick starts
- Try it!
- MCP servers and LLM tools (Beta)
- VS Code Extension (Beta)
- Video tutorial library
- Programmatic asset management
- Programmatic upload
- Upload programmatically
- Create upload presets
- Auto upload
- Moderate images with AI
- Use AI to generate image captions
- Upload images in Flutter
- Upload images in Node.js
- Auto-tag images in Node.js
- Upload multiple files in Node.js
- Upload videos in Node.js
- Upload images in Python
- Auto-tag images in Python
- Upload videos in Python
- Upload images in PHP
- Upload images in Go
- Upload assets in a React app
- Upload assets in a Vue.js app
- Drag-and-drop uploads in React
- Upload assets in a Next.js app
- Upload assets with Server Actions
- Upload assets in Svelte
- Upload assets in a SvelteKit app
- Upload assets in a Remix app
- Upload images in Hono
- Use webhooks to remove backgrounds
- Upload images in Laravel
- Interaction with Cloudinary APIs
- Cloudinary SDKs
- Find your credentials
- Configure the JavaScript SDK
- Configure the React SDK
- Configure the Angular SDK
- Configure the Flutter SDK
- Configure Svelte Cloudinary
- Configure the Javascript SDK in Svelte
- Getting started with Cloudinary in Node.js
- Configure the Node.js SDK
- Configure the Python SDK
- Configure the PHP SDK
- Configure the Go SDK
- Configure the Vue.js SDK
- Configure the Next.js SDK
- List images in Next.js
- Lazy load images with Next.js
- Image fallbacks in JavaScript
- Captioning on upload with Node.js
- Delete assets with Node.js
- Manage images in a Django app
- Cloudinary CLI
- Widgets and tools
- Programmatic upload
- Optimization and delivery
- Transformations
- Get started with transformations
- Advanced transformation features
- Text overlay transformations
- Complex transformations
- Named transformations
- Named transformations using TX Builder
- Advanced image components
- Trim videos in Node.js
- Splice videos in Node.js
- Zoompan effect
- Video transformations
- Crop and resize images in React
- Crop and resize videos in React
- Crop and resize images in Python
- Remove backgrounds and add drop shadows
- AI generative fill in Next.js
- Color accessibility in JavaScript
- Transformations for social media
- Dev Hints on YouTube
- Dev Hints en Español
- Cloudinary Café Training Sessions
- Programmatic asset management
- Additional onboarding resources
- Guides
- Cloudinary Image
- Product overview
- Image transformations
- Image transformations overview
- Resizing and cropping
- Placing layers on images
- Effects and enhancements
- Background removal
- Generative AI transformations
- Face-detection based transformations
- Custom focus areas
- Transformation refiners
- Animated images
- Transformations on 3D models
- Conditional transformations
- User-defined variables and arithmetic transformations
- Custom functions
- Image optimization and delivery
- Programmatic image creation
- Product Gallery widget
- Media Editor widget
- Image add-ons
- Cloudinary Video
- Upload
- Asset management
- Account management
- Retail and e-commerce
- User-generated content
- Accessible media
- AI in action
- Native mobile
- Add-ons
- Advanced Facial Attributes Detection
- Amazon Rekognition AI Moderation
- Amazon Rekognition Video Moderation
- Amazon Rekognition Auto Tagging
- Amazon Rekognition Celebrity Detection
- Aspose Document Conversion
- Cloudinary AI Background Removal
- Cloudinary AI Content Analysis
- Cloudinary AI Vision
- Cloudinary Duplicate Image Detection
- Google AI Video Moderation
- Google AI Video Transcription
- Google Auto Tagging
- Google Automatic Video Tagging
- Google Translation
- Imagga Auto Tagging
- Imagga Crop and Scale
- Perception Point Malware Detection
- Microsoft Azure Video Indexer
- OCR Text Detection and Extraction
- Pixelz - Remove the Background
- URL2PNG Website Screenshots
- VIESUSTM Automatic Image Enhancement
- WebPurify Image Moderation
- Cloudinary Image
- References
- SDKs
- Release Notes
Optimize by default settings
Last updated: Aug-31-2025
Cloudinary performs various default optimizations when delivering media assets. You can control these for your product environment in Settings > Optimization and override them through transformation parameters.
In addition to the options mentioned on this page, there are other default optimizations for images and videos.
- Each of the default optimizations affect only the delivered image or video. The original file remains unchanged.
- Default optimizations count towards your usage, even though the delivery URL does not appear to be different from delivering an original asset. To deliver an original asset without incurring a transformation cost when you have any of the Optimize by default settings enabled, use the
originalflag (fl_originalin URLs). - If your account plan uses only the image impressions metric and not video seconds, your videos will not be optimized by default. Similarly, if your account plan uses only the video seconds metric and not image impressions, your images will not be optimized by default.
- The optimize by default settings are not supported together with strict transformations, so if your solution relies on strict transformations, don't enable these settings.
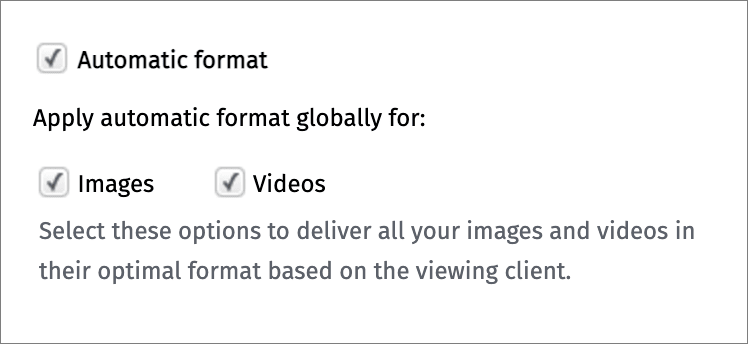
Default automatic format
The Automatic format setting in the Optimize by default section applies automatic format selection to all images and/or videos delivered from your product environment, depending on your selection, regardless of whether other transformations are also applied.
This determines the best format in which to deliver each of your images and videos.
As this counts as a transformation, default image quality or default video quality is also invoked.
To override this setting, in order to deliver an original image or video, use the original flag (fl_original in URLs). This flag does not count as a transformation and does not invoke default image/video quality.
To override this setting, in order to deliver a particular format, set the format parameter in your transformation (f_ in URLs).
- Enabling default automatic format may significantly increase your transformation usage, although it should also reduce your bandwidth usage.
- This setting is ignored if there is a named transformation or format parameter in the delivery URL.
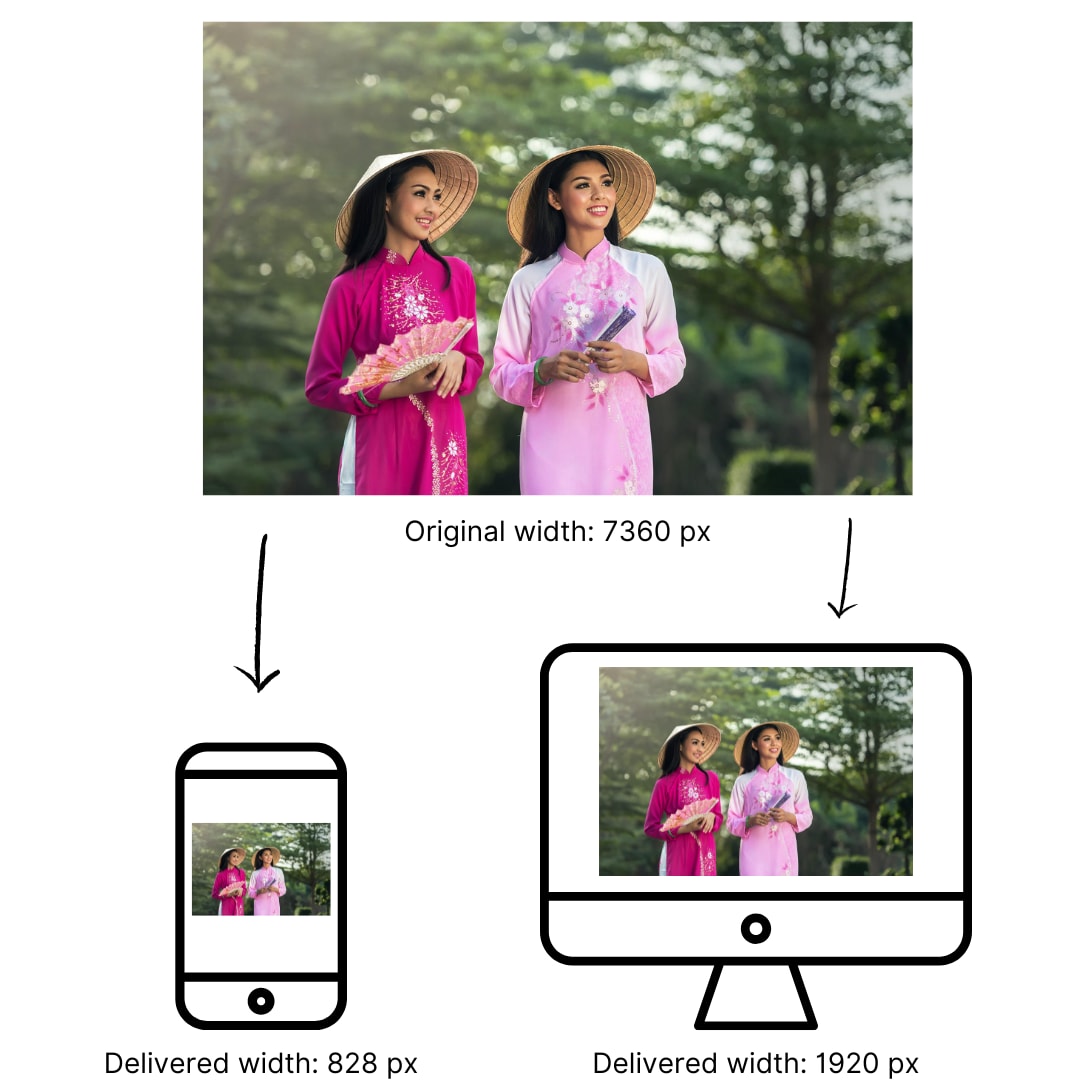
Default image width
By selecting Limit maximum image width, any images that are delivered with no other resizing transformations are automatically downscaled if they exceed the width settings for mobile or desktop.
The default maximum width is 828 pixels for smartphone devices and 1920 pixels for other devices, including desktops, laptops and tablets, but you can change these in the settings.
Responsive width conceptual diagram
As this counts as a transformation, default image quality is also invoked.
To override this setting, in order to deliver an original image, use the original flag (fl_original in URLs). This flag does not count as a transformation and does not invoke default image quality.
- Enabling default image width may significantly increase your transformation usage, although it should also reduce your bandwidth usage.
- This setting is ignored if there is a named transformation or any parameter that alters the size of the image in the delivery URL.
- Images are only downscaled, never upscaled.