- Get Started
- Image & Video APIs overview
- Developer kickstart
- SDK quick starts
- Try it!
- MCP servers and LLM tools (Beta)
- VS Code Extension (Beta)
- Video tutorial library
- Programmatic asset management
- Programmatic upload
- Upload programmatically
- Create upload presets
- Auto upload
- Moderate images with AI
- Use AI to generate image captions
- Upload images in Flutter
- Upload images in Node.js
- Auto-tag images in Node.js
- Upload multiple files in Node.js
- Upload videos in Node.js
- Upload images in Python
- Auto-tag images in Python
- Upload videos in Python
- Upload images in PHP
- Upload images in Go
- Upload assets in a React app
- Upload assets in a Vue.js app
- Drag-and-drop uploads in React
- Upload assets in a Next.js app
- Upload assets with Server Actions
- Upload assets in Svelte
- Upload assets in a SvelteKit app
- Upload assets in a Remix app
- Upload images in Hono
- Use webhooks to remove backgrounds
- Upload images in Laravel
- Interaction with Cloudinary APIs
- Cloudinary SDKs
- Find your credentials
- Configure the JavaScript SDK
- Configure the React SDK
- Configure the Angular SDK
- Configure the Flutter SDK
- Configure Svelte Cloudinary
- Configure the Javascript SDK in Svelte
- Getting started with Cloudinary in Node.js
- Configure the Node.js SDK
- Configure the Python SDK
- Configure the PHP SDK
- Configure the Go SDK
- Configure the Vue.js SDK
- Configure the Next.js SDK
- List images in Next.js
- Lazy load images with Next.js
- Image fallbacks in JavaScript
- Captioning on upload with Node.js
- Delete assets with Node.js
- Manage images in a Django app
- Cloudinary CLI
- Widgets and tools
- Programmatic upload
- Optimization and delivery
- Transformations
- Get started with transformations
- Advanced transformation features
- Text overlay transformations
- Complex transformations
- Named transformations
- Named transformations using TX Builder
- Advanced image components
- Trim videos in Node.js
- Splice videos in Node.js
- Zoompan effect
- Video transformations
- Crop and resize images in React
- Crop and resize videos in React
- Crop and resize images in Python
- Remove backgrounds and add drop shadows
- AI generative fill in Next.js
- Color accessibility in JavaScript
- Transformations for social media
- Dev Hints on YouTube
- Dev Hints en Español
- Cloudinary Café Training Sessions
- Programmatic asset management
- Additional onboarding resources
- Guides
- Cloudinary Image
- Product overview
- Image transformations
- Image transformations overview
- Resizing and cropping
- Placing layers on images
- Effects and enhancements
- Background removal
- Generative AI transformations
- Face-detection based transformations
- Custom focus areas
- Transformation refiners
- Animated images
- Transformations on 3D models
- Conditional transformations
- User-defined variables and arithmetic transformations
- Custom functions
- Image optimization and delivery
- Programmatic image creation
- Product Gallery widget
- Media Editor widget
- Image add-ons
- Cloudinary Video
- Upload
- Asset management
- Account management
- Retail and e-commerce
- User-generated content
- Accessible media
- AI in action
- Native mobile
- Add-ons
- Advanced Facial Attributes Detection
- Amazon Rekognition AI Moderation
- Amazon Rekognition Video Moderation
- Amazon Rekognition Auto Tagging
- Amazon Rekognition Celebrity Detection
- Aspose Document Conversion
- Cloudinary AI Background Removal
- Cloudinary AI Content Analysis
- Cloudinary AI Vision
- Cloudinary Duplicate Image Detection
- Google AI Video Moderation
- Google AI Video Transcription
- Google Auto Tagging
- Google Automatic Video Tagging
- Google Translation
- Imagga Auto Tagging
- Imagga Crop and Scale
- Perception Point Malware Detection
- Microsoft Azure Video Indexer
- OCR Text Detection and Extraction
- Pixelz - Remove the Background
- URL2PNG Website Screenshots
- VIESUSTM Automatic Image Enhancement
- WebPurify Image Moderation
- Cloudinary Image
- References
- SDKs
- Release Notes
Account console settings
Last updated: Sep-25-2025
You can configure settings that influence your account as a whole, as well as how your assets get uploaded, stored, and delivered within the currently selected product environment.
Some Settings affect both Assets (DAM) users or admins and developers, so you should coordinate with other teams where relevant.
Click the Settings icon in the Console Options sidebar to view your Console Settings.
The default settings are a good place to start but you'll want to review all the settings to ensure they meet your organization's needs.
The following sections highlight a few of the common settings that you may want to consider when setting up your account.
Overview
From the Cloudinary Console Settings pages, you can define a variety of options and configurations. With the exception of the My Profile page, these settings all apply globally to the entire account:
| Option | Useful for... |
|---|---|
| My Profile | Editing personal information, setting display preferences (such as language and dark/light theme), managing email preferences and two-factor authentication, and generating support verification codes. All user roles can access this page and settings here apply to each user separately. Learn more |
| Account | Upgrading your plan, viewing your account details, and accessing account usage reports. |
| Account API Keys | Managing your account API key and secret pairs, and copying your account ID, credentials used to authenticate Provisioning API calls. Learn more Note: The Account API Keys page is available only to customers who can access the Provisioning API, available to Enterprise customers by request. |
| Product Environments | Adding product environments or editing the ones already in your account. Learn more |
| User Management | Creating and managing users and groups in your account. Learn more |
| Account Security | Enabling or requiring SAML login and two-factor authentication for the users in the account. Learn more |
| Other settings: | |
| Billing | Managing your plan and billing details including:
|
| Add-ons | Extending Cloudinary capabilities with tools that offer advanced features for managing, processing, and delivering your digital assets effectively. Learn more |
- To find out which roles grant permission to access each setting, see Role-based permissions.
- While in most accounts, Billing and Add-ons have separate sections in the Console Settings, in older accounts, these sections appear under Account settings.
Support verification code
If you're working with Cloudinary Support on a sensitive issue—such as security updates or major account modifications—you, your CSM, or a support representative may ask you to generate a support verification code. This code helps Cloudinary verify your identity and protect your account throughout the support process.
You can generate the verification code from the Support Verification Code tab in the My Profile page of the Console Settings. The verification code will be sent to the email associated with your Cloudinary account.
Two-factor authentication and SSO
In the Account Security page of the Console Settings, check or modify two-factor authentication (2FA) and SAML/SSO login settings for your account.
Two-factor authentication (2FA) is recommended for any Production environment, or per your organization's security policy. You can upgrade to two-factor authentication on any account, including free accounts and those registered via GitHub, Google, or email.
SSO is available for enterprise accounts. It's recommended especially if you have more than 100 users or per your organization's security policy.
Account API keys
Accounts with Provisioning API access can create and manage their product environments, users, user groups, access keys (product environment API keys), and account API keys using the RESTful Provisioning API.
If your account has Provisioning API access, users with the Master admin, Admin, or Technical admin role can access the account API key and secret pairs and account ID credentials, on the Account API Keys page of the Cloudinary Console Settings. These credentials are required to interact with Cloudinary's Provisioning API.
You pass the values individually, or use a single environment variable in the following format:
As with all configuration parameters, you can set this globally or pass it with each call.
Root account API key
The root API key is automatically created as the first account-level API key in a Cloudinary account. It's clearly marked in the Console to distinguish it from other keys.
While you can disable it like any other account API key, you may choose to reserve the root key for master administrators. Treat this key with care, as it's often used as the primary credential for account management.
By default, the root API key has a generic name. For security and operational clarity, it's best practice to rename this key meaningfully and maintain a secure internal record of its purpose and access details.
Managing account API keys
You can also manage your account API keys from the Account API Keys page of the Console Settings. This page allows you to generate new account API key and secret pairs, activate them, and assign them names under the same cloud name. Generating multiple keys for various purposes, such as delegating different keys to different admin teams or limiting access for temporary administrative tasks, helps maintain security and organize access. If you have more than one account API key, you can deactivate keys as needed to maintain security and control access.
Product environment management
A product environment encompasses a distinct asset repository with specific settings and attributes. To learn more about product environments, see What's a product environment?.
To manage your product environments, navigate to the Product Environment page of the Console Settings. Here, you can browse through all your product environments, search for specific ones, enable or disable them and modify attributes such as cloud name (the unique identifier), display name (shown in the Product Selector instead of the cloud name, if defined) and description. You can check if your product environments are using dynamic folders mode, and you can add new product environments, within the limit of your plan.
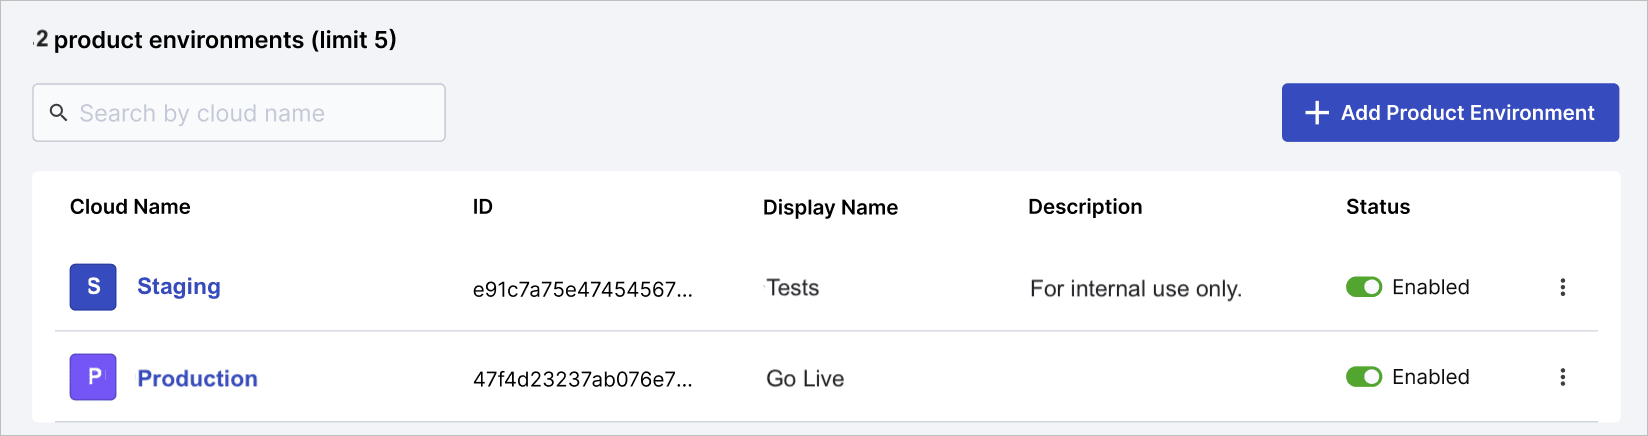
When creating a new product environment:
You can configure its cloud name, display name, description, and folder mode.
By default, all new product environments are set to use the dynamic folders mode, which allows for flexibility in organizing files. However, if necessary, you can select fixed folder mode. You can't change folder modes in existing product environments.
Additionally, you can choose an existing product environment to serve as the Base product environment.
sub_accounts endpoint. Access to the Provisioning API is available for accounts on an Enterprise plan. If you don’t currently have access and would like to explore your options, contact us. For more details, see the Provisioning API reference.Dynamic and fixed folder modes
All Cloudinary product environments use either dynamic folders or fixed folders. Both modes support most features but differ in some behavior and management options:
Dynamic folders offer flexibility, as folder changes and asset naming in the Media Library (managed by display name) don’t affect public IDs included in delivery URLs. This allows you to update names and folder structures in the UI without breaking production links.
Fixed folders tie the folder structure and asset naming in the Media Library directly to the public ID, which is part of the delivery URL. As a result, changes to folder structures or asset names can break links if not managed carefully.
Starting June 4th, 2024, all new Cloudinary accounts are created using dynamic folder mode.
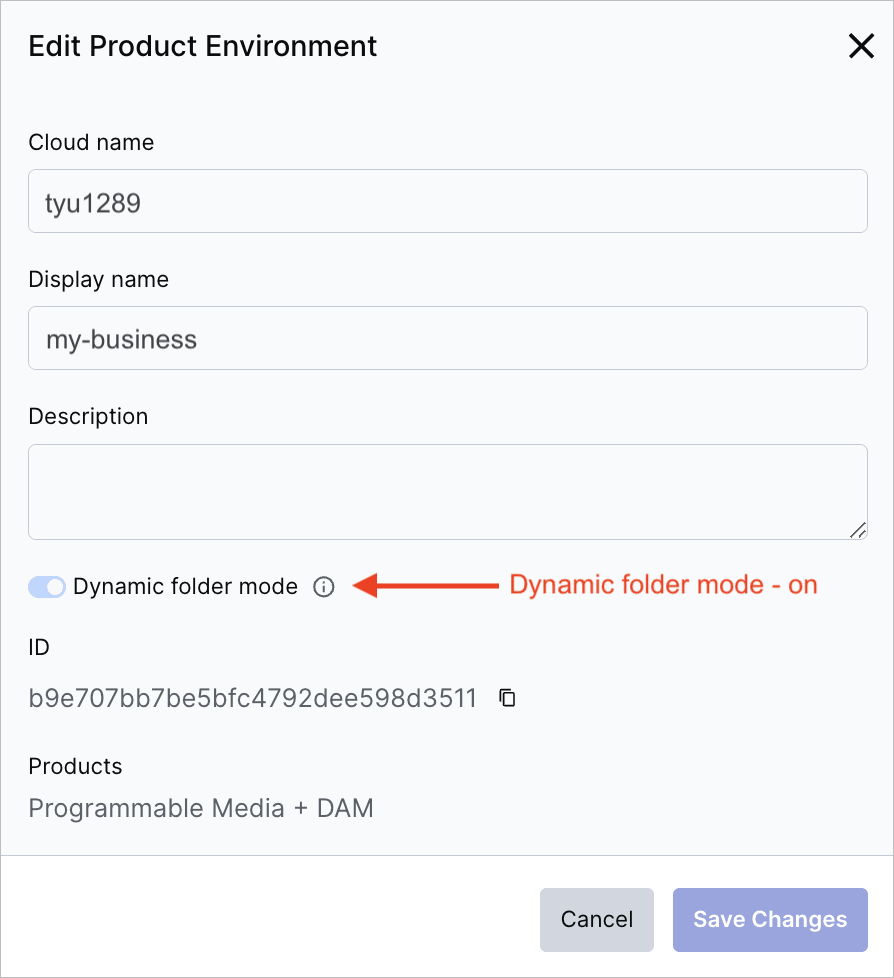
You can find out if dynamic folders is enabled for your product environment by navigating to the Product Environments settings page. From the (3-dots) option menu next to the relevant product environment select Edit. Your product environment is using dynamic folder mode if the Dynamic folder mode toggle button is on. If it's off, you're using fixed folder mode.
- Historically, Cloudinary accounts used fixed folder mode. If you're currently using the legacy fixed folder mode and would like to enable dynamic folders for your product environment, contact support.
- For more information on the ways that dynamic and fixed folder modes differ in the Cloudinary Console, see the Folder modes page in the Assets Admin Guide.
- For more information about how their differences are reflected in the API, see Folder modes.
Base product environment
The Base Product Environment option simplifies creating new product environments by inheriting key configurations from an existing environment. When using this option, the following settings are automatically copied:
- Usage limits
- Folder mode (removing the option to select a folder mode independently)
- Customized options applied by Cloudinary support
- Asset record location (EU, US, or AP)
It's important to note that some elements, such as folders and assets, are not transferred to the new environment.
This feature is designed to help maintain consistency in core configurations while streamlining the setup of new environments. Before selecting a base environment, carefully review its settings to ensure they align with your requirements.
If you need help, contact support or your Customer Success Manager.
Additional product environment subscriptions
You can find the maximum number of product environments that you're eligible for at the top of the Product Environments page of the Console Settings. If you're on a paid plan and have reached your base plan limit, the Change Limit button will appear, allowing you to increase this limit. Click Change Limit and select the appropriate add-on for the desired number of additional product environments. Subsequently, you can adjust the number of additional product environment subscriptions on your account at any time.
If you're already subscribed to an Add product environments add-on, you can change the number of product environments beyond your base plan limit. However, please note that selecting a different Add product environments add-on will replace your previous selection, rather than adding to it. The number of product environments you add will always be applied to the base plan limit, which is the initial cap before any Add product environments plans are included. You can view your base plan limit in the side panel of the Account page within the Console Settings.
For additional help, or to add more than 5 additional product environments, contact support.