- Get Started
- Image & Video APIs overview
- Developer kickstart
- SDK quick starts
- Try it!
- MCP servers and LLM tools (Beta)
- VS Code Extension (Beta)
- Video tutorial library
- Programmatic asset management
- Programmatic upload
- Upload programmatically
- Create upload presets
- Auto upload
- Moderate images with AI
- Use AI to generate image captions
- Upload images in Flutter
- Upload images in Node.js
- Auto-tag images in Node.js
- Upload multiple files in Node.js
- Upload videos in Node.js
- Upload images in Python
- Auto-tag images in Python
- Upload videos in Python
- Upload images in PHP
- Upload images in Go
- Upload assets in a React app
- Upload assets in a Vue.js app
- Drag-and-drop uploads in React
- Upload assets in a Next.js app
- Upload assets with Server Actions
- Upload assets in Svelte
- Upload assets in a SvelteKit app
- Upload assets in a Remix app
- Upload images in Hono
- Use webhooks to remove backgrounds
- Upload images in Laravel
- Interaction with Cloudinary APIs
- Cloudinary SDKs
- Find your credentials
- Configure the JavaScript SDK
- Configure the React SDK
- Configure the Angular SDK
- Configure the Flutter SDK
- Configure Svelte Cloudinary
- Configure the Javascript SDK in Svelte
- Getting started with Cloudinary in Node.js
- Configure the Node.js SDK
- Configure the Python SDK
- Configure the PHP SDK
- Configure the Go SDK
- Configure the Vue.js SDK
- Configure the Next.js SDK
- List images in Next.js
- Lazy load images with Next.js
- Image fallbacks in JavaScript
- Captioning on upload with Node.js
- Delete assets with Node.js
- Manage images in a Django app
- Cloudinary CLI
- Widgets and tools
- Programmatic upload
- Optimization and delivery
- Transformations
- Get started with transformations
- Advanced transformation features
- Text overlay transformations
- Complex transformations
- Named transformations
- Named transformations using TX Builder
- Advanced image components
- Trim videos in Node.js
- Splice videos in Node.js
- Zoompan effect
- Video transformations
- Crop and resize images in React
- Crop and resize videos in React
- Crop and resize images in Python
- Remove backgrounds and add drop shadows
- AI generative fill in Next.js
- Color accessibility in JavaScript
- Transformations for social media
- Dev Hints on YouTube
- Dev Hints en Español
- Cloudinary Café Training Sessions
- Programmatic asset management
- Additional onboarding resources
- Guides
- Cloudinary Image
- Product overview
- Image transformations
- Image transformations overview
- Resizing and cropping
- Placing layers on images
- Effects and enhancements
- Background removal
- Generative AI transformations
- Face-detection based transformations
- Custom focus areas
- Transformation refiners
- Animated images
- Transformations on 3D models
- Conditional transformations
- User-defined variables and arithmetic transformations
- Custom functions
- Image optimization and delivery
- Programmatic image creation
- Product Gallery widget
- Media Editor widget
- Image add-ons
- Cloudinary Video
- Upload
- Asset management
- Account management
- Retail and e-commerce
- User-generated content
- Accessible media
- AI in action
- Native mobile
- Add-ons
- Advanced Facial Attributes Detection
- Amazon Rekognition AI Moderation
- Amazon Rekognition Video Moderation
- Amazon Rekognition Auto Tagging
- Amazon Rekognition Celebrity Detection
- Aspose Document Conversion
- Cloudinary AI Background Removal
- Cloudinary AI Content Analysis
- Cloudinary AI Vision
- Cloudinary Duplicate Image Detection
- Google AI Video Moderation
- Google AI Video Transcription
- Google Auto Tagging
- Google Automatic Video Tagging
- Google Translation
- Imagga Auto Tagging
- Imagga Crop and Scale
- Perception Point Malware Detection
- Microsoft Azure Video Indexer
- OCR Text Detection and Extraction
- Pixelz - Remove the Background
- URL2PNG Website Screenshots
- VIESUSTM Automatic Image Enhancement
- WebPurify Image Moderation
- Cloudinary Image
- References
- SDKs
- Release Notes
Audio transformations
Last updated: Dec-16-2025
You can stream audio from any audio or video file in your product environment, adjust audio settings, or generate audio waveform images from any audio or video file.
video asset type, not raw. This is because audio files are essentially video files without a visual element, and they support many of the same transformations. When uploading or referencing audio files via the API, use resource_type: "video".Audio transformation and streaming
You can upload any audio file to your product environment, convert the audio file format, extract audio from videos and transform them on delivery. Audio files are uploaded to Cloudinary as a video asset type (resource_type: "video" in the API). For details, see Uploading videos.
Video files can be converted to audio files by setting the file format (or extension) to one of the supported audio formats. For example, to convert the MP4 video file named dog to an MP3 audio file:
Relevant video transformations apply for audio as well (e.g., bitrate and trimming), but dimensional or visual related transformations are ignored.
For example, you can trim an audio file to 3 seconds, starting from second 2.0, use the mp3 codec, and set a maximum bitrate of 44 kbps:
Supported audio formats
The table below summarizes the supported audio formats.
| Format | Extensions | Supported for Upload | Supported for Delivery |
|---|---|---|---|
| AAC (Advanced Audio Coding) | aac | Yes | Yes |
| AIFF (Audio Interchange File Format) | aiff | Yes | Yes |
| AMR (Adaptive Multi-Rate) | amr | Yes | |
| FLAC (Free Lossless Audio Codec) | flac | Yes | |
| M4A | m4a | Yes | Yes |
| MP3 (MPEG-3) | mp3 | Yes | Yes |
| OGG | ogg | Yes | Yes |
| OPUS | opus | Yes | |
| WAV (Waveform Audio File Format) | wav | Yes | Yes |
See also: Supported video formats
Audio settings
Audio settings are used for adjusting the audio properties of an audio or video file. You can:
- Control the audio sampling frequency
- Select the audio codec (or remove the audio)
- Adjust the audio volume
Audio frequency control
Use the audio_frequency parameter (af in URLs) to control the audio sampling frequency. This parameter represents an integer value in Hz, or, to retain the original frequency (af_iaf in URLs) of a video when setting the video codec automatically. See af (audio_frequency) in the Transformation URL API Reference for the possible values.
For example, setting the audio frequency to 22050 Hz in the mp4 video with the public ID: parrot:
Audio codec settings
Use the audio_codec parameter (ac in URLs) to set the audio codec or remove the audio channel completely as follows:
-
noneremoves the audio channel -
aac(mp4 only) -
vorbis(ogv or webm only) -
mp3(mp4 only) -
opus(webm only) -
pcm24sets the audio codec to PCM signed 24-bit little-endian
For example, removing the audio channel from the uploaded mp4 video with public ID: docs/parrot:
Adjust the audio volume
Control the audio volume of an audio or video file with the volume effect parameter (e_volume in URLs). You can adjust the volume as a percentage of the current volume, by specifying an increase or decrease in decibels, or just set the volume to mute.
For example, decreasing the volume in this parrot video by 50%:
For all volume effect options, see the e_volume parameter in the Transformation URL API Reference.
Mixing audio tracks
You can mix together two or more audio tracks by layering them on top of each other using the audio overlay.
For example, here are two tracks of piano accompaniment from the fourth movement of Franck's Violin Sonata:
- Lower piano accompaniment
- Higher piano accompaniment
You can mix them together by specifying the first track (docs/franck/audio/piano_low) as the base track and overlaying the second track (l_audio:docs:franck:audio:piano_high):
You can then add the violin melody, which starts two seconds into the accompaniment, using another audio overlay with start offset of 2.0 (fl_layer_apply,so_2.0):
Then, you can combine other transformations, such as raising the volume of the violin line (e_volume:200):
See also: Audio overlays
Auto-generated waveform images
You can create audio waveform images from audio or video files with fine control over the look & feel of the generated waveform image.
This section is divided into the following subsections:
Creating waveform images
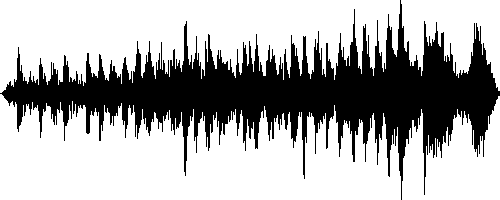
To create a waveform image from an audio or video file uploaded to your Cloudinary product environment, change the file extension (format) of the Cloudinary delivery URL to any image format (e.g., PNG) and enable the waveform flag (fl_waveform in URLs). By default, the resulting waveform image is delivered with a very high resolution, so you will probably also want to scale down the resulting image.
For example, to generate a PNG waveform image from the audio track of the dog.mp4 video file uploaded to Cloudinary's demo product environment, scaled to a height of 200 pixels and a width of 500 pixels:
Customizing the waveform image
You can also control the colors used in the waveform image with the color parameter (co in URLs) to set the color for the waveform (default white) and the background parameter (b in URLs) to set the background color of the image (default black). You can create waveforms with a transparent background by setting the background parameter to transparent or none (b_transparent or b_none in URLs).
For example, to generate the same PNG waveform image from the audio track of the dog.mp4 video file in the example above in inverted colors - with the waveform rendered in black on a white background:
If you want to capture the waveform of a specific segment of the audio file, you can select from the following parameters to specify the section of the file to sample for the waveform:
-
start_offset(soin URLs) specifies the start of the sample. -
end_offset(eoin URLs) specifies the end of the sample. -
duration(duin URLs) specifies the duration of the sample.
For example, to display a PNG waveform image of a sample from the 2 second mark until the 4 second mark of the dog.mp4 video file uploaded to Cloudinary's demo product environment, scaled to a height of 250 pixels and a width of 400 pixels, with the waveform rendered in blue on a transparent background:
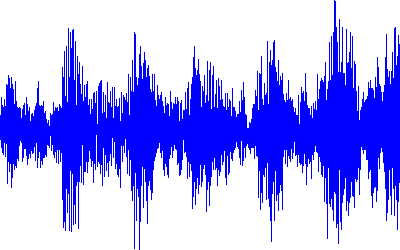
The generated image waveforms can be further transformed to match any graphic design and any responsive layout, just like any other image uploaded to Cloudinary.
See full syntax: fl_waveform in the Transformation Reference.
Learn about optimizing audio.