Showing posts with label LCDs. Show all posts
Showing posts with label LCDs. Show all posts
Sunday, April 3, 2011
WM8505 LCD driver
Another low-level hack on my Android Apad ((削除) clone/fake Apad? (削除ここまで)).
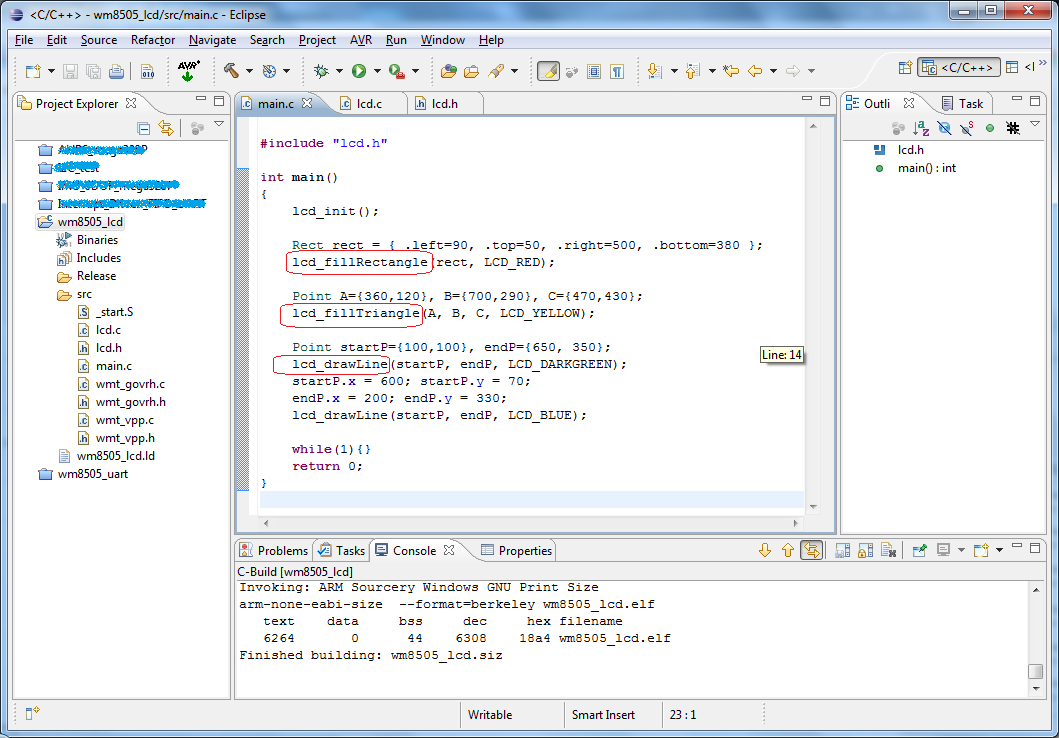
This time it's now with the 800x480 GLCD driver. It's working, but I'm not sure if the initialization is complete (i.e. the hardware is, most probably, already initialized by the bootloader). I've just modified the sources from Wondermedia (look at "\common\wmt_logo\" folder). LCD routines here are not using the graphics engine (GE) of WM8505.
download Eclipse project here: ARM9_WM8505_LCD.zip
Read my previous post on how to set-up the tool-chain and how to load the program on WM8505.
forum link: Re: Let's learn ARM using cheap 7" tablets
This time it's now with the 800x480 GLCD driver. It's working, but I'm not sure if the initialization is complete (i.e. the hardware is, most probably, already initialized by the bootloader). I've just modified the sources from Wondermedia (look at "\common\wmt_logo\" folder). LCD routines here are not using the graphics engine (GE) of WM8505.
download Eclipse project here: ARM9_WM8505_LCD.zip
Read my previous post on how to set-up the tool-chain and how to load the program on WM8505.
-
expected output:
forum link: Re: Let's learn ARM using cheap 7" tablets
Tuesday, December 14, 2010
N6610 LCD 3D Demo Part II
Instead of drawing only the edges of a polyhedron, this time we draw the faces and 'fill' it with corresponding colors. This demo now uses a dsPIC (16-bit and 40MIPS core) for "faster" and "smoother" graphics in the N6610/N6100 LCD (w/ pcf8833 controller). See "lcd6610.h" for the used pinouts.
[埋込みオブジェクト:http://www.youtube.com/v/3hsGie6RX5k?hl=en&fs=1]
There are several ways of "hidden surface removal". The easiest way, and most appropriate for drawing convex polyhedron is the use of Backface culling. "Backface" will determine whether a surface (e.g. triangular face) is need to be drawn or not.
/-----------------------------------------------------------------------------------/
Draw3D routine:
triangle color-fill routine:
(*another version of using dsPIC hardware multiplier/divider is included in the download)
detect whether a triangle is facing backward.
Complete MPLAB+C30 project (dsPIC33FJ16GS504):
n6610lcd_3D_demo_part2.zip
Wednesday, December 8, 2010
N6610 LCD 3D Demo
Nokia 6610/6100 LCD 3D projections demo using Microchip's PIC18F25J11.
PIC18F25J11 is clocked at 12MHz external oscillator with 4xPLL enabled.
It's operated at 3.3V supply, same with the LCD (and so, direct connections and higher spi clock rates are possible).
[埋込みオブジェクト:http://www.youtube.com/v/IrXP0mtwpbo?hl=en&fs=1]
The demo is all about simple 3D projection - no rendering, no raycasting, etc., just the plotting of edges/lines. It displays common polyhedrons like tetrahedron, hexahedron(cube), octahedron, square pyramid, and triangular prism.
"3Ddemo.c"
*based on original sources:
Nokia 6100 LCD with CCS C
3D Vector objects in C using the PIC micro
Microchip C18 project: n6610lcd_3D_demo.zip
Thursday, November 18, 2010
Nokia LCDs - Proteus VSM Models
Proteus VSM models for some Nokia LCDs
LCD controllers used:
PCF8833 - Nokia 6100/6610/6610i
S1D15G14 - Nokia 3530/3510i/3595
PCF8814 - Nokia 1100
Download: Nokia LCDs - Proteus VSM Models.zip
(MODELS + LIBRARY + some demos)
* just copy the files to their corresponding folder
//------------------------------------------------------------------------------------
//------------------------------------------------------------------------------------
//------------------------------------------------------------------------------------
//------------------------------------------------------------------------------------
UPDATES:
11-21-10
- N6610LCD model (&symbol) was updated based on the datasheet of PCF8833 alone,
but the result was different from expected. =(
again, this model still have lots of problems!
- found a bug on the N3530LCD model (PASET & CASET commands affected),
corrected model will be uploaded soon.
- I apologize for I cannot upload the source codes (msvc++ 2008) for these projects.
( Proteus ISIS itself is NOT free. VSM SDK, I assume, is also not open-source).
ask for code snippets here: "Creating Proteus Models" ,instead.
Tuesday, June 1, 2010
Mini-STM32 WAVE Audio Player
Mini-STM32 SD/MMC WAV (RIFF-WAVE-LPCM format) Audio Player with Spectrum Display
Simple SD Audio Player with an 8-pin IC by ChaN
DSP (FFT) libraries for Cortex M3 by Ivan Mellen
CooCox CoOS real-time multi-task OS
minimal hardware modification:
demo video:
[埋込みオブジェクト:http://www.youtube.com/v/sNo6axRcdeQ&hl=en&fs=1]
Project files: Mini-STM32 WAVE Audio Player.rar
forum link: Mini-STM32 board
Saturday, May 22, 2010
PIC18F SD WAV Audio Player
As inspired by Simple SD Audio Player by ChaN, this project uses Microchip's PIC18F2550 to read RIFF WAVE files, and display some file information on the N6610 LCD; And then it will play the audio itself through PIC's PWM with a simple RC filter on the output pin. The hardware actually comes from my previous project, and I just attached a ready-made audio amp (w/ speaker) for the demo.
Schematic:
Due to PIC's peripheral limitations, I only set the PWM frequency to 187.5kHz and not the 250kHz carrier frequency originally used by ChaN, because it's the maximum PWM frequency than can still get an 8-bit resolution of the duty cycles (=48MHz/256). It is also possible to use R-2R ladder in stead of (low-pass) filtering the PWM output since there still enough unused digital output pins for this approach.
On the software part, I wasn't able to make a good data buffering as good as what ChaN did. It's noticeable with WAVE files with higher bit-rates (=SampleRate*NumChannels*BitsPerSample). Nevertheless, it can still support up to 48kHz sampling rate, but with only Mono channel and 8-bits/sample resolution.
demo video:
[埋込みオブジェクト:http://www.youtube.com/v/mRzOwF4bx7c&hl=en_US&fs=1&]
Source code(PICC-18) with and without LCD: PIC18 SD WAV Audio Player
My on-going project: currently porting the code to STM32F103RB for additional features.
Some useful software (shareware) tools:
TextAloud - Text to Speech software
Switch Sound File Converter-multi format audio file converters
Tuesday, May 11, 2010
PIC SD BMP Reader II
It is similar to my first PIC SD BMP Reader , and almost the same circuit except for the LCD. This time I now use a Nokia 6610 LCD. The LCD is capable of displaying 4096 colors, but for code simplicity I just operate it at 8-bit (256 colors) resolution.
Diagram:
This project is capable of reading bitmap file using common format (24-bit per pixel), with size (width and height) equal to or less than 132 pixels at both side.
demo video:
[埋込みオブジェクト:http://www.youtube.com/v/lrGJ3ZsSoy0&hl=en&fs=1]
Source code + diagram: PIC18 SD BMP Reader 2.rar
similar project at Hack-a-day: How-to: Digital picture frame, 100% DIY
-it uses PIC24FJ64 in stead of pic18f2550
Saturday, May 8, 2010
PIC18 SD BMP Reader
This project uses Microchip's PIC18F2550 and Nokia 3310 LCD to read and display images from BMP files on the SD/MMC cards. Although the display itself is monochrome, it still supports 24-bpp (bits per pixel), 8-bpp, 4-bpp, and 1-bpp (monochrome) Bitmap files (*.BMP) with size of 84x48 pixels. It uses the Petit FAT File System Module by ChaN.
Diagram and simulation:
Actual circuit:
Demo video:
[埋込みオブジェクト:http://www.youtube.com/v/sovl6MoydeA&hl=en&fs=1]
forum link: Petit FAT File System (w/ Proteus ISIS simulation)
Source code(PICC18) + simulation(ISIS) + others: PIC18 SD BMP Reader.rar
references for BMP file format:
Wiki BMP file format
atlc.sourceforge bmp format
MSDN Types of Bitmaps
Saturday, April 24, 2010
Mini-STM32 Digital Picture Frame
The original source code for this project is copied from Martin Thomas' Simple STM32 Digital Picture Frame
Some of the minor modifications I made were:
demo video:
[埋込みオブジェクト:http://www.youtube.com/v/Xk-h1CDADSc&hl=en&fs=1]
Modified Source Code (Keil RVMDK + uVision 4): Digital Picture Frame.rar
The application reads picture-files in standard Windows BMP-format from a SD-Card and shows them on a 2.8" color-LCD-module (320*240 px).The application also uses the FAT File System Module by Chan, on which M. Thomas ported to work on STM32 SPI interface. Additional information about this project can be found on the link above.
Some of the minor modifications I made were:
- I've modified the LCD driver so that it will work on my unit. My unit got the ILI9320 LCD controller.
- I didn't utilize the USART interface (but this can be easily enabled in the code). In stead of sending the "information" through this interface , some of them are being displayed on the LCD itself (e.g. bitmap filenames).
- I've enabled the two push-buttons on the board. The first one toggles between "Play" and "Pause"; and the other one is to "Restart" the "slide-show" from the beginning.
demo video:
[埋込みオブジェクト:http://www.youtube.com/v/Xk-h1CDADSc&hl=en&fs=1]
Modified Source Code (Keil RVMDK + uVision 4): Digital Picture Frame.rar
Friday, April 9, 2010
Mini-Term
I've recently bought a Mini-STM32 kit for the purpose of learning ARM-based MCUs. These development kits were from China and then locally distributed by DIY Hobbyist Corner at an affordable price.
After playing with the example codes, including the uCOS/uCGUI demo, I came up with this Mini UART (serial) Terminal application.
I just utilized the source/library for OS of the uCOS_DEMO since I still don't understand how it works. Luckily I got a copy of uCGUI manual and so I manage to make modifications on the existing sample GUIs (graphical user interface). And later, I'm also able to design my own GUIs.
The USART interface is not difficult to learn since it's almost similar to what other microcontrollers is using. Therefor, it's also easy "porting" the USART code (using standard C language) from my previous MCUs to this STM32 MCU.
The application uses the touch-screen capability of the kit for the keypad interface. However, because of the small LCD area, it's impractical to design the keypad as a full featured "qwerty" keyboard. What I did was just provide alternate characters for most of the existing keys.
"Caps" key pressed and USART baudrate chage:
"QWERTY" key toggled and MainForm minimized(showing desktop background):
Alternate keys/symbols and movable dialog:
It's also possible to use a "gender changer" (DB9 female to DB9 Male) on CON1 of the kit to make it resembles as a common PC serial port.
A problem may also raises because of the possibility that the touch-screen response will vary with different units. So, I added an optional "touch-screen calibrate" at start-up. This option can be found on "miniterm.h" header (the "calibration" code is also copied from one of the demo/example codes).
Source Code (using Keil RVMDK + uVision) download: mini-Term.rar
forum link: Mini STM32 with 2.8 LCD and touchscreen
Wednesday, January 13, 2010
Z8 on-chip Temperature Sensor
It is basically based on technical note (TN004201-0905) by ZiLOG: Technique for Measuring System Temperature Using the On-chip Temperature Sensor of the Z8 Encore! XP®. I just copied the routine for measuring the temperature. The main difference is, in stead of sending the result through the UART of Z8F042A (i.e. using Hyperterminal), I used Nokia 5110 LCD to display the temperature reading. N5110 LCD has the same LCD controller with that of N3310 LCD (so, N3310 LCD can also be used with this project).
The equation used for temperature reading is:
integrated on-chip temperature sensor (ITS) temperature:
T = (25/128)*ADC – 77
where,
T is the temperature in C
ADC represents the 10-bit compensated ADC register value
I was also able to implement a different approach in computing the temperature of the on-chip sensor using the sample code from this application note AN019102-0708 also by ZiLOG: Reading Temperature Using the F082A Series MCUs. Unfortunately, I don't know why the result is different from the previous approach. And I don't have the time (and an accurate thermometer) to test which one is correct (although both of them are not accurate enough compared to of using external temperature sensor). Also, in the datasheet of F082A series, there's a parameter called TSCAL (Temperature Sensor Calibration Data) which I never noticed in the sample codes of the two. I also tried doing my own code starting from 'scratch' (using the datasheet as the only reference), but I always failed. The hardest part is on the compensating of the ADC results.
Download:
source code (w/ HEX) and schematic: Z8042A temperature sensor.rar
edited (Jan 16, 2009):
uses this equation from the datasheet in stead of the previous one:
V = 0.01 * T + 0.65 (where T is the temperature in C; V is the sensor output in Volts)
forum link: digital thermometer using 8-pin Z8F042A
Nokia LCD Interfacing
Due to their wide availability in the local markets, old Nokia LCDs are the best alternatives for those expensive GLCDs. They can be bought cheaply at many cellphone parts shops (N3310 lcds usually cost only around Php100 each). Interfacing them with microcontrollers can easily be done using serial communication (e.g. SPI protocol).
Nokia 3530/3510i LCD
98x67 pixels , 4096 colors
Nokia 6610/6100 LCD
132x132 pixels, 4096 colors
(good backlights,
but the connector is difficult to use)
Nokia 3310/5110 LCD
84x48 pixels, monochrome
(very common and relatively cheap)
some links for N3310/N5110 LCDs:
Using Nokia 3310 LCD as Display for PIC Projects
Nokia 3310 LCD LPH7779
Nokia 3310 LCD Image Encoder
DIY scope using Z8F0823 and N3310 LCD
Saturday, September 19, 2009
Wireless LCD
Wireless LCD using Nokia 6100/6610 colored LCD, National Semiconductor's LMX9838 Bluetooth SPP module and Zilog's Z8F082A MCU.
demo:
[埋込みオブジェクト:http://www.youtube.com/v/3k4LtJ102S4&hl=en&fs=1]
more info: Wireless LCD
demo:
[埋込みオブジェクト:http://www.youtube.com/v/3k4LtJ102S4&hl=en&fs=1]
more info: Wireless LCD
N3310 LCD Image Encode
Nokia 3310/5110 LCD Image(full screen) Encoder -> generates HEX array equivalent of the input images. supports JPG, BMP and GIF files.
simple code usuage:
download: 3310 Image Encoder.exe
*requires dotNET 3.5
simulation:
sample circuit using N5110LCD:
simple code usuage:
 lcd_gotoxy(0,0);
 for(i=0; i<504; i++) lcd_send(image[i],LCD_TDATA);
download: 3310 Image Encoder.exe
*requires dotNET 3.5
simulation:
sample circuit using N5110LCD:
Thursday, September 17, 2009
mini LCD Projector
simple LCD projector using a small LCD and a bright white LED.
using Nokia 6610/6100 colored LCD + OSRAM high-power LED
demo video:[埋込みオブジェクト:http://www.youtube.com/v/xOBEpLd1A6w&hl=en&fs=1&]
using Nokia 6610/6100 colored LCD + OSRAM high-power LED
demo video:[埋込みオブジェクト:http://www.youtube.com/v/xOBEpLd1A6w&hl=en&fs=1&]
Subscribe to:
Comments (Atom)