Zobrazují se příspěvky se štítkemJavaScript. Zobrazit všechny příspěvky

neděle 2. listopadu 2014

Events visualization with EvenDrops and KoExtensions (D3 and Knockout)

I have recently needed to visualize a set of events which occurred within a certain interval. Each event would have couple parameters and there would be multiple event lines. Let's say that you want to visualize the occurences of car sales in couple countries. For each sale you would also want to visualize the price and the mark of the sold car. Before writing everything from scratch, I have found EventDrops project which responded to the majority of my requirements. It had just one flaw and that is that there is no way to chart another characteristics for each event.

I have decided to add such possibility and since I am using KnockoutJS and binding to create all of my charts I have also decided to add EventDrops to my KoExtensions project - in order to make it's usage simplier. The resulting chart looks like this:

This example is available on GitHub as part of KoExtensions.

What I have added to the original event drops are the following possibilities:

  • The chart now accepts generic collection instead of just a collection of dates. The developer in turn has to specify a function to get the date for each item
  • The size of the event is dynamic
  • The color of the event is dynamic
  • Better possibility to provide a however action
  • The size of the event can use logarithmic or linear scale
  • Everything is available as KnockoutJS binding
The html is now really straightforward:
<div data-bind="eventDrops: carSales, chartOptions: carSalesOptions"></div>
The javascript behind this page contains a bit more to generate the data:
require(['knockout-3.2.0.debug', 'KoExtensions/koextbindings', 'KoExtensions/Charts/linechart', 'KoExtensions/Charts/piechart', 'KoExtensions/Charts/barchart'], function(ko) {
 function createRundomSales(country) {
 var event = {};
 var marks = ['Audi', 'BMW', 'Peugot', 'Skoda'];
 event.name = country;
 event.dates = [];
 
 var endTime = Date.now();
 var oneMonth = 30 * 24 * 60 * 60 * 1000;
 var startTime = endTime - oneMonth;
 var max = Math.floor(Math.random() * 80);
 for (var j = 0; j < max; j++) { var time = Math.floor((Math.random() * oneMonth)) + startTime; event.dates.push({ timestamp: new Date(time), carMark: marks[Math.floor(Math.random() * 100) % 4], price: Math.random() * 100000 }); } return event; } function createSales() { var sales = []; var countries = ['France', 'Germany', 'Czech Republic', 'Spain']; countries.forEach(function(country) { var countrySales = createRundomSales(country); sales.push(countrySales); }); return sales; } function TestViewModels() { var self = this; self.carSales = ko.observableArray([]); self.carSales(createSales()); self.carSalesOptions = { eventColor: function (d) { return d.carMark; }, eventSize: function (d) { return d.price; }, eventDate: function (d) { return d.timestamp; }, start: new Date(2014, 8, 1) }; } var vm = new TestViewModels(); ko.applyBindings(vm); }); 

In this example the createSales and createRandomSales methods are just use to get testing data. Once the testing data is generated it is stored to the carSales observable collection. Any time this collection is changed the chart would be updated.

The sales collection looks a bit like this:

The carSalesOptions object contains the charting options. These tell to the event drops chart the necessary information to specify how big and which color should be used for the given event.

čtvrtek 17. července 2014

Unit testing Knockout applications

In ideal case any View Model in Knockout based application should be completely unit-testable. The View Model ofcourse interacts with other code but in majority of cases this would be either some UI code or the server side code, probably over REST API. The UI interaction should be minimal. If possible, the binding capabilities of Knockout should be leveraged. The REST API is not available while unit testing and thus has to be mocked or hidden by an abstraction layer. I went for the first option and this blog describes how to mock the AJAX calls while unit testing Knockout View Models. At the end I also provide information about the ChutzPah test runner and the way that the tests can be run from within Visual Studio.

The typical view model that I am using looks like the following one.

function AssetViewModel(){
 var self = this;
 self.city = ko.observable();
 self.country = ko.observable();
 self.size = ko.observable();
 
 self.load = function(){
 $.ajax("/api/assets/" + self.city(), {
 data: dto,
 type: "GET", contentType: "application/json",
 success: function (result) {
 self.updateData(data);
 }
 });
 }
 self.save = function () {
 var dto = self.toDto();
 self.isBusy(true);
 self.message("Saving...");
 $.ajax("/api/assets/", {
 data: dto,
 type: "POST", contentType: "application/json",
 success: function (result) {
 self.edit(false);
 self.isBusy(false);
 self.message(result.message);
 self.update(result.data);
 }
 });
 };
 self.update = function(updateData){
 self.city(updateData.City);
 self.country(updateData.Country);
 }
 
 self.toDto = function () {
 var model = new Object();
 model.City = self.city();
 model.Country = self.country();
 return JSON.stringify(model);
 };
}

You might thing that the toDto method is useless if one uses the Knockout Mapping plug-in, however in many cases the view models get much more complex and they can't be directly mapped to any kind of data transfer objects or domain objects. Other than that, nothing should be surprising here. The save method sends the dto over the wire and than treats the response.

The unit test

Nowadays one has a choice between multiple JavaScript testing frameworks, QUnit, Jasmine or Mocha being probably the most common choices - I am staying with QUnit. Testing the updateData with QUnit might look like this.

var vm;
function initTest() {
 
 var vm = new AssetViewModel();
}
$(function () {
 QUnit.module("ViewModels/AssetViewModel", {
 setup: initTest
 });
 QUnit.test("updateData sets correctly the city", function () {
 var data = {
 City: "Prague",
 Country:"Czech Republic"
 };
 vm.updateData(data);
 equal(vm.city(), "Prague");
 });
}

QUnit module function takes 2 parameters - name and a sort of configuration object. Configuration object can contain a setup and tearDown methods. Their usage and intend should be clear.

This test case is very simple for 2 reasons: it does not depend on any external resources and it executes synchronously.

QUnit has 3 assert methods which can be used in the tests:

  • ok - One single argument which has to evaluate to true
  • equal - Compare two values
  • deepEqual - Recursively compare a objects properties

Asynchronous testing

Here is the test for the save method which calls the REST server interface.

function initTest() {
 $.mockjax({
 url: '/api/assets/Prague',
 type: 'GET',
 responseTime: 30,
 responseText: JSON.stringify({
 Name: "Prague",
 Country: "Czech Republic",
 Size: 20
 })
 });
}
$(function () {
 QUnit.module("ViewModels/AssetViewModel", {
 setup: initTest
 });
 QUnit.asyncTest("testing the load method", function () { 
 setTimeout(function () {
 ok(true, "Passed and ready to resume!");
 start();
 vm.load();
 QUnit.equal(vm.size(),20);
 }, 100);
 });
}

I am using MockJax library to mock the results of the REST calls. The initTest method setups the desired behavior of the REST service call, the test is executed after 100ms of waiting time. In this case the call is a GET and we define the response simply as JSON data. QUnit has a method for asynchronous tests called asyncTest .

Currently there is a small issue in MockJax regarding the way that incoming JSON values are handled. That might get fixed in future versions.

Mocking the server interface

Returning a simple JSON data may be sufficient for some case, for others however we would maybe like to verify the integrity of the data sent to the server, just like when testing the save method

var storedAssets = [];
function initTest() {
 $.mockjax({
 url: '/api/assets',
 type: 'POST',
 responseTime: 30,
 response: function (data) {
 storedAssets.push(JSON.parse(data.data));
 }
 });
}
$(function () {
 QUnit.module("ViewModels/AssetViewModel", {
 setup: initTest
 });
 QUnit.asyncTest("save asset - check the update of the size", function () {
 vm.size(10);
 vm.save();
 setTimeout(function () {
 ok(true, "Passed and ready to resume!");
 start();
 equal(storedAssets.length, 1);
 var storedAssets = storedCharges[0];
 equal(storedAssets.Size, vm.size());
 }, 100);
 });
}

In this case the save method passes the JSON data to the server side. The server is mocked by MockJax which only adds the data to a dump array, which can be then used to verify the integrity of the data.

Running Unit Tests in Visual Studio

There are 3 reasons for which I am using Visual Studion even for JavaScript project:

  • Usually the application has some backend written in .NET and I don't want to use 2 IDEs for one single application.
  • I can easily debug JS application from within VS. Of course Chrome's debugger is very useful as well - but if I can do everything from 1 IDE, why should I use other.
  • ReSharper has really good static analysis of JavaScript and HTML files. That saves me a lot of time - typos, unknown references and other issue are catched before I run the application.
  • I can run JavaScript unit tests right from the IDE.

To run the Unit Tests I am using ChutzPah test runner. ChutzPah internally uses the PhantomJS in-memory browser, and interprets the tests. While using this framework, one does not need the QUnit wrapper HTML page and the Unit Tests can be run as they are.

Note that ChutzPah already contains QUnit and you will obtain TimeOutException, if you try to add a reference to QUnit explicitly (http://chutzpah.codeplex.com/workitem/72).

Since your tests are just JavaScript files, without the HTML wrapper page, ChutzPah needs to know what libraries do your View Models reference and load them. This is handled using a configuration file chutzpah.json which has to be placed alongside the unit tests. The following is an example of configuration file that I am using for my tests.

{
 "Framework": "qunit",
 "References" : [
 { "Path": "../Scripts/jquery-2.1.0.js"},
 { "Path": "../Scripts/knockout-3.1.0.js"},
 { "Path": "../Scripts/jquery.mockjax.js"}, 
 { "Path": "../Scripts/tech", "Include": "*.js"},
 { "Path": "../ViewModels", "Include": "*.js"}
 ]
}

JSON DateTime serialization

This is more a side note. Dates in JSON are serialized into ISO format. That is good, the problems is that if you try to deserialize an object which contains a date, the date comes out as a string. The reason of course is that since there is no type, the de-serializer does not know that given property is a date - and keeps the value as a string. You can read more on dates serialization in JSON here. Any time that you are mocking backend which handles dates you have to be aware of this fact. Remember the mock of the back-end which inserts the object to a dummy array that I have used above:

function initTest() {
 $.mockjax({
 url: '/api/assets',
 type: 'POST',
 responseTime: 30,
 response: function (data) {
 storedAssets.push(JSON.parse(data.data));
 }
 });
}

JSON.parse call we handle the dates as strings. If the ViewModel has a date property, you will have to convert it into string before testing the equality.

sobota 31. května 2014

Detecting extreme values in SQL

In a set of data points, outliers are such values that theoretically should not appear in the dataset. Typically these can be measurement errors or values caused by human mistakes. In some cases outliers are not caused by errors. These values affect the way that the data is treated and any statistics or report based on data containing outliers are erroneaus.

Detecting these values might be very hard or even impossible and a whole field of statistics called Robust Statistics covers this subject. If you are further interested into the subject please read Quantitative Data Cleaning For Large Databases written by Joseph M. Hellerstein from UC Barkeley. Everything that I have implemented here is taken from this paper. The only thing that I have added to that are two aggregates for SQL Server which help efficiently get the outliers and extreme values from the data stored in SQL Server and a simple tool to chart data and distribution of data using JavaScript

Theory

Any dataset can be characterized by the way the data is distributed over the whole range. The probability that a single point has given value in the dataset is defined using the probability distribution function. The Gaussian standard distribution is only one among many distribution functions, I won't go into statistics basics here, but let's consider only the standard distribution for our case.

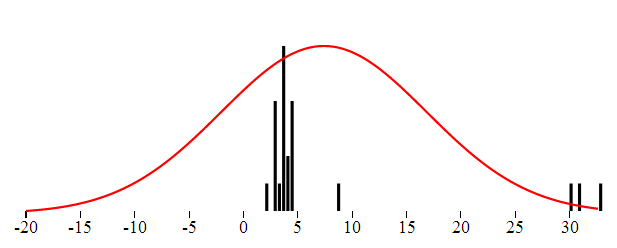
In the Gaussian distribution the data points are somehow gathered around the "center", and most values fall not far. Rare are the values really far away from the center. Intuitively the ouliers are points very far from the center. Consider the following set of numbers which represent in minutes the length of a popular song:

3.9,3.8,3.9,2.7,2.8,1.9,2.7,3.5, 4.4, 2.8, 3.4, 8.6, 4.5, 3.5, 3.6, 3.8, 4.3, 4.5, 3.5,30,33,31

You have probably spotted the values 30,33 and 31 and you immediately identify them as outliers. Even if the Doors would double the length of their keyboard solo we would not get this far.

The standard distribution can be described using the probability density function. This function defines the probability that the point will have given value. The function is defined with two parameters: the center and the dispersion. The center is the most common value, the one around which all others are gathered. The dispersion describes how far the values are scattered from the center.

The probability that a point has a given value, provided that the data has the Gaussian distribution is given by this equation:

We can visualize both the theoretical and the real distribution of data. The distribution probability density function is continuous and thus can be charted as simple line. The distribution of the real data in turn can be visualized like a histogram.

The following graphics were created using KoExtensions project, which is a small mediator project making Knockout and D3 work nicely together.

In perfect world the center is the mean value. That value is probably not a part of a data set but represents the typical value. The seconds measure which describes how far from the center the data is dispersed is called standard deviation. If we want to obtain the standard deviation from data we take the distance of each point from the center, square these values add them together and take square root. So we actually have all we need to get the distribution parameters from the data.

This approach of course has one main flaw. The mean value is affected by the outliers. And since the dispersion is deduced using the mean and outliers affect the mean value, the dispersion as well will be affected by them. In order to get a description of the dataset not affected by the extreme values one needs to find robust replacements for the mean and the dispersion.

Robust Center

The simplest and very efficient replacement for the mean as the center of the data is the median. Median is such value that half of the points in the dataset are smaller are bellow. That is if the data set consists of even number of samples, we just need to order the values and take mean of the two values in the middle of the ordered array. If the data consist of odd number of values then we take the element exactly in the middle of the ordered data. The before mentioned paper describes two more alternatives: trimmed mean, winsorized mean. Both of these are based on the exclusion of marginal values and I did not used them in my implementation.

Let's take the median of the given dataset and see if the distribution function based on it fits better the data. Even though the center is now in correct place the shape of the function does not fit completely the data from the histogram. That is because the variance is still affected by the outliers.

Robust Dispertion

Standard variance takes into account the the distance of all the numbers from the center. To rule out the extreme values, we can just use the median of distances. The outlier's distance from the center is much bigger than other distance and by taking the median of all distances we can get rid of outlier's influence over the dispersion. Here is the distribution function using this Robust type of dispersion. This characteristic is called MAD - Median Absolute Deviation.

Detecting the outliers

Now that we have the value of "real" center and "real spread" or dispersion we can state that the outlier is a value which differs "too much" from the center, taking into account the dispersion. Typically we could say that the outliers are such values that have a distance from center greater or equal to 10 * dispersion. The question is how to specify the multiplication coefficient. There is a statistics method called Hampel Indetifier which gives a formula to obtain the coefficient. Hampel identifier labels as outliers any points that are more than 5.2 away from the MAD. More details can be found here.

The overall reliability of this method

A question which might arise is up to which kind of messy data this method can be used. A common intuition would say that definitely more than the half of the data has to be "correct", in order to be able to detect the incorrect ones. To be able to measure the robustness of each method of detecting outliers, statisticians have introduced a term called Breakdown point. This point states which percentage of the data can be corrupted in order for given method to work. Using the Median as the center with the MAD (Median Absolute Deviation) has a breakdown point of 1/2. That is this method works if more than half of the data is correct. The standard arithmetic mean has a BP = 0. It is directly affected by all the numbers and one single outlier can completely move the data.

SQL implementation

In order to implement detection of outliers in SQL, one needs to first have the necessary functions to compute the mean, median and dispersion. All these functions are aggregates. Mean (avg) and Dispersion (var) are already implemented in SQL Server. If you are lucky enough to use SQL Server 2012 you can use the built-in median aggregate as well. The robust dispersion however has to be implemented manually even on SQL Server 2012.

Implementing aggregates for SQL Server is very easy, thanks to the predefined Visual Studio template. This templates will create a class for you which implements the IBinarySerializable interface and is decorate with couple attributes defined in the Microsoft.SqlServer namespace.

This class has 4 important methods:

  • Init - anything needed before starting the aggregation
  • Accumulate - adding one single value to the aggregate
  • Merge - merging two aggregates
  • Terminate - work to be done before returning the result of the aggregate

Here is the example of the Median aggregate

private List ld;
public void Init()
{
 ld = new List();
}
public void Accumulate(SqlDouble value)
{
 if (!value.IsNull)
 {
 ld.Add(value.Value);
 }
}
public void Merge(Median group)
{
 ld.AddRange(group.ld.ToArray());
}
public SqlDouble Terminate()
{
 return Tools.Median(ld);
}

Note that some aggregates can be computed iteratively. In that case all the necessary logic is in the Accumulate method and the Terminate method can be empty. With Median this is not the case (even though some iterative estimation methods exist. For the sake of the completeness, here is the implementation of median that I am using. It is the standard way: sorting the array and taking the middle element or average of the two middle elements. I am returning directly SqlDouble value, which is the result of the aggregate.

public static SqlDouble Median(List ld)
{
 if (ld.Count == 0)
 return SqlDouble.Null;
 ld.Sort();
 int index = ld.Count / 2;
 if (ld.Count % 2 == 0)
 {
 return (ld[index] + ld[index - 1]) / 2;
 }
 return ld[index];
}

Implementing the Robust variance using the MAD method is very similar, everything happens inside the Terminate method.

public SqlDouble Terminate()
{
 var distances = new List();
 var median = Tools.Median(ld);
 foreach (var item in ld)
 {
 var distance = Math.Abs(item - median.Value);
 distances.Add(distance);
 }
 var distMedian = Tools.Median(distances);
 return distMedian;
}

That implementation is directly the one described above: we take the distance of each element from the center (median) and than we take the median of the distances.

Outliers detection with the SQL aggregates

Having implemented both aggregates, detecting the outlier is just a matter of a SQL query - giving all the elements which are further away from the center than the variance multiplied by a coefficient.

select * from tbUsers where Height> ( Median(Height) + c*RobustVar(Height)) or Height < (Median(Height) - c*RobustVar(Height)) 

You will have to play with the coefficient value c to determine which multiplication gives you the best results.

JavaScript implementation

The same can be implemented in JavaScript. If you are interested in a JavaScript implementation you can check out the histogram chart from KoExtensions. This charting tool draws the histogram and the data distribution function. You can than configure it to use either Median or Mean as the center of the data as well as to use MAD, or standard variance to describe the dispersion.

KoExtensions is based on Knockout.JS and adds several useful bindings and the majority of them to simplify charting. Behind the scenes the data is charted using D3.

To draw a histogram chart with the distribution and detecting the outliers at the same time one needs just few lines of code

<div id="histogram" data-bind="histogram: data, chartOptions : {
 tolerance : 10,
 showProbabilityDistribution: true,min : -20,
 expected: 'median',
 useMAD: true,
 showOutliers: true}">
var exData = [3.9,3.8,3.9,2.7,2.8,1.9,2.7,3.5, 4.4, 2.8, 3.4, 8.6, 4.5, 3.5, 3.6, 3.8, 4.3, 4.5, 3.5,30,33,31];
 
function TestViewModel() {
 var self = this;
 self.data = ko.observableArray(exData);
}
var vm = new TestViewModel();
ko.applyBindings(vm);
initializeCharts();

Knockout.JS is a JavaScript MVVM framework tool which gives you all you need to create bi-directional binding between the view and the view model, where you can encapsulate and unit test all your logic. KoExtensions adds a binding call "histogram", which takes simple array and draws a histogram. In order to show the probability function and the outliers one has to set the options of the chart as shown in the example above.

AltStyle によって変換されたページ (->オリジナル) /

pondělí 25. března 2013

Sample application: RavenDB, KnockoutJS, Bootstrap and more

While learning a new technology or framework, I always like to build small but well covering Proof Of Concept application. It is even better if one can combine several new technologies into such a project. This is description of one such project which uses RavenDB, WebAPI, KnockoutJS, Bootstrap, D3JS.
Source code is available on GitHub

The Use Case

Everyone renting an apartment or any other property knows that it might be quite difficult to track the expenses and income in order to assure himself of the rent-ability of the given property. I have created an applications which helps with just that and thanks to this applications I was able to lern the mentioned technologies. Now let's take a look at them closer.
  • KnockoutJS - to glue the interaction on the client side. Knockout is one of the cool JavaScript MV(*) frameworks which provide a way to organise and facilitate the JavaScript development. Unlike other frameworks (Backbone or Ember) KnockoutJS concentrate itself only on binding of the data and actions between the GUI (HTML) and the ViewModel (JavaScript) and does not take care for other aspects (such as client side routing). The framework is very flexible and allows you to bind almost anything to any DOM's elenent value or style.
  • RavenDB - to stored the data. RavenDB is a document database, which seamlessly integrates into any C# project.
  • WebAPI - to serve the data through REST services. WebAPI is a quite new technology from MS which is meant to provide better support for building REST services. Of course we have built REST services with WCF before, so the questions is why should we change to WebAPI? WCF was created in the age of WSDL. It was adapted later to generate JSON, however inside it still uses XML as data transformation format. WebAPI is complete rewrite which also provides other interesting features.
  • Bootstrap - to give it a decent GUI. As its name says, bootstrap enables a quick development of a web application's GUI. It is a great tool to all of us who just want to get the project out and we still need a decent user interface.
  • D3.js - to visualize data using charts. D3JS is a JavaScript library enabling the user to manipulate the DOM and SVG elements.
  • KoExtensions - very small set of tools which I have created, allowing easy creation of pie charts or binding to google maps while using KnockoutJS.
Here is how it looks like at the end:

The architecture of the application

The architecture is visualized in the following diagram. The backend is composed of MVC application, which exposes several API controllers. These controllers talk directly to the database through RavenDB IDocumentSession interface. The REST services are invoked by ViewModel code written in JavaScript. The content of the ViewModels is bound the view using Knockout.


This application is as lightweight as possible. It is composed of a MVC 4 application with two types of Controllers: Standard and API. Standard controllers are used to render the base web pages.
Even though that this applications uses client side MVVM, the Html and JavaScript of the client side app have to be hosted in some server side application. I have chosen to host the applications inside the classic ASP.MVC application, but I could as well choose to use standard ASP.NET application.
But as many on the web I prefer MVC style applications. It is not a sin to mix server and client side MVC in one application.
This application has no service layer. All the logic can be found inside the Controllers. The controllers all use directly the IDocumentSession of RavenDB to access the database. The correct approach to user RavenDB when using ASP.MVC is described on the official web page. Basically the RavenDB session is opened when the controller's action is started and is closed when the action terminates. The structure of API controller however differs a little bit, but the principle is the same.

When to use Knockout or client side MV*

There are probably a lot of people around there with exactly the same question. It basically comes to the answer of whether to use or not any client side MVC JavaScript framework. From my purely personal point of view this makes sense when one or more of these conditions are met:
  • You have a good server side REST API (or you plan to build one) and want to use it to build a web page.
  • You are building more web-application then a website. That is to say, your users will stay at the page for some time, perform multiple actions, keep some user state and you need a responsive application for that.
  • You need a really dynamic page. Even if you would use server side MVC than you would somehow need to include a lot of JavaScript for the dynamics of the page.
This is just my personal opinion and there is a lot of discussion around internet and as usually no silver-bullet answer.

Data model

RavenDB is NoSQL database, or as it would be better to say non-relational database. The data is stored in document collections, serialized to JSON. Each document contains an object or more specifically graph of objects serialized to JSON.
When working with relational databases, the aggregated graph of objects which is served to the user is usually constructed by several joins into several tables. On the other hand when working with document databases, the data which is aggregated into one object graph, should be also stored that way.
In our particular example, one property or asset can have several rents and several charges. One rent does not really have sense without the asset to which it is attached. That's why the rents and charges are stored directly inside each asset. This applications is composed of two collections: Owners and Assets. Here are examples of Owner and Asset document.
{
 "Name": null,
 "UserName": "test", 
 "Password": "test"
}
 
{
 "OwnerId": 1,
 "LastChargeId": 5,
 "LastRentId": 0,
 "Name": "Appartment #1",
 "Address": "5th Ave",
 "City": "New York",
 "Country": "USA",
 "ZipCode": "10021",
 "Latitude": 40.774,
 "Longitude": -73.965,
 "InitialCosts": 0.0,
 "Rents": [],
 "Charges": [
 {
 "Counterparty": "New York Electrics",
 "Type": null,
 "Automatic": false,
 "Regularity": "MONTH",
 "Id": 2,
 "Name": "Electricity",
 "PaymentDay": 4,
 "AccountNumber": "9084938890-2491",
 "Amount": 1000.0,
 "Unit": 3,
 "Notes": "",
 "End": "2013-03-19T23:00:00.0000000Z",
 "Start": "2013-03-10T23:00:00.0000000Z",
 },
 { ... },
 { ... }
 ],
 "Ebit": 0.0,
 "Size": 80.0,
 "PMS": 1250000.0,
 "Price": 100000000.0,
 "IncomeTax": 0.0,
 "InterestRate": 0.0
}

One question you might be asking yourself is why did I not use only one collection of Owners. Each Owner document would than contain all the assets as an inner collection. This is just because, I thought it might make sense in the future, to have an asset shared by two owners. The current design allows us anytime in the future, connect the asset to an collection of Owners, simply by replacing OwnerID property with and collection of integers, containing all the ids of the owners.

The Backend

The backend is composed by set of REST controllers. Here is the provided API:

  • GET api/assets - get the list of all the appartment of current user
  • DELETE api/asset/{id} - removing existing asset
  • PUT api/asset - adding new asset
  • PUT api/charges?assetID={id} - add new charge to existing asset
  • POST api/charges?assetID={id} - update existing charge in given asset
  • DELETE api/charge/assetID={id}?assetID={assetID} - removing charge from existing asset
  • PUT api/rents/?assetID={id} - add new charge
  • POST api/rents/?assetID={id} - update existing charge
  • DELETE api/rents/assetID={id}?assetID={assetID} - removing rent from existing asset

Getting all the assets

Without further introduction let's take a look at the first Controller which returns
all the apartments of the logged owner. This service is available at api/assets url.
[Authorize]
public IEnumerable<Object> Get()
{
 var owner = ObtainCurrentOwner();
 var assets = GetAssets(owner.Id);
 return result;
}
protected Owner ObtainCurrentOwner()
{
 return RavenSession.Query<Owner>().SingleOrDefault(x => x.UserName == HttpContext.Current.User.Identity.Name);
}
public IEnumerable<Asset> GetAssets(int ownerID)
{
 return RavenSession.Query<Asset>().Where(x => x.OwnerId == ownerID);
}
 
This method is decorated with the [Authorize] attribute. This mechanism was known previosly in WCF. ASP.NET checks for the cookie within this request and if no cookie is present the request is rejected. Getting the current user and all it's assets is a metter of two linq queries using the RavenSession. which has to be opened before.

Opening RavenDB session

All the controllers inherit from a base controller called RavenApiController. This controller opens the session to RavenDB when it is initialized and than potentially saves the changes to the database when the work is finished. The dispose method of the controller is the last method which is invoked when the work is over.
protected override void Initialize(System.Web.Http.Controllers.HttpControllerContext controllerContext)
{
 base.Initialize(controllerContext);
 if(RavenSession == null)
 RavenSession = WebApiApplication.Store.OpenSession();
}
protected override void Dispose(bool disposing)
{
 base.Dispose(disposing);
 using (RavenSession)
 {
 if (RavenSession != null)
 RavenSession.SaveChanges();
 }
}

You can notice that this ViewModel calls jQuery's $.extend method right at the begining of the function. This is one of the ways to express inheritance in JavaScript. JavaScript is prototype based language. The objects derive directly from other objects, not from classes. The extend method basically copies all properties from the object specified in the parameter.

All of my ViewModels have certain common properties such as busy or message. These are help variables which I use on all ViewModels to visualize progress or show some info messages in the GUI. The BaseViewModel is a good place to define these common properties. Notice also the selectedAsset property, which holds the currently selected AsseetViewModel (imagine user selecting one line in the table of assets).

Wihtout further examination let's take a look at the AssetViewModel. There are several self-epxlanatory properties such as address, price and similar. What is more interesting are the arrays of Rents and Charges. These are observable arrays of ViewModels which are filled during the construction of the AssetViewModel object. The data to this object is passed from the OwnerViewModel. The asset also holds its value to the owner in the parent property.

function AssetViewModel(parent,data) {
 var self = this;
 $.extend(self, new BaseViewModel());
 self.lat = ko.observable();
 self.lng = ko.observable();
 self.city = ko.observable();
 self.country = ko.observable();
 self.zipCode = ko.observable();
 self.address = ko.observable();
 self.name = ko.observable();
 self.charges = ko.observableArray([]);
 self.rents = ko.observableArray([]);
 self.parent = parent;
 
 if (data != null) {
 self.isNew(false);
 self.name(data.Name);
 //update all asset data here
 
 //fill the charges collection - note the rents are filled similarly
 if (data.Charges != null) {
 self.charges($.map(data.Charges, function (data) {
 return new ChargeViewModel(self, data);
 }));
 }
 }
}

To sum it up: When the OwnerViewModel is loaded in the screen, it immidiately starts HTTP request to obtain all the data. It will recieve a JSON which contains all the assets, each asset containing the charges and rents inside. This JSON is parsed respectively by OwnerViewModel, AssetViewModel and Charge and RetnViewModel. At the end the complete hierarchy of ViewModels is created on the client side which copies exactly the server side.

Before detailing the last missing ViewModels (Rents and Charges), let's take a look at the first part of the View. The parent layout is defined in _Layout.cshtml however the part mastered by Knockout is defined in the Index.cshtml file. The left side menu is composed of two smaller menus. One which contains the list of properties with the possibility to create new one and another one which allows to switch over details of the selected property. Here is the View representing the first menu:

<div class="well sidebar-nav">
 <li class="nav-header">Property list:</li>
 <ul class="nav nav-list" data-bind="foreach:assets">
 <li><a data-bind="text:name,click:select" href="#"></a></li>
 </ul>
 <ul class="nav nav-list">
 <li class="nav-header">Actions:</li>
 <li><a href="#" data-bind="click: newAsset"><i class="icon-pencil"></i>@BasicResources.NewProperty</a></li>
 </ul>
</div>

Foreach binding was used in order to render all the apartments. For each apartment an anchor tag is emitted. The text of this tag is bound to the name of the apartment and the click actions is bound to the select function. The creation of new asset is handled by the newAsset function of the OwnerViewModel.

The second part of the menu is defined directly as html. Three anchor tags are render, each of them pointing to different tab, using the same url pattern. For example the URL "#/{property-name}/overview" should navigate to the "Overview" tab of the property with given name.

Client side routing is used, in order to execute certain actions depending on the accessed url. In order to enable client side rendering Path.JS library is used. The attribute binding of knockout is used to render the correct anchor tag.

<div class="well sidebar-nav" data-bind="with:selectedAsset">
 <ul class="nav nav-list">
 <li class="nav-header" data-bind="text:name"></li>
 <li><a data-bind="attr: {href: '#/' + name() + '/overview'}"><i class="icon-pencil"></i>Overview</a></li>
 <li><a data-bind="attr: {href: '#/' + name() + '/charges'}"><i class="icon-arrow-down"></i>Charges</a></li>
 <li><a data-bind="attr: {href: '#/' + name() + '/rents'}"><i class="icon-arrow-up"></i>Rents</a></li>
 </ul>
</div>

You can also notice, that the with binding was used to set the current asset view model as the parent for the navigation div. The right part simply contains all of the 3 tabs (overview, charges or rents), only one of them visible at time. In order to separate the content into multiple files, partial rendering of ASP.MVC is used.

<div id="assetDetail" class="span9" data-bind="template: {data: selectedAsset, if:selectedAsset, afterRender: detailsRendered}">
 <div id="overview">
 @Html.Partial("Overview")
 </div>
 <div id="charges">
 @Html.Partial("Charges")
 </div>
 <div id="rents">
 @Html.Partial("Rents")
 </div>
</div>

Again the with binding is used as the selected apartment's ViewModel is used to back-up this part of the view.

Now let's go back to the ViewModels. ChargeViewModel and RentViewModel have a same ancestor which is called ObligationViewModel. Since both rents and charges how some common properties such as the amount or the regularity, a common parent ViewModel is good place to define them.
The most interesting part of ChargeViewModel is the save function which uses JQuery to emit a HTTP request to the ChargesController. As previously described, two different operations are exposed with the same url, one for creation (HTTP PUT) another for update (HTTP POST). The ViewModel uses a new flag to distinguish these two cases. Before the request is executed, the ViewModel uses Knockout.Validation plugin to perform this check with the errors property.
self.save = function () {
 if (self.errors().length != 0) {
 self.errors().showAllMessages();
 return;
 }
 self.isBusy(true);
 data = self.toDto();
 var rUrl = "/../api/charges?assetID=" + self.parent.id();
 if (self.isNew())
 var opType = "post";
 else
 var opType = "put";
 $.ajax(rUrl, {
 data: JSON.stringify(data),
 type: opType, contentType: "application/json",
 success: function (result) {
 self.isBusy(false);
 self.message(result.message);
 if (self.isNew()) {
 self.update(result.dto);
 parent.charges.push(self);
 }
 }
 });
}

When there are no validation errors, the object which will be sent to the server is created from the ViewModel by the toDto method. It does not make sense to serialize the whole ViewModel and send it to the server. In the toDto method the ViewModel is converted to an JSON object which can be directly mapped to the server side entity. The ajax method of jQuery is called, which creates new HTTP request.

When the response from the server comes back, the callback is executed, which performs several operations. Besides updating the GUI-helpful variables the callback performs two different operations. If the new charge was added, then it has to be added also to the parent ViewModel(appartment - represented by AssetViewModel). The new charge also recieved the server side ID which has to be updated. All other properties are already up-to-date.

Removing charge

The delete operation is very simple. Only asset and charge ids have to be supplied to the controller. If the operation has succeed, then againg the collection of charges inside AssetViewModel has to be updated.

self.remove = function () {
 $.ajax("/../api/charges/" + self.id() + "?assetID=" + self.parent.id(), {
 type: "delete", contentType: "application/json",
 success: function (result) {
 self.isBusy(false);
 parent.charges.remove(self);
 parent.selectedCharge(null);
 }
 });
};

Charges View

The charges view is classic master detail view. We have list of items on the left side and the detail of one of the items on the right. A table of charges is rendered using the foreach binding and then the currently selected charge is rendered in a side div tag using the with binding.

<div class="row-fluid">
 <table class="table table-bordered table-condensed">
 <tbody data-bind="foreach: charges">
 <tr style="cursor: pointer;" data-bind="click: select">
 <td style="vertical-align: middle">
 <div data-bind='text: name'></div>
 </td>
 <td style="vertical-align: middle">
 <div data-bind="text: amount"></div>
 </td>
 <td style="vertical-align: middle">
 <div data-bind="text: amount"></div>
 </td>
 <td>
 <button type="submit" class="btn" data-bind="visibility: !isNew(), click:remove"><i class="icon-trash"></i></button>
 </td>
 </tr>
 </tbody>
 </table>
</div>
You can see, that the click action of the table row is bound the the select method of the ChargeViewModel

Using the KoExtensions

As you can see there is a pie chart representing the charges repartition. This chart is rendered using D3JS, more specifically by a special binding of a small project of mine called KoExtensions. The rendering of the graph is really simple. The only thing to do is to use the piechart binding which is part of KoExtensions. This binding takes 3 parameters: the collection of the data to be rendered, transformation function to indicate which values inside the collection should be used to render the graph and the last but not least the initialization parameters.


<div data-bind="piechart: charges, transformation:obligationToChart"></div>
function obligationToChart(d) {
 return { x: d.name(), y: d.amount() };
}
 
In order to render the graph, the KoExtensions binding needs to know which value in one concretion collection item specifies the with of each arc in the pie chart and which value is the title. Internally these values are called simply x and y. The developer has to specify function which for each item in the collection returns {x,y} pair. The transformation function uses the name and the amount values of the charge. The initialization parameters of the chart are not set, so the default once are used.

Bootstrap style date-time picker

Bootstrap does not contain a date-time picker nor is it on their roadmap. Luckily the community came up with a solution. I have used the one called bootstrap-datepicker.js. Since I needed to use it with Knockout, I have came up with another special binding which you can find in KoExtensions, it's usage is fairly simple.

<div class="controls">
 <input type="text" data-bind="datepicker:end">
</div>
 

Binding to the map

The last usage of KoExtensions is the rendering of the map containing all the assets in the left hand bar. I have created a binding which enables the rendering of one or more ViewModels on the map, by specifing which property contains the latitude and longitude values. Here the binding is used withing a foreach binding, in order to display all the appartments in the map.

<div class="row-fluid">
 <div data-bind="foreach: assets">
 <div data-bind="latitude: lat, longitude:lng, map:map, selected:selected">
 </div>
 </div>
 <div id="map" style="width: 100%; height: 300px">
 </div>
</div>
 
The map has to be initialized the usual way as described in the official google maps tutorial, the binding does not take care of this. This enables the developer to define the map exactly the way he likes. Any other elements can be rendered on the same map, simply by passing the same map object to other bindings. The selected property which is passed in the binding tells the binding which variable it should update or which function to call when one element is selected in the map.

Knockout Validation and Bootstrap styles

One of the Knockout's features which make it a really great tool, is the styles binding, providing you with the ability to associate one concrete css style to an UI component, if some condition in the ViewModel was met. One of the typical examples is giving the selected row in a table a highlight.

<tr style="cursor: pointer;" data-bind="css : {info:selected},click: select">...</tr>

Bootstrap provides styles for highlighting UI components such as textboxes and are ready to use.

Knockout-Validation is a great plugin which extends any observable value with isValid property, and enables the developer to define rules which will determine the value of this property.

self.amount = ko.observable().extend({ required: true, number: true });
self.name = ko.observable().extend({ required: true });
<div class="control-group" data-bind="css : {error:!name.isValid()}">
 <label class="control-label">Name</label>
 <div class="controls">
 <input type="text" placeholder="@BasicResources.Name" data-bind="value:name">
 <span class="help-inline" data-bind="validationMessage: name"></span>
 </div>
</div>
<div class="control-group" data-bind="css : {error:!amount.isValid()}">
 <label class="control-label">@BasicResources.Amount</label>
 <div class="controls">
 <input type="text" placeholder="@BasicResources.Amount" data-bind="value: amount">
 <span class="help-inline" data-bind="validationMessage: amount"></span>
 </div>
</div>


By combining Bootstrap with Knockout-Validation, we can achieve a very nice effect of highlighting when the value is invalid.

What is not described in this article

I did not describe every line of code, but since the project is available at my Github account, you can easily examine it. There are interesting parts at which you might take a look at: JavaScript unit tests, integration test for WebAPI Controller, bundles to regroup and minimize several JS files. Also please not, that the code is not perfect I have used it to play around, not to create a production ready application.

Summary

I think that the frameworks which I have used are all great at what they do. RavenDB in a .NET project is extremely not-present. You don't even have to think about your data storage layer. I know that this DB has much more to offer, but I did not dig to it enough to be able to talk about performance or optimization it provides, but I will definitely check it out later.
KnockoutJS is great at UI data binding. It does not pretend to do more but it does that perfectly. There is not a better tool to declaratively define UI and comportement. And any-time there is some challenging task to do, Knockout usually provides an elegant way to achieve it (like css style binding for the validation).
D3.js even though I did not use it a lot is very powerfull. You can visualize any data any way you want. The only minus might be it's size.
And bootstrap is finally a tool which enables us to get out usable UI in reasonable time, without having a designer at our side. This was not really possible before. Go and use them.

středa 26. prosince 2012

Playing with Google Drive SDK and JavaScript

I am just starting to use the Google Drive SDK for one of my personal projects. The front-end of the application is written entirely in JavaScript. I am in the process of integrating Google Drive and it took me some time to get throw the API reference and get it to work, here are some useful code snippets. I have started with the JavaScript Quickstart available at the google sdk page and I have added couple useful methods:

The Google Drive API is a standard RESTful API. You can access the functionalities only by issuing HTTP requests, so you do not need any special SDK. However the requests have to be signed. OAuth protocol is used to secure the communication. Google provides a SDK for many languages, JavaScript being one of them. Using this SDK facilitates the creation of HTTP requests. The API provides a good compromise between the simplicity and flexibility.

The OAuth handshake

Every request has to be signed using OAuth token. The application has to first perform the OAuth handshake to obtain the token. JavaScript SDK provides gapi.auth.authorize function which can be used. This function takes the necessary parameters (OAuth client ID and the scope) and also the callback which will be executed when the handshake is over.

function checkAuth() {
 gapi.auth.authorize(
 {'client_id': CLIENT_ID, 'scope': SCOPES, 'immediate': true},
 handleAuthResult);
}
function handleAuthResult(authResult) {
 if (authResult && !authResult.error) {
 //Auth OK
 }
}

Once the client is authenticated, the SDK stores the token internally and adds it to any new request, created before the web page is closed.

Composing the Google Drive requests

Any simple request can be created with gapi.client.request function. The SDK will create a HTTP request using the supplied information. The method takes in JavaScript object. I have found that I am using mostly 4 fields in this object:

  • path – the url of the request
  • method – http method of the request (get/post/put/delete)
  • params – any information passed here will be added to the request as URL parameter.
  • headers – any information passed here will be added to the header of the HTTP request.
  • body – the body of the request. Usually posted JSON.

Getting first 10 items from the drive

function getItems() {
 var request = gapi.client.request({
 'path': 'drive/v2/files',
 'method': 'GET',
 'params': {
 'maxResults': '10'
 }
 });
 request.execute(listItems);
}
function listItems(resp) {
 var result = resp.items;
 var i = 0;
 for (i = 0; i < result.length; i++) { console.log(result[i].title); } } 

Creating a folder

function createFolder(folderName) {
 var request = gapi.client.request({
 'path': 'drive/v2/files',
 'method': 'POST',
 'body': {
 'title': folderName,
 'mimeType': 'application/vnd.google-apps.folder'
 }
 });
 request.execute(printout);
}
function printout(result) {
 console.log(result);
}

In this request, nothing is passed as parameter in the URL. Instead of that JSON object containing two fields (title and mimeType) is passed in the body of the request.

Searching for folders

function getAllFolders(folderName) {
 var request = gapi.client.request({
 'path': 'drive/v2/files',
 'method': 'GET',
 'params': {
 'maxResults': '20',
 'q':"mimeType = 'application/vnd.google-apps.folder' and title contains '" + folderName + "'"
 }
 });
 request.execute(listItems);
}

You can get more information about searching the google drive here.

sobota 17. března 2012

KnockoutJS and Google Maps binding

This post describes the integration between Google Maps and KnockoutJS. Concretely you can learn how to make the maps marker part of the View and automatically change it's position any time when the ViewModel behind changes. The ViewModel obviously has to contain the latitude and longitude positions of the point that you wish to visualize on the map.

Previously I have worked a bit with Silverlight/WPF which in general leaves one mark on a person: the preference for declarative definition of the UI leveraging the rich possibilities of data binding provided by the previously mentioned platforms. In this moment I have a small free-time project where I am visualizing a collection of points on a map. This post describes how to make the marker automatically change it's position after the model values behind changes. Just like in this picture bellow, where the position changes when user changes the values of latitude and longitude in the input boxes.

image

Since I like Model-View-ViewModel pattern I was looking for a framework to use this pattern in JS, obviously KnockoutJS saved me. The application that I am working on, has to visualize several markers on Google Maps. As far as I know there is no way to define the markers declaratively. You have to use JS:

marker = new google.maps.Marker({
 map:map,
 draggable:true,
 animation: google.maps.Animation.DROP,
 position: parliament
});
google.maps.event.addListener(marker, 'click', toggleBounce);

So let's say you have a ViewModel which holds a collection of interesting points, that will be visualized on the map. You have to iterate over this collection to show all of them on the map. One possible way around would be to use the subscribe method of KO. You could subscribe for example to the latitude of the point (assuming that the latitude would be an observable) and on any change perform the JS code. There is a better way.

Defining custom binding for Google Maps.

The way to go here is to define a custom binding, which will take care of the update of the point on the map, any time, that one of the observable properties (in basic scenario: latitude and longitude) would change.

ko.bindingHandlers.map = {
init: function (element, valueAccessor, allBindingsAccessor, viewModel) {
 var position = new google.maps.LatLng(allBindingsAccessor().latitude(), allBindingsAccessor().longitude());
 var marker = new google.maps.Marker({
 map: allBindingsAccessor().map,
 position: position,
 icon: 'Icons/star.png',
 title: name
 });
 viewModel._mapMarker = marker;
},
update: function (element, valueAccessor, allBindingsAccessor, viewModel) {
 var latlng = new google.maps.LatLng(allBindingsAccessor().latitude(), allBindingsAccessor().longitude());
 viewModel._mapMarker.setPosition(latlng);
 }
}
;<div data-bind="latitude: viewModel.Lat, longitude:viewModel.Lng, map:map" ></div>

So let's describe what is going on here. We have defined a map binding. This binding is used on a div element. Actually the type of the element is not important. There are also latitude and longitude bindings, which are not defined. That is because the map binding takes care of everything. The binding has two functions: init and update, first one called only once, the second one called every time the observable value changes.

The allBindingsAccessor parameter contains a collection of all sibling bindings passed to the element in the data-bind attribute. the valueAccessor, holds just the concrete binding (in this case the map value, because we are in definition of the map binding). So from the allBindingsAccessor we can easily obtain the values that we need:

allBindingsAccessor().latitude()
allBindingsAccessor().longitude()
allBindingsAccessor().map()
Notice that the map is passed to the binding in parameter (that is concretely the google.maps.Map object, not the DOM element. Once we have these values, there is nothing easier than to add the marker to the map.

And there is one important thing to do at the end – save the marker, somewhere so we can update it’s position later. Here again KO comes with rescue, because we can use the viewModel parameter passed to the binding and we can attach the marker to the ViewModel. Here I suppose that there is no existing variable with name _mapMarker in the viewModel and JS can happily add the variable to the ViewModel.

viewModel._mapMarker = marker; 
The update method has an easy job, because the marker has been stored, and we only need to update it's position.

viewModel._mapMarker.setPosition(latlng);

Almost full example

Just check it here on JsFiddle.

Possible improvements

One thing that I do not like about this, is the fact, that you have to pass the map as an argument to the binding and the div element has to be outside of the map. Coming from Silverlight/WPF you would like to do something like this:

<div id=”map_canvas”>
<div data-bind=”latitude: vm.Lat, longitude:vm.Lng”>Whatever I want to show on the map marker</div>
</div>

That is actually the beauty of declarative UI definition. You can save a lot of code only by composing the elements in the correct order. However this is not possible – at least I was not able to get it to work. I was close however:

init: function (element, valueAccessor, allBindingsAccessor, viewModel) {
var map = element.parentNode;
var googleMap = new google.maps.Map(.map.);
//add the pointer
var contentToAddToMarker = element;
}

Again thanks to KO, here the element variable represents the DOM element to which the binding is attached. If the div element is inside the map, than we can get the parent element (which is the div for the map) and we are able to create a new map on this element. The problem which I had is the once, the new map was created, the div elements nested inside the map disappeared. Even if that would work, some mechanism would have to be introduced, in order to create the map only the first time (in case there are more markers to show on the map) and store it somewhere (probably as global JS variable).

On the other hand, thanks to the element you can get all the div which should be for example given as the description to the marker.

Summary: KnouckoutJS is great. It lets me get rid of the bordelic JS code.

sobota 18. února 2012

JavaScript asynchronously uploading files

At the beginning I have thought, that it has to be easy; just make a POST to the server using jQuery and the only question is how to get the data. Well I have found out that it is not that easy and googling around I have found there are quite a lot of pre-build components and plugins, which makes it quite difficult to decide for one of those.

Why it is not possible to use simple JavaScript POST?

Because of the security restrictions. The browser is not allowed to post the file content asynchronously. This is however about to change thanks to HTML 5.

Workarounds

  • HTML 5 - has a support for file uploading. Use the File API. Follow this how to. This does not work in current versions of IE (7,8,9).
  • Create a hidden iFrame on the page and redirect the return of the post to this iFrame
  • Use Flash, Silverlight, or Java applet
  • Use some component, or jQuery plugin, which usually makes use of the preceding ones (usually the iFrame hack)

jQuery plugins

There are quite few of those:

I have tested jQuery File Upload. Which is cool, comes with nice GUI but at the time of writing this, I have found it little hard to customize. Actually I have struggled to use a simple form, which would upload just one file, instead of the predefined GUI with it's behavior.

The second one that I have tested is jQuery Form Plugin which contrary to the previous one, is simple to use in a one file upload scenario. However it does not provide the nice UI, ready for multiple files upload etc...

Using jQuery Form Plugin in ASP.NET

Client side

On the client side you need jQuery and the Plugin js file. Then with one jQuery call you can set up the form, to use the plugin.
<form id="uploadForm" action="Upload.ashx" method="POST" enctype="multipart/form-data">
 <input type="hidden" name="MAX_FILE_SIZE" value="100000" />
 File:
 <input type="file" name="file" />
 <input type="submit" value="Submit" />
</form>
$('#uploadForm').ajaxForm({
 beforeSubmit: function (a, f, o) {
 o.dataType = 'html'
 },
 success: function (data) {
 alert('upload OK:' + data);
 }
});
The dataType property which is set to 'html, specifies to Form Plugin what kind of response should it expect. To check the other options see the documentation.

You can see, that the form action is set to "Upload.ashx". This is the server side script, being a Http Handler (in case of ASP.NET application). It could also probably be a WCF service - but let's keep it simple when we can.

Server side

On the server side you have to define a Http Handler which will take care of the upload functionality.
public class Upload : IHttpHandler
{
 public void ProcessRequest(HttpContext context)
 {
 System.Web.HttpPostedFile file = context.Request.Files[0];
 String filePath = "Uploads" + "\\" + RandomString(10) + "." + extension;
 string linkFile = System.Web.HttpContext.Current.Server.MapPath("~") + filePath;
 file.SaveAs(linkFile);
 context.Response.StatusCode = 200;
 context.Response.Write(filePath);
 }
}
And that's it. The handler will save the file and send back the address of the file.

sobota 9. dubna 2011

JavaScript to call to external DLL by NPAPI plugin

This is a somewhat special scenerio: you want to use JavaScript to call a function exposed by DLL. The DLL is old Native C++. Here in this simple Proof of Concept I call a DLL which simple writes to a file on disk.

I have achived this by using NPAPI plugin. (I did not do it for fun, but it was one of my assignements last week...)

Netscape Plugin API is a plugin architecture which allows you to write components (plugins) which can be embeded to web pages. Plugins are developed in native code and are deployed via registering the resulting DLL file to Windows Registry. (using regsvr32 on Windows).

Creating the native dll library to be called

In this part I will just define a simple DLL library with one function allowing you to write to file. Normally you have already some legacy dll which you want to call, this one will serve just for a test. There is a MSDN page concerning this topic.

In Visual Studio creat a new project -> Visual C++ -> Win32 -> Win32 Console Application.

You will be presented by a Application Settings dialog where you can select DLL library and Export symbols.

A project structure is created for you, where a header file and corresponding cpp file named after you project will be prepared for you to define and implement functions which you want to expose. I have called my project "NativeLib". Here is the header file:
class NATIVELIB_API CNativeLib {
public:
 CNativeLib(void);
};
extern NATIVELIB_API int nNativeLib;
NATIVELIB_API int fnNativeLib(void);
NATIVELIB_API int fnPrintToFile(void);

And here the code file:

NATIVELIB_API int fnNativeLib(void)
{
 return 42;
}
NATIVELIB_API int fnPrintToFile(void)
{
 ofstream myfile;
 myfile.open ("C:\example.txt");
 if(myfile.is_open()){
 myfile << "Writing this to a file.\n"; return 1; }else{ return 0; } myfile.close(); } // This is the constructor of a class that has been exported. // see NativeLib.h for the class definition CNativeLib::CNativeLib() { return; } 
You can see that there is already one function predefined which returns the ultimate answer. I have just added my function to write a simple text to a file. When you compile the solution, you will have a dll file and also a lib file.

Creating the plugin structure

The architecture of the plugin is quite complicated so to help out there is a tool called FireBreath which helps you with creation of the simple plugin.

Firebreath is written in C++ and uses Python to run PREP scripts so you will need Python to execute it. You can download Firebreath from its official page or from its GIT repository. On the official page you can find a great video works you through the process of creation of the plugin structure.

Firebreath also uses CMAKE to create a build which will fit your platform needs. CMAKE is a crossplatform build system which from one configuration written in a CMakeList.txt file will build Make file or Visual Studio Solution structure which later can be build on your system.

Follow the video on the Firebreath page to create the plugin structure and the VS solution. During the process of creation you will be asked for the name of the plugin, description, if you want your plugin to have GUI and some additional information. If you open created Visual Studio solution you will see that it consists of several projects, but you will be concerned only with the with the same name as you gave to your plugin.
If you opened the details of the project you will see that it contains a header file with "API" suffix and corresponding cpp file.
Now to add your function to the API file you will add it respectively to header and to cpp file:
class MyAPI : public FB::JSAPIAuto
{
public:
 MyAPI(const OctoTestPtr& plugin, const FB::BrowserHostPtr& host);
 virtual ~MyAPI();
 MyPtr getPlugin();
 
 //call to native library to print to file
 int printToFile();
};
//add the header file
#include "NativeLib.h"
//add the function implementation
int MyAPI::printToFile()
{
 return fnPrintToFile();
}

There is one last step and that is to register this method so it will be exposed by the plugin to JavaScript calls. This is done in the constructor of the plugin:

MyAPI::MyAPI(const MyPtr& plugin, const FB::BrowserHostPtr& host) : m_plugin(plugin), m_host(host)
{
 registerMethod("printToFile", make_method(this,&MyAPI::printToFile));
}

Now you will have to add the header file to your solutions header files and than the LIB for the linker to be able to find your native library functions. To do so go to Project properties -> Linker -> Input -> Additional Dependencies and add your lib file here. One last will be to copy the NativeLib.dll to the location of you plugins generated DLL.

Now you can compile the solution (first time it will take maybe couple minutes, next time it will be faster since you are only changing one project). In the "BIN\Debug" folder you will find the DLL of your plugin. Now run regsvr32 myplugin.dll and the plugin should be registered.

Now you can locate FBControl.html (generated for you by Firebreath) which already contains your plugin so you can test it directly (you should find it in "projects\MyPluging\gen" folder). Now that file already contains a JavaScript function to get your plugin.

function plugin0()
{
 return document.getElementById('plugin0');
}
plugin = plugin0;

So in the body of the html just add a button to call the plugins function by JavaScript and show the result of the function:

<input type="button" value="Print to file" name="button2" onClick="alert(plugin().printToFile());">
This is quite special scenario so I am not sure if this post will serve anyone...but never know.
Přihlásit se k odběru: Komentáře (Atom)