Showing posts with label USB. Show all posts
Showing posts with label USB. Show all posts
Sunday, December 29, 2019
TVplus Go on Laptop
Watch free ISDB-T digital TV on laptop (or any x86_64 computer) using the ABS-CBN TVplus Go USB dongle.
[フレーム]
As of this writing, the TVplus Go dongle only works on Android operating system. So the way to make it work on an x86 platform is either install the Android-x86 or simply use an Android emulator. This demo will use the official emulator running on Ubuntu 18.04 64-bit host OS. Other OS types, like Windows 10, might also work but will still initially require *nix-based tools for modifying the virtual device's ramdisk cpio archive and system ext4 image file.
The TVplus Go Android app, as of version 1.0.28, only works on ARM CPUs (armeabi-v7a and arm64-v8a only). Running the ARM emulator is not advisable because it's too slow and unusable. So the only option now is to install libhoudini (ARM translator) on the x86 emulator.
Guide:
1. Download the Android command line tools (installing the whole Android studio is only optional).
https://developer.android.com/studio, e.g. extract sdk-tools-linux-4333796.zip to ~/android/sdk.
2. Open a terminal, change directory to ~/android/sdk, and set the following environment variables:
3. Download the emulator, platform-tools, and the system-image. Android Nougat (API-25) is selected because easier to modify compared to with the recent versions.
4. Go to $ANDROID_SDK_ROOT/system-images/android-25/google_apis/x86_64 and increase the size of the system.img (create a backup first!). Allocate at least 128MB for the additional files.
5. Copy libhoudini binaries. Mount first the system.img before extracting the files.
Either set the selinux to permissive (add -selinux permissive option on the emulator) or set the security context of the libhoudini files.
6. Allows ARM executable file formats
7. Enable access to the TVPlus Go USB dongle (vendor id 0x048d, product id 0x9308)
8. Hide from "root-detection" and "running-on-emulator-detection"
i. rename the su executable
(削除) edit again build.prop, check these answers on which properties to be modified. Replace, at least, the "generic" string from ro.product.device and ro.build.fingerprint (削除ここまで). (not the actual workaround)
iii. (optional) Install Google Play, if you want to watch the encrypted channels - need to pay P20 for the registration (in-app purchase). Copy "Phonesky.apk" from opengapps.org to systemfs/priv-app/Phonesky
iv. finally, unmount the image.
9. Extract ramdisk, and edit default.prop
Replace ro.dalvik.vm.native.bridge=0 with ro.dalvik.vm.native.bridge=libhoudini.so
10. Edit an init configuration file (e.g. init.ranchu.rc) to register the libhoudini by adding these lines:
11. Repack the new ramdisk
12. Create the AVD named "avd_7_1_x86_64" based on "Android TV (720p)" device.
13. Now launch the emulator.
14. Install the TVplus Go Android app, either via the Google Play or via adb install
15. Finally, plugin the TVplus Go dongle to a USB port and then launch now the app on the emulator
[フレーム]
As of this writing, the TVplus Go dongle only works on Android operating system. So the way to make it work on an x86 platform is either install the Android-x86 or simply use an Android emulator. This demo will use the official emulator running on Ubuntu 18.04 64-bit host OS. Other OS types, like Windows 10, might also work but will still initially require *nix-based tools for modifying the virtual device's ramdisk cpio archive and system ext4 image file.
The TVplus Go Android app, as of version 1.0.28, only works on ARM CPUs (armeabi-v7a and arm64-v8a only). Running the ARM emulator is not advisable because it's too slow and unusable. So the only option now is to install libhoudini (ARM translator) on the x86 emulator.
Guide:
1. Download the Android command line tools (installing the whole Android studio is only optional).
https://developer.android.com/studio, e.g. extract sdk-tools-linux-4333796.zip to ~/android/sdk.
2. Open a terminal, change directory to ~/android/sdk, and set the following environment variables:
$ export JAVA_OPTS='-XX:+IgnoreUnrecognizedVMOptions --add-modules java.se.ee'
$ export ANDROID_HOME=$HOME/android/sdk
$ export ANDROID_SDK_ROOT=$ANDROID_HOME
3. Download the emulator, platform-tools, and the system-image. Android Nougat (API-25) is selected because easier to modify compared to with the recent versions.
$ ./tools/bin/sdkmanager "platform-tools" "platforms;android-25" "emulator"
$ ./tools/bin/sdkmanager --install "system-images;android-25;google_apis;x86_64"
4. Go to $ANDROID_SDK_ROOT/system-images/android-25/google_apis/x86_64 and increase the size of the system.img (create a backup first!). Allocate at least 128MB for the additional files.
$ cd $ANDROID_SDK_ROOT/system-images/android-25/google_apis/x86_64
$ dd if=/dev/zero bs=1M count=512 >> ./system.img
$ e2fsck -f system.img
$ resize2fs system.img
5. Copy libhoudini binaries. Mount first the system.img before extracting the files.
$ wget http://dl.android-x86.org/houdini/7_y/houdini.sfs -O houdini_7_y.sfs
$ mkdir -p systemfs
$ sudo mount -o loop -t ext4 system.img systemfs
$ sudo unsquashfs -d systemfs/lib/arm houdini_7_y.sfs
$ sudo cp systemfs/lib/arm/libhoudini.so systemfs/lib/
$ sudo cp systemfs/lib/arm/houdini systemfs/bin/
Either set the selinux to permissive (add -selinux permissive option on the emulator) or set the security context of the libhoudini files.
$ sudo setfattr -n security.selinux -v u:object_r:system_file:s0 systemfs/bin/houdini
$ sudo setfattr -n security.selinux -v u:object_r:system_file:s0 systemfs/lib/libhoudini.so
$ sudo setfattr -n security.selinux -v u:object_r:system_file:s0 systemfs/lib/arm
$ sudo setfattr -n security.selinux -v u:object_r:system_file:s0 systemfs/lib/arm/*
$ sudo setfattr -n security.selinux -v u:object_r:system_file:s0 systemfs/lib/arm/nb/*
6. Allows ARM executable file formats
$ sudo mkdir -p systemfs/etc/binfmt_misc
$ echo ":arm_dyn:M::\x7f\x45\x4c\x46\x01\x01\x01\x00\x00\x00\x00\x00\x00\x00\x00\x00\x03\x00\x28::/system/bin/houdini:" | sudo tee systemfs/etc/binfmt_misc/arm_dyn
$ echo ":arm_exe:M::\x7f\x45\x4c\x46\x01\x01\x01\x00\x00\x00\x00\x00\x00\x00\x00\x00\x02\x00\x28::/system/bin/houdini:" | sudo tee systemfs/etc/binfmt_misc/arm_exe
$ sudo nano systemfs/build.prop
add the following properties to the build.prop (overwrite if existing):
ro.enable.native.bridge.exec=1
ro.product.cpu.abilist=x86_64,x86,armeabi-v7a,armeabi
ro.product.cpu.abilist32=x86,armeabi-v7a,armeabi
7. Enable access to the TVPlus Go USB dongle (vendor id 0x048d, product id 0x9308)
$ echo '<permissions><feature name="android.hardware.usb.host"/></permissions>' | sudo tee systemfs/etc/permissions/android.hardware.usb.host.xml
$ echo 'SUBSYSTEM=="usb", ATTRS{idVendor}=="048d", ATTRS{idProduct}=="9308", GROUP="kvm"' | sudo tee /etc/udev/rules.d/89-usb-android.rules
$ sudo udevadm control --reload-rules
8. Hide from "root-detection" and "running-on-emulator-detection"
i. rename the su executable
$ sudo mv systemfs/xbin/su systemfs/xbin/_s_uii.
iii. (optional) Install Google Play, if you want to watch the encrypted channels - need to pay P20 for the registration (in-app purchase). Copy "Phonesky.apk" from opengapps.org to systemfs/priv-app/Phonesky
iv. finally, unmount the image.
$ sync
$ sudo umount systemfs
9. Extract ramdisk, and edit default.prop
$ mkdir -p ramdiskfs
$ cd ramdiskfs
$ gzip -dc ../ramdisk.img | cpio -i
$ nano default.prop
Replace ro.dalvik.vm.native.bridge=0 with ro.dalvik.vm.native.bridge=libhoudini.so
10. Edit an init configuration file (e.g. init.ranchu.rc) to register the libhoudini by adding these lines:
# Enable native bridge for target executables
on early-init
 mount binfmt_misc binfmt_misc /proc/sys/fs/binfmt_misc
on property:ro.enable.native.bridge.exec=1
 copy /system/etc/binfmt_misc/arm_exe /proc/sys/fs/binfmt_misc/register
 copy /system/etc/binfmt_misc/arm_dyn /proc/sys/fs/binfmt_misc/register
11. Repack the new ramdisk
$ cd ..
$ wget https://github.com/xiaolu/mkbootimg_tools/raw/master/mkbootfs
$ chmod +x mkbootfs
$ ./mkbootfs ./ramdiskfs | gzip > ramdisk.img
12. Create the AVD named "avd_7_1_x86_64" based on "Android TV (720p)" device.
$ ./tools/bin/avdmanager --verbose create avd --force --name "avd_7_1_x86_64" --device "tv_720p" \
 --package "system-images;android-25;google_apis;x86_64" --tag "google_apis" --abi "x86_64"
13. Now launch the emulator.
$ ./tools/emulator @avd_7_1_x86_64 -show-kernel -verbose -memory 2048 \
 -qemu -usb -device usb-host,vendorid=0x048d,productid=0x9308
14. Install the TVplus Go Android app, either via the Google Play or via adb install
$ adb install ../apks/TVplus\ GO_v1.0.28_apkpure.com.apk
15. Finally, plugin the TVplus Go dongle to a USB port and then launch now the app on the emulator
[フレーム]
Monday, May 9, 2016
Android-Arduino Communication via USB OTG
USB On-the-go capability in Android devices has now become more available in the market. And why wouldn’t it be? This feature, nicknamed OTG, enables you to use your flash drives, keyboards, mice and even printers with just your phone! What’s more interesting is it can also enable you to communicate and control your microprocessors using your Android device without the need for additional modules – just a cable. In this article, we will see how this communication can become possible. To demonstrate, we will control the behavior of an LED and send messages to another very popular item in the electronics world – the Arduino.
The shorter end of the stick is Arduino’s side. In your Arduino, simply upload this code:
int ledPin = 13;
void setup(){
 Serial.begin(9600);
 Serial.setTimeout(200);
 pinMode(ledPin, OUTPUT);
}
void loop(){
 if (Serial.available()){
 String c = Serial.readString();
 if (c.equals("TONLED")) digitalWrite(ledPin, HIGH);
 else if (c.equals("TOFFLED")) digitalWrite(ledPin, LOW);
 else Serial.print(c);
 }
}
In the above sketch, we are simply waiting for the data arriving at our serial line and performing actions based on the data received. For instance, turning on the LED ledPin requires a TONLED message from our Android device. You’ve probably noticed that there are no special libraries or methods in our Arduino sketch. That’s a great thing because it tells us that the system is not exclusive to Arduino and will work with any microcontroller that supports serial communication.
Let’s now move on to Android’s side. The first step is to create an Android project and add the necessary components. In the project we created, we added extra components for user convenience. For learning and testing purposes, only the following are necessary:
- Text Field – used to get input data by the user, which will be sent to and echoed by the Arduino
- Toggle Button – used to control the behavior of the LED
- Start Button – used to open the serial port
- Send Button – used to send messages to Arduino
- Text View – used to display logs
To simplify the setup and processes, we will use the UsbSerial library by felHR85. There are a lot of libraries you can choose from. In case you have other preferences, feel free to modify and adapt to your preferred library.
In the build.gradle of your project, add jitpack. Jitpack is a very awesome tool that enables us to get a Git project into our build.
allprojects {
 repositories {
 jcenter()
 maven { url "https://jitpack.io" }
 }
}
Now, add the dependency to your module’s build.gradle.
compile 'com.github.felHR85:UsbSerial:4.3'
Moving on to our main activity, there are some variables that we wish to declare globally for convenience.
private static final String ACTION_USB_PERMISSION = "com.android.example.USB_PERMISSION";
UsbDevice device;
UsbDeviceConnection connection;
UsbManager usbManager;
UsbSerialDevice serialPort;
PendingIntent pendingIntent;
The next items that we will present here will not be discussed thoroughly, but you can refer to Android's official documentation for details.
Before trying to start the communication, you must seek permission from the user. To do this, create a broadcast receiver. This receiver listens for the intent that gets broadcasted when you call requestPermission(). Only when granted can we proceed to opening the connection and setting parameters for the Serial communication.
private final BroadcastReceiver broadcastReceiver = new BroadcastReceiver() {
 @Override
 public void onReceive(Context context, Intent intent) {
 if (intent.getAction().equals(ACTION_USB_PERMISSION)) {
 boolean granted = intent.getExtras().getBoolean(UsbManager.EXTRA_PERMISSION_GRANTED);
 if (granted) {
 connection = usbManager.openDevice(device);
 serialPort = UsbSerialDevice.createUsbSerialDevice(device, connection);
 if (serialPort != null) {
 if (serialPort.open()) {
 serialPort.setBaudRate(9600);
 serialPort.setDataBits(UsbSerialInterface.DATA_BITS_8);
 serialPort.setStopBits(UsbSerialInterface.STOP_BITS_1);
 serialPort.setParity(UsbSerialInterface.PARITY_NONE);
 serialPort.setFlowControl(UsbSerialInterface.FLOW_CONTROL_OFF);
 serialPort.read(mCallback);
 } else {
 Log.d("SERIAL", "PORT NOT OPEN");
 }
 } else {
 Log.d("SERIAL", "PORT IS NULL");
 }
 } else {
 Log.d("SERIAL", "PERMISSION NOT GRANTED");
 }
 } else if (intent.getAction().equals(UsbManager.ACTION_USB_DEVICE_ATTACHED)) {
 onClickStart(startButton);
 } else if (intent.getAction().equals(UsbManager.ACTION_USB_DEVICE_DETACHED)) {
 //can add something to close the connection
 }
 };
};
On your onCreate method, declare the intent and register your broadcast receiver to start and stop the serial connection.
pendingIntent = PendingIntent.getBroadcast(this, 0, new Intent(ACTION_USB_PERMISSION), 0);
IntentFilter filter = new IntentFilter(ACTION_USB_PERMISSION);
registerReceiver(broadcastReceiver, filter);
In our application, we created a start button to start the connection when pressed. In the method that corresponds to the onClick action of our button, we add the following:
public void onClickStart(View view) {
 if (!isSerialStarted) {
 usbManager = (UsbManager) getSystemService(Context.USB_SERVICE);
 HashMap<String, UsbDevice> usbDevices = usbManager.getDeviceList();
 if (!usbDevices.isEmpty()) {
 boolean keep = true;
 for (Map.Entry<String, UsbDevice> entry : usbDevices.entrySet()) {
 device = entry.getValue();
 int deviceVID = device.getVendorId();
 if (deviceVID == 1027 || deviceVID == 9025) { //Arduino Vendor ID
 usbManager.requestPermission(device, pendingIntent);
 keep = false;
 } else {
 connection = null;
 device = null;
 }
 if (!keep)
 break;
 }
 }
 }
}
The code above searches for vendor IDs 1027 or 9025 – the vendor ID’s associated to FTDI or Arduino. The vendor ID equal to 9025 is the more popular and more common value based on other articles in the internet, but mine has an ID of 1027. The easiest way to know is to just print the vendor IDs detected by the Android device. If the vendor ID matches the expected ID for our device, we will call the requestPermission() method. With this, the intent will be broadcasted and picked up by our receiver, starting and opening the connection.
Once communication is opened, we can start sending and receiving data. To receive from Arduino, simply add the codes below. Note that we are appending the data received to the text view.
private UsbSerialInterface.UsbReadCallback mCallback = new UsbSerialInterface.UsbReadCallback() {
 //Defining a Callback which triggers whenever data is read.
 @Override
 public void onReceivedData(byte[] arg0) {
 String data = null;
 try {
 data = new String(arg0, "UTF-8");
 data.concat("/n");
 tvAppend(displayView, data);
 } catch (UnsupportedEncodingException e) {
 e.printStackTrace();
 }
 }
};
private void tvAppend(final TextView tv, final CharSequence text) {
 runOnUiThread(new Runnable() {
 @Override public void run() {
 if (text != null) {
 tv.append(text);
 }
 }
 });
}
Sending data is easier. We only need to get user input from the text field, and send it to the connected device.
public void onClickSend(View view) {
 String textInput = inputView.getText().toString();
 serialPort.write(textInput.getBytes());
}
To control the LED in Arduino, simply add the code below. You are free to change TONLED and TOFFLED to whatever names you want. Just don’t forget to adjust the Arduino code as well.
public void onClickToggle(View view) {
 if (isLedON == false) {
 isLedON = true;
 tvAppend(displayView, "\nLED TURNED ON\n");
 serialPort.write("TONLED".getBytes());
 } else {
 isLedON = false;
 serialPort.write("TOFFLED".getBytes());
 tvAppend(displayView, "\nLED TURNED OFF\n");
 }
}
You can close the connection using:
serialPort.close();
We are almost done. In your manifest file, add the following so that your application will be notified of an attached USB device.
<?xml version="1.0" encoding="utf-8"?>
<manifest xmlns:android="http://schemas.android.com/apk/res/android"
 package="yourpackage.com.name">
 <uses-feature android:name="android.hardware.usb.host" />
 <application
 android:allowBackup="true"
 android:icon="@mipmap/ic_launcher"
 android:label="@string/app_name"
 android:supportsRtl="true"
 android:theme="@style/AppTheme">
 <activity
 android:name=".MainActivity"
 android:label="@string/app_name"
 android:theme="@style/AppTheme.NoActionBar">
 <intent-filter>
 <action android:name="android.intent.action.MAIN" />
 <category android:name="android.intent.category.LAUNCHER" />
 </intent-filter>
 <intent-filter>
 <action android:name="android.hardware.usb.action.USB_DEVICE_ATTACHED" />
 </intent-filter>
 <meta-data
 android:name="android.hardware.usb.action.USB_DEVICE_ATTACHED"
 android:resource="@xml/device_filter" />
 <intent-filter>
 <action android:name="android.hardware.usb.action.USB_DEVICE_DETACHED" />
 </intent-filter>
 </activity>
 </application>
</manifest>
Create an xml folder inside the res folder and add device_filter.xml
<?xml version="1.0" encoding="utf-8"?>
<resources>
 <usb-device
 vendor-id="9025"/>
</resources>
And… were done! Additional tips, we can add a checker to confirm that the serial connection is already open. This saves us from crashes due to attempts to send serial data while the connection is still closed. We can also add clear buttons, or place the text view inside a scroll view then automatically scroll to end of page using:
mScrollView.smoothScrollTo(0, displayView.getBottom());
That’s it. If you want to extend your phone’s sensors, or if you want to add storage, wireless and messaging capability, camera and orientation sensors in your microprocessor project with just one device, USB On-the-Go, may be your way to go.
A demo application, SimpleArDroid by YMSoftLabs can be downloaded from Google Play. Here's a video of how the system works.
[フレーム]
References:
UsbSerial: A serial port driver library for Android v3.0
USBSerial
Communicate with Your Arduino Through Android
Thursday, October 14, 2010
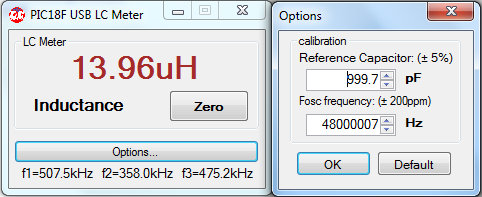
PIC18F USB LC Meter
Inductance and Capacitance Meter using Microchip's PIC18F2550 connected to USB using HID class (Plug-n-Play).
* f1, f2. and f3 are the frequencies defined by the equations stated on Digital LC Meter .
diagram using internal Analog Comparator and Timer Peripherals of PIC18:
download link (HEX and PC app): PIC18F2550_USB-HID_LC-Meter.zip
elab.ph forum link: PIC18F2550 USB LC Meter
# edit (10-20-10)
added "Calibration option" ( same PIC18F firmware )
# edit (08-14-11)
V1.2 -> updated host-side application,
-> should now work both on 32-bit OS and 64-bit OS hosts.
* f1, f2. and f3 are the frequencies defined by the equations stated on Digital LC Meter .
diagram using internal Analog Comparator and Timer Peripherals of PIC18:
schematic with actual values:
*simulation on Proteus 7 is NOT working (particularly the LC oscillator part and internal pull-up on RB0)
download link (HEX and PC app): PIC18F2550_USB-HID_LC-Meter.zip
elab.ph forum link: PIC18F2550 USB LC Meter
# edit (10-20-10)
added "Calibration option" ( same PIC18F firmware )
- reference capacitance range is 1.0nF +/- 5%
- Fosc (20MHz crystal with PLL) frequency range is 48MHz +/- 200ppm
# edit (08-14-11)
V1.2 -> updated host-side application,
-> should now work both on 32-bit OS and 64-bit OS hosts.
Sunday, December 6, 2009
USB-based Oscilloscope (beta)
This is NOT considered as an oscilloscope yet. It's just a preparation of making a real PIC18F USB-based oscilloscope. For my initial testing, I used my PIC18F and PyUSB demo, same hardware and firmware for the 18F2550. The only difference is in the GUI, instead of PyQt QDial, I use PyQwt PlotCurve widget.
the Python script: (compatible with my Portable Eric 4 Python IDE (v2))
Right now, my problem is on the 18F2550 side. I still don't know how to use both the USB and ADC interrupts together. My first modification on PIC's firmware was no success. When I enabled the ADC interrupt routine, the whole program response slows down. I still have to read properly the datasheet(plus application notes), and ask for help of the 'masters'. What I'm currently doing on the code is reading a single byte of ADC value every 200ms (very slow!). From what I've understand, the PIC can (it should) send 64 bytes for every USB interrupt read request. I don't know how fast it is, but it will surely improve the PIC18F USB-based oscilloscope.
the Python script: (compatible with my Portable Eric 4 Python IDE (v2))
 #################################
 # USB-based oscillpscope (beta)
 # using pyUSB and PyQt/PyQwt
 #################################

 import sys, usb
 from PyQt4.QtCore import *
 from PyQt4.QtGui import *
 from PyQt4.Qwt5 import *
 from PyQt4.Qwt5.anynumpy import *

 class UsbPic:
 def __init__(self, vendor_id, product_id):
 busses = usb.busses() # enumerate busses
 self.handle = None
 for bus in busses:
 devices = bus.devices
 for dev in devices:
 if dev.idVendor==vendor_id and dev.idProduct==product_id: # device matches
 self.dev = dev
 self.conf = self.dev.configurations[0]
 self.intf = self.conf.interfaces[0][0]
 self.endpoints = []
 for endpoint in self.intf.endpoints:
 self.endpoints.append(endpoint)
 return

 def open(self):
 if self.handle:
 self.handle = None
 try:
 self.handle = self.dev.open()
 self.handle.detachKernelDriver(0)
 self.handle.detachKernelDriver(1)
 self.handle.setConfiguration(self.conf)
 self.handle.claimInterface(self.intf)
 self.handle.setAltInterface(self.intf)
 return True
 except:
 return False

 def write(self, ep, buff, timeout = 100):
 try:
 return self.handle.interruptWrite(ep, buff, timeout) #return bytes written
 except:
 return 0
 def read(self, ep, size, timeout = 100):
 try:
 return self.handle.interruptRead(ep, size, timeout) # return data read
 except:
 return []
 def getDeviceName(self):
 return self.handle.getString(2, 40)

 class AmplitudevsTime(QwtPlot):
 def __init__(self):
 QwtPlot.__init__(self)
 self.setTitle("<font size=1 color=darkblue>Potentiometer Position ( 8-bit ADC value )</font>")
 self.setCanvasBackground(Qt.black)
 #grid
 grid = QwtPlotGrid()
 #grid.enableXMin(True)
 #grid.enableYMin(True)
 grid.setMajPen(QPen(Qt.darkGreen, 0, Qt.DotLine))
 grid.setMinPen(QPen(Qt.darkGreen, 0 , Qt.DotLine))
 grid.attach(self)
 # x-axis
 self.setAxisTitle(QwtPlot.xBottom, "<font size=1 color=darkred>time (seconds)</font>")
 self.timerange = arange(0.0, 60, 0.2) #60 seconds, 200 ms interval
 self.amplitudes = zeros(len(self.timerange), Float)
 # curve
 self.amplitude_plot = QwtPlotCurve('Amplitude')
 self.setAxisScale(QwtPlot.yLeft, 0, 255) #amplitude range : 0 to 255
 self.setAxisScale(QwtPlot.xBottom, 0, 60) #time range: 0 to 60 seconds
 self.amplitude_plot.setPen(QPen(Qt.yellow))
 self.amplitude_plot.attach(self)

 def updatePlot(self, new_value=0):
 # shift amplitude array left and assign new value to z[n-1].
 self.amplitudes = concatenate((self.amplitudes[1:], self.amplitudes[:1]), 1)
 self.amplitudes[-1] = new_value
 self.amplitude_plot.setData(self.timerange, self.amplitudes)
 self.replot()

 class MyForm(QDialog):
 def __init__(self, parent = None):
 super(MyForm, self).__init__(parent)
 self.setWindowTitle("USB-based Oscilloscope (Beta) - pYUSb + PIC18F2550")
 self.setMinimumSize(560, 300)
 # create widgets/controls
 self.connect_btn = QPushButton('Connect')
 self.toggle1_btn = QPushButton('Toggle LED1')
 self.toggle2_btn = QPushButton('Toggle LED2')
 self.status_label = QLabel('press "Connect" button')
 self.update_timer = QTimer()

 self.display = AmplitudevsTime()

 layout = QGridLayout()
 layout.addWidget(self.display, 0, 0, 10, 15)
 layout.addWidget(self.toggle1_btn, 2, 15)
 layout.addWidget(self.toggle2_btn, 2, 16)
 layout.addWidget(self.connect_btn, 7, 15)
 layout.addWidget(self.status_label, 4, 15, 2, 2)
 self.setLayout(layout)
 # widgets initial condition
 self.toggle1_btn.setEnabled(False)
 self.toggle2_btn.setEnabled(False)
 # signals
 self.connect(self.connect_btn, SIGNAL("clicked()"), self.DeviceConnect)
 self.connect(self.toggle1_btn, SIGNAL("clicked()"), self.toggleLED1)
 self.connect(self.toggle2_btn, SIGNAL("clicked()"), self.toggleLED2)
 self.connect(self.update_timer, SIGNAL("timeout()"), self.updateDisplay)

 def DeviceConnect(self):
 self.device = UsbPic(0x04d8, 0x0204) # Microchip Vendor ID and Product ID
 if self.device.open():
 self.toggle1_btn.setEnabled(True)
 self.toggle2_btn.setEnabled(True)
 self.update_timer.start(200) # update every 200ms
 self.status_label.setText('Connected to:\n %s' %self.device.getDeviceName())
 else:
 self.toggle1_btn.setEnabled(False)
 self.toggle2_btn.setEnabled(False)
 self.update_timer.stop()
 self.status_label.setText('Warning:\n No Device Found!')
 def toggleLED1(self):
 self.device.write(1, [0x80], 1000)
 def toggleLED2(self):
 self.device.write(1, [0x82], 1000)
 def updateDisplay(self):
 self.device.write(1, [0x81])
 byteread = self.device.read(0x81, 64)
 if len(byteread)>1:
 self.display.updatePlot(byteread[1])

 if __name__ == "__main__":
 app = QApplication(sys.argv)
 form = MyForm()
 form.show()
 sys.exit(app.exec_())
Right now, my problem is on the 18F2550 side. I still don't know how to use both the USB and ADC interrupts together. My first modification on PIC's firmware was no success. When I enabled the ADC interrupt routine, the whole program response slows down. I still have to read properly the datasheet(plus application notes), and ask for help of the 'masters'. What I'm currently doing on the code is reading a single byte of ADC value every 200ms (very slow!). From what I've understand, the PIC can (it should) send 64 bytes for every USB interrupt read request. I don't know how fast it is, but it will surely improve the PIC18F USB-based oscilloscope.
Labels:
instrumentation,
Microchip PIC mcu,
PC programming,
USB
Saturday, November 21, 2009
PIC18F and PyUSB
I finally got a clearer idea on how to use the PyUSB libray. PyUSB is simply a python binding/wrapper for libusb. There are only few examples of python scripts I found on the net regarding the use of PyUSB. Also, the documentation for PyUSB is not that comprehensive yet.
On the USB device side, fortunately, Microchip has provide a LibUSB example for their PICDEM Full Speed USB demo board. Aside from the firmware for the PIC18F4550 family (includes PIC18F2550), they also provided a simple demo (Windows) application (with source codes for MSVC++ and Qt). It's a good opportunity to study LibUSB library along its generic usb device driver.
After some trial&errors on my python script, I finally made my PyQt GUI program working. (Most of my mistakes on the PyUSB module usage were the incorrect types of arguments used in the pyusb functions).
Below is my proto circuit. Basically it's the same circuit I used in my PIC18F2550 USB HID Mouse project. I only added two LEDs on RB0 and RB1 pins of pic18f2550. I also included a 10k potentiometer on RA0 pin (ADC ANA0).
I made a minimal modification on the LibUSB example firmware by Microchip so that it will be compatible with PyUSB demo python script:
then, the generated hex code for PIC18F2550 device using C18 compiler:
here's my python script for PyUSB (also uses PyQt for the GUI):
And finally, the actual circuit in action:
[フレーム]
additional useful links:
Microchip USB Framework for PIC18, PIC24 & PIC32
LibUSB Win32
On the USB device side, fortunately, Microchip has provide a LibUSB example for their PICDEM Full Speed USB demo board. Aside from the firmware for the PIC18F4550 family (includes PIC18F2550), they also provided a simple demo (Windows) application (with source codes for MSVC++ and Qt). It's a good opportunity to study LibUSB library along its generic usb device driver.
After some trial&errors on my python script, I finally made my PyQt GUI program working. (Most of my mistakes on the PyUSB module usage were the incorrect types of arguments used in the pyusb functions).
Below is my proto circuit. Basically it's the same circuit I used in my PIC18F2550 USB HID Mouse project. I only added two LEDs on RB0 and RB1 pins of pic18f2550. I also included a 10k potentiometer on RA0 pin (ADC ANA0).
I made a minimal modification on the LibUSB example firmware by Microchip so that it will be compatible with PyUSB demo python script:
 /*
 Filename: main.c
 */

 /** INCLUDES *********************/
 #include "Compiler.h"
 #include "HardwareProfile.h"
 #include "GenericTypeDefs.h"
 #include "USB/usb_device.h"
 #include "USB/usb.h"
 #include "USB/usb_function_generic.h"
 #include "usb_config.h"

 /** CONFIGURATION ****************/
 #pragma config PLLDIV = 5 // (20 MHz crystal on PICDEM FS USB board)
 #pragma config CPUDIV = OSC1_PLL2
 #pragma config USBDIV = 2 // Clock source from 96MHz PLL/2
 #pragma config FOSC = HSPLL_HS
 #pragma config FCMEN = OFF
 #pragma config IESO = OFF
 #pragma config PWRT = OFF
 #pragma config BOR = ON
 #pragma config BORV = 3
 #pragma config VREGEN = ON //USB Voltage Regulator
 #pragma config WDT = OFF
 #pragma config MCLRE = ON
 #pragma config LPT1OSC = OFF
 #pragma config PBADEN = OFF
 #pragma config STVREN = ON
 #pragma config LVP = OFF
 #pragma config XINST = OFF // Extended Instruction Set
 #pragma config CP0 = OFF
 #pragma config CP1 = OFF
 #pragma config CPB = OFF
 #pragma config WRT0 = OFF
 #pragma config WRT1 = OFF
 #pragma config WRTB = OFF // Boot Block Write Protection
 #pragma config WRTC = OFF
 #pragma config EBTR0 = OFF
 #pragma config EBTR1 = OFF
 #pragma config EBTRB = OFF

 /** VARIABLES ******************************************************/
 #pragma udata USB_VARIABLES=0x500

 unsigned char OUTPacket[64]; //User application buffer for receiving and holding OUT packets sent from the host
 unsigned char INPacket[64]; //User application buffer for sending IN packets to the host
 #pragma udata

 USB_HANDLE USBGenericOutHandle;
 USB_HANDLE USBGenericInHandle;
 #pragma udata

 /** PRIVATE PROTOTYPES *********************************************/
 static void InitializeSystem(void);
 void USBDeviceTasks(void);
 void YourHighPriorityISRCode(void);
 void YourLowPriorityISRCode(void);
 void ProcessIO(void);

 /** VECTOR REMAPPING ***********************************************/
 #define REMAPPED_RESET_VECTOR_ADDRESS 0x00
 #define REMAPPED_HIGH_INTERRUPT_VECTOR_ADDRESS 0x08
 #define REMAPPED_LOW_INTERRUPT_VECTOR_ADDRESS 0x18

 #pragma code REMAPPED_HIGH_INTERRUPT_VECTOR = REMAPPED_HIGH_INTERRUPT_VECTOR_ADDRESS
 void Remapped_High_ISR (void)
 {
 _asm goto YourHighPriorityISRCode _endasm
 }
 #pragma code REMAPPED_LOW_INTERRUPT_VECTOR = REMAPPED_LOW_INTERRUPT_VECTOR_ADDRESS
 void Remapped_Low_ISR (void)
 {
 _asm goto YourLowPriorityISRCode _endasm
 }

 #pragma code
 //These are your actual interrupt handling routines.
 #pragma interrupt YourHighPriorityISRCode
 void YourHighPriorityISRCode()
 {
 USBDeviceTasks();
 } //This return will be a "retfie fast", since this is in a #pragma interrupt section
 #pragma interruptlow YourLowPriorityISRCode
 void YourLowPriorityISRCode()
 {
 }

 /** DECLARATIONS ***************************************************/
 #pragma code

 //////////////////////////////////////////////////////////////////////
 void main(void)
 {
 InitializeSystem();
 USBDeviceAttach();
 while(1)
 {
 ProcessIO();
 }
 }

 static void InitializeSystem(void)
 {
 ADCON1 |= 0x0F; // Default all pins to digital

 USBGenericOutHandle = 0;
 USBGenericInHandle = 0;

 InitLEDs();
 InitPot();
 USBDeviceInit(); //usb_device.c. Initializes USB module SFRs and firmware variables to known states.
 }

 ////////////////////////////////////////////////////////////
 void ProcessIO(void)
 {
 if((USBDeviceState < CONFIGURED_STATE)||(USBSuspendControl==1)) return;
 if(!USBHandleBusy(USBGenericOutHandle)) //Check if the endpoint has received any data from the host.
 {
 switch(OUTPacket[0]) //Data arrived, check what kind of command might be in the packet of data.
 {
 case 0x80: // toggle LED1 (command from PC application)
 LED1 = !LED1;
 break;
 case 0x82: // toggle LED2
 LED2 = !LED2;
 break;
 case 0x81: //Get potentiometer position
 adc_status = 1; // start a/d conversion
 INPacket[0] = 0x81;
 while(adc_status); // wait for the a/d conversion to complete (or use interrupt)
 INPacket[1] = ADRESH; //read only 8-bit adc value (left justified)
 if(!USBHandleBusy(USBGenericInHandle))
 USBGenericInHandle = USBGenWrite(USBGEN_EP_NUM,(BYTE*)&INPacket,USBGEN_EP_SIZE);
 break;
 }

 USBGenericOutHandle = USBGenRead(USBGEN_EP_NUM,(BYTE*)&OUTPacket,USBGEN_EP_SIZE);
 }
 }//end ProcessIO


 /*********** USB Callback Functions ****************/
 void USBCBSuspend(void)
 {
 }

 void USBCBWakeFromSuspend(void)
 {
 }

 void USBCB_SOF_Handler(void)
 {
 }

 void USBCBErrorHandler(void)
 {
 }

 void USBCBCheckOtherReq(void)
 {
 }

 void USBCBStdSetDscHandler(void)
 {
 }

 void USBCBInitEP(void)
 {
 USBEnableEndpoint(USBGEN_EP_NUM,USB_OUT_ENABLED|USB_IN_ENABLED|USB_HANDSHAKE_ENABLED|USB_DISALLOW_SETUP);
 USBGenericOutHandle = USBGenRead(USBGEN_EP_NUM,(BYTE*)&OUTPacket,USBGEN_EP_SIZE);
 }

 void USBCBSendResume(void)
 {
 static WORD delay_count;
 USBResumeControl = 1; // Start RESUME signaling
 delay_count = 1800U; // Set RESUME line for 1-13 ms
 do{
 delay_count--;
 }while(delay_count);
 USBResumeControl = 0;
 }

 BOOL USER_USB_CALLBACK_EVENT_HANDLER(USB_EVENT event, void *pdata, WORD size)
 {
 switch(event)
 {
 case EVENT_CONFIGURED:
 USBCBInitEP();
 break;
 case EVENT_SET_DESCRIPTOR:
 USBCBStdSetDscHandler();
 break;
 case EVENT_EP0_REQUEST:
 USBCBCheckOtherReq();
 break;
 case EVENT_SOF:
 USBCB_SOF_Handler();
 break;
 case EVENT_SUSPEND:
 USBCBSuspend();
 break;
 case EVENT_RESUME:
 USBCBWakeFromSuspend();
 break;
 case EVENT_BUS_ERROR:
 USBCBErrorHandler();
 break;
 case EVENT_TRANSFER:
 Nop();
 break;
 default:
 break;
 }
 return TRUE;
 }
then, the generated hex code for PIC18F2550 device using C18 compiler:
 :020000040000FA
 :060000008AEF0AF0120075
 :0600080073EF08F0120086
 :06001800BEEF08F012002B
 :02002A000000D4
 :04002C00D9CFE6FF43
 :10003000E1CFD9FFE6526A6A686A160E6F6E9F0EAC
 :100040006B6E7B0E696E6D8C6E6A000EE66EE66AF4
 :10005000E66A710EE66E0F0EE66E70EC0AF00B6E3D
 :10006000050EE15E0B506D9CDF6ADF500B6E0C6A73
 :10007000080E0B5C000E0C5810E2DF50040DF3CF9D
 :10008000E9FFF4CFEAFF000EE926040EEA22EE6A49
 :10009000EE6AEE6AEE6ADF2AE8D7160E706E68A680
 :1000A0000CD0030EE66E680EE66E0F0EE66E39ECAF
 :1000B00008F0E552E552E552F2D70001736B786B18
 :1000C000796B7A6B6D98080E6B6F040E6C6F616BB9
 :1000D000606BE552E552E7CFD9FF1200D9CFE6FFBA
 :1000E000E1CFD9FFE6520001600507E16DBA05D006
 :1000F000686A69806988020E606F6850040B0FE0BF
 :100100006950040B0CE0020EE66E680EE66E0F0EF0
 :10011000E66E39EC08F0E552E552E552E9D86DA2F9
 :1001200002D0A19AA1D06850010B1BE06950010BCD
 :1001300018E07CDF0001040E606F0401200E026FE6
 :10014000040E036F080E016F006B8C0E0013E66A3D
 :10015000680EE66E0F0EE66E39EC08F0E552E552D9
 :10016000E5526850100B0FE06950100B0CE0A4D85A
 :10017000040EE66E680EE66E0F0EE66E39EC08F0C1
 :10018000E552E552E5526850400B1DE06950400BC6
 :100190001AE0010EE66EE66A000EE66EE66A020EF0
 :1001A000E66EE66A7DEC09F00B6E060EE15E0B5022
 :1001B000060EE66E680EE66E0F0EE66E39EC08F07F
 :1001C000E552E552E5526850200B04E06950200BDF
 :1001D00001E04FD86850020B12E06950020B0FE0AB
 :1001E000010EE66EE66A000EE66EE66AE668E6680E
 :1001F0007DEC09F00B6E060EE15E0B506A6A040E90
 :100200000001605D02E2A19A2FD069A62CD0DF6ABE
 :10021000040EDF5C28E268A625D06CCF80F0030EC8
 :10022000E66E680EE66E0F0EE66E39EC08F0E552EB
 :10023000E552E552780E0001801502E178D810D021
 :10024000000EE66EE66A800EE66E000EE66E010EA9
 :10025000E66EE66A7DEC09F00B6E060EE15E0B5071
 :10026000DF2AD6D700D0A19AE552E552E7CFD9FFD1
 :10027000120070A015D063C0E9FF64C0EAFFEF5020
 :1002800080080DE16BC0E9FF6CC0EAFFEF50840805
 :1002900006E163C0E9FF64C0EAFF8C0EEF6E709068
 :1002A000050EE66E680EE66E0F0EE66E39EC08F08F
 :1002B000E552E552E55212006984040EE66E680EBE
 :1002C000E66E0F0EE66E39EC08F0E552E552E552A7
 :1002D0006D82000EE66EE66AE66EE66A040EE66E73
 :1002E000E66A7DEC09F00B6E060EE15E0B50120023
 :1002F000000EE66EE66AE66EE66A030EE66EE66AF3
 :100300007DEC09F00B6E060EE15E0B506D92699468
 :1003100068A40CD0020EE66E680EE66E0F0EE66E56
 :1003200039EC08F0E552E552E552F2D71200D9CF88
 :10033000E6FFE1CFD9FFE652FD0E000180155AE13C
 :100340007E0E8015E8407F0B040DF3CF63F0F4CFF1
 :1003500064F0000E6327040E642363C065F064C07C
 :1003600066F0657563C0E9FF64C0EAFFEF503C0BBF
 :10037000E842E8420D083CE163C0E9FF64C0EAFFDF
 :10038000020EE926000EEA22EECF0BF0EFCF0CF0C2
 :10039000280E0B1802E1040E0C1828E163C0E9FFD7
 :1003A00064C0EAFF020EE926000EEA22200EEE6E7D
 :1003B000040EED6EDF6ADF500B6E0C6A080E0B5CEC
 :1003C000000E0C5813E2DF50EA6A280FE96E040EA3
 :1003D000EA22EF50E66EDF50EA6A200FE96E040E63
 :1003E000EA22E552E750EF6EDF2AE5D70DD801D0BB
 :1003F0002ED805D0FD0E8015040801E14ED8E55237
 :10040000E552E7CFD9FF12006BC0E9FF6CC0EAFFED
 :10041000EF50800B05E06BC0E9FF6CC0EAFFEF6AAC
 :1004200000016F6B706B746B756B736BB6D8000EDD
 :10043000E66EE66AE66EE66A170EE66EE66A7DEC42
 :1004400009F00B6E060EE15E0B5079EF04F0020E20
 :100450000001705D02E1ADDB1FD06CD8000181515D
 :100460001AE165C0E9FF66C0EAFFEE52080EEF6EC2
 :1004700065C0E9FF66C0EAFF020EE926000EEA2227
 :10048000200EEE6E040EED6E65C0E9FF66C0EAFF59
 :100490008C0EEF6E01D0816B1200D9CFE6FFE1CF59
 :1004A000D9FFE6526BC0E9FF6CC0EAFFEF50400B8A
 :1004B00001E0010EDF6E00016B75080E605D0AE160
 :1004C00022C46EFF6E50000803E2100E606F02D06F
 :1004D000040E606F700528E16BC0E9FF6CC0EAFF95
 :1004E000020EE926000EEA22280EEE6E040EED6ED4
 :1004F000D5DA020E00016F5D07E16BC0E9FF6CC049
 :10050000EAFF840EEF6E0FD0DF5007E16BC0E9FF0A
 :100510006CC0EAFFC80EEF6E06D06BC0E9FF6CC07E
 :10052000EAFF880EEF6E01D005D8E552E552E7CF1D
 :10053000D9FF1200D9CFE6FFE1CFD9FF020EE126A5
 :100540000001706B6BC0E9FF6CC0EAFFEF6A040E3C
 :100550006B190B6E6CC00CF00BC0DEFF0CC0DDFF26
 :10056000DECFE9FFDDCFEAFFEF6A78AF0CD07B5139
 :100570007C1107E005D07CC0FAFF00017B51F96EC9
 :10058000FADF0001789F020EE15C02E2E16AE552C7
 :10059000E16EE552E7CFD9FF120004012051600B54
 :1005A000E842E842E842E842E842000901E058D067
 :1005B00021510C0A54E00B0A43E00C0A35E0010A11
 :1005C00026E00B0A22E0020A20E0030A1CE0080AE7
 :1005D00010E0010A0CE00F0A08E0030A01E03FD036
 :1005E0000001738F080E606F3BD0C8D839D07FDB15
 :1005F00037D00001610E716F000E726F7381010EB2
 :10060000746F738F2DD014D92BD02BD829D02451AF
 :100610000001716F726B620E7127000E722373817D
 :10062000010E746F738F1CD00001738F040124516D
 :10063000EA6A620FE96E000EEA2222C4EFFF10D0D0
 :10064000000EE66EE66AE66EE66A160EE66EE66A8C
 :100650007DEC09F00B6E060EE15E0B5001D000D070
 :100660001200D9CFE6FFE1CFD9FF040EE126040145
 :10067000220510E120511F0B00090CE10001738FCE
 :10068000030E0401215D04E10001010E7F6F02D021
 :1006900000017F6B0401225167E120511F0B02080A
 :1006A00063E124510F0B00095FE00001738F040127
 :1006B00024BF10D024510F0BE96EEA6AD890E936B6
 :1006C000EA36670EE926000EEA22EECFDEFFEDCF16
 :1006D000DDFF0FD024510F0BE96EEA6AD890E9369E
 :1006E000EA366B0EE926000EEA22EECFDEFFEDCFF2
 :1006F000DDFF030E215D07E1DECFE9FFDDCFEAFF7D
 :10070000840EEF6E31D024510F0B0C6A700F0B6EFC
 :100710000F0E0C22020E0BC0DBFF030E0CC0DBFF22
 :10072000020EDBCFE9FF030EDBCFEAFFEE90ED52C6
 :1007300024AF0DD0DECFE9FFDDCFEAFFEF6ADF7433
 :10074000DECFE9FFDDCFEAFF400EEF6E0DD0DECF4A
 :10075000E9FFDDCFEAFF880EEF6EDF74DECFE9FF41
 :10076000DDCFEAFFC80EEF6E040EE15C02E2E16A43
 :10077000E552E16EE552E7CFD9FF1200800E040189
 :10078000205D55E10001C00E736F04012351030A7F
 :100790002EE0010A0EE0030A03E00001736B47D06C
 :1007A0000001900E716F130E726F120E746F756BE5
 :1007B0003ED02251F66EF76AD890F636F7363A0EEA
 :1007C000F626140EF7220900F5CF71F00A00F5CFD6
 :1007D00072F0020E0001F76A7125F66E7251F7226F
 :1007E0000900F5CF74F00A00F5CF75F020D0030EA4
 :1007F000225D1AE22251F66EF76AD890F636F73685
 :100800003C0EF626140EF7220900F5CF71F00A000F
 :10081000F5CF72F071C0F6FF72C0F7FF0800F55017
 :100820000001746F756B02D00001736B00D0120071
 :10083000D9CFE6FFE1CFD9FF020EE1260401286BF4
 :10084000296B20511F0B020A12E0030A0DE0010A76
 :1008500001E03BD00001738F0401288100017F0576
 :1008600002E10401288331D00001738F2ED00001F2
 :10087000738F040124BF10D024510F0BE96EEA6A74
 :10088000D890E936EA36670EE926000EEA22EECF66
 :10089000DEFFEDCFDDFF0FD024510F0BE96EEA6ACA
 :1008A000D890E936EA366B0EE926000EEA22EECF42
 :1008B000DEFFEDCFDDFFDECFE9FFDDCFEAFFEF505A
 :1008C000040B02E0010E286F00D0000173AF07D0C7
 :1008D000280E716F040E726F7381020E746F020E18
 :1008E000E15C02E2E16AE552E16EE552E7CFD9FF51
 :1008F00012006D98000173BF4AD078AF28D0020E65
 :10090000706F6BC0E9FF6CC0EAFFEE52EF6A6BC01C
 :10091000E9FF6CC0EAFFC80EEF6E65C0E9FF66C074
 :10092000EAFFEE52080EEF6E65C0E9FF66C0EAFF0F
 :10093000020EE926000EEA22280EEE6E040EED6E7F
 :1009400065C0E9FF66C0EAFFC80EEF6E1FD065C044
 :10095000E9FF66C0EAFFEE52080EEF6E65C0E9FFE0
 :1009600066C0EAFF020EE926000EEA22200EEE6EB5
 :10097000040EED6E65C0E9FF66C0EAFF8C0EEF6EF7
 :100980006BC0E9FF6CC0EAFF840EEF6E86D078BFC3
 :1009900084D0040120AF59D0000174510401265DB8
 :1009A000000175510401275904E226C474F027C4DC
 :1009B00075F074D80001010E706F65C0E9FF66C064
 :1009C000EAFFEE52080EEF6E65C0E9FF66C0EAFF6F
 :1009D000020EE926000EEA22200EEE6E040EED6EE7
 :1009E00065C0E9FF66C0EAFF800EEF6E816B63C0F1
 :1009F000E9FF64C0EAFFEE52080EEF6E63C0E9FF44
 :100A000064C0EAFF020EE926000EEA22200EEE6E16
 :100A1000040EED6E63C0E9FF64C0EAFF840EEF6E62
 :100A2000010E816F6BC0E9FF6CC0EAFF020EE92680
 :100A3000000EEA22280EEE6E040EED6E6BC0E9FF8A
 :100A40006CC0EAFFC80EEF6E28D00001020E706F76
 :100A50006BC0E9FF6CC0EAFFEE52EF6A6BC0E9FFC2
 :100A60006CC0EAFFC80EEF6E65C0E9FF66C0EAFF22
 :100A7000EE52080EEF6E65C0E9FF66C0EAFF020E97
 :100A8000E926000EEA22280EEE6E040EED6E65C019
 :100A9000E9FF66C0EAFFC80EEF6E1200D9CFE6FF8D
 :100AA000E1CFD9FF020EE1260001080E745D000EB1
 :100AB00075590EE274C0DEFF75C0DDFF6F5103E1B2
 :100AC000010E6F6F04D06F0502E1020E6F6F03D04D
 :100AD000080EDE6EDD6A6BC0E9FF6CC0EAFFEF92C4
 :100AE0006BC0E9FF6CC0EAFFEF906BC0E9FF6CC020
 :100AF000EAFF010EDB50EF126BC0E9FF6CC0EAFFAA
 :100B0000EE52DFCFEFFF000EDB50745F010EDB50C3
 :100B1000755B280E7D6F040E7E6F73B121D0D9CF27
 :100B2000E9FFDACFEAFFEE50ED1019E071C0F6FFF1
 :100B300072C0F7FF712B000E72230800F550E66EAD
 :100B40007DC0E9FF7EC0EAFF7D2B000E7E23E552CB
 :100B5000E750EF6EDF06010E01E2DB06E0D71FD0A3
 :100B6000D9CFE9FFDACFEAFFEE50ED1018E071C0FF
 :100B7000E9FF72C0EAFF712B000E7223EF50E66EA0
 :100B80007DC0E9FF7EC0EAFF7D2B000E7E23E5528B
 :100B9000E750EF6EDF06010E01E2DB06E1D7020E41
 :100BA000E15C02E2E16AE552E16EE552E7CFD9FF8E
 :100BB0001200D9CFE6FFE1CFD9FF020EE12663C0D4
 :100BC000E9FF64C0EAFFEE52EFCFDFFFDFCF0BF0AB
 :100BD0000B500001795D000E7A5903E279C0DFFF06
 :100BE00009D0DF500B6E0C6A0B50795D796F0C5099
 :100BF0007A597A6F010EDB6ADF50F36E010EDBCF9C
 :100C0000F4FFF350F45C16E2010EDB50EA6A280FA1
 :100C1000E96E040EEA22EF50E66E76C0E9FF77C077
 :100C2000EAFF762B000E7723E552E750EF6E010EB8
 :100C3000DB2AE2D7000ED8807955000E7A5528E2DB
 :100C400065C0E9FF66C0EAFFEE52080EEF6E65C0B0
 :100C5000E9FF66C0EAFF020EE926000EEA22280E2E
 :100C6000EE6E040EED6E63C0E9FF64C0EAFFEF5064
 :100C7000400B07E165C0E9FF66C0EAFFC80EEF6EF2
 :100C800006D065C0E9FF66C0EAFF880EEF6E25D08A
 :100C900065C0E9FF66C0EAFFEE52080EEF6E65C060
 :100CA000E9FF66C0EAFF020EE926000EEA22200EE6
 :100CB000EE6E040EED6E65C0E9FF66C0EAFF840EBD
 :100CC000EF6E7B517C1107E005D07CC0FAFF00017C
 :100CD0007B51F96EFADF0001789F020EE15C02E2BF
 :100CE000E16AE552E16EE552E7CFD9FF120000015B
 :100CF000738F000EE66EE66AE66A710EE66E0F0E00
 :100D0000E66E70EC0AF00B6E050EE15E0B50010E04
 :100D1000E66EE66AE66A620EE66E000EE66E70EC5D
 :100D20000AF00B6E050EE15E0B5022C461F0040167
 :100D3000225104E10001100E606F11D00001200E5D
 :100D4000606F000EE66EE66AE66EE66A150EE66E07
 :100D5000E66A7DEC09F00B6E060EE15E0B501200A8
 :100D6000D9CFE6FFE1CFD9FF020EE126000EDE6EFD
 :100D7000040EDD6EFD0EDB50E8240D6EFE0EDB5022
 :100D8000040DF3500D24040DF3500B6E0C6A020E8B
 :100D90000F0B05E0D8900C320B32E806FBE1D8903F
 :100DA0000B360C36D8900B360C36D9CFE9FFDACF9C
 :100DB000EAFF0B50EE260C50ED22DECFE9FFDDCF2F
 :100DC000EAFFEF9EFD0EDB500FE1FE0EEA6ADB3418
 :100DD000FE0BEA36E96E670EE926000EEA22DECF48
 :100DE000EEFFDDCFEDFF0ED0FE0EEA6ADB34FE0B28
 :100DF000EA36E96E6B0EE926000EEA22DECFEEFF40
 :100E0000DDCFEDFFDECFE9FFDDCFEAFFEF9CDECFE8
 :100E1000E9FFDDCFEAFF040EE926000EEA22EF8C9F
 :100E2000020EE15C02E2E16AE552E16EE552E7CFD3
 :100E3000D9FF1200D9CFE6FFE1CFD9FF020EE1269C
 :100E4000FE0EDB500C6A700F0B6E0F0E0C220BC0E7
 :100E5000DEFF0CC0DDFFDECFE9FFDDCFEAFFFD0ED8
 :100E6000DBCFEFFFDBA407D0E66AFE0EDBCFE6FFA9
 :100E700077DFE552E552FD0EDBA208D0010EE66EEB
 :100E8000FE0EDBCFE6FF6CDFE552E552020EE15CC1
 :100E900002E2E16AE552E16EE552E7CFD9FF1200C6
 :100EA000D9CFE6FFE1CFD9FF020EE126FE0EDB50DF
 :100EB00020E165C0E9FF66C0EAFFEE52080EEF6E62
 :100EC00065C0E9FF66C0EAFF020EE926000EEA22CD
 :100ED000200EEE6E040EED6E65C0E9FF66C0EAFFFF
 :100EE0008C0EEF6E6BC0E9FF6CC0EAFF840EEF6EF4
 :100EF0003DD0FD0EDB50E8240D6EFE0EDB50040DE0
 :100F0000F3500D24040DF3CF0BF0F4CF0CF0000ED2
 :100F10000B26040E0C220BC0DEFF0CC0DDFF840E7E
 :100F20000B6EDECFE9FFDDCFEAFF0B50EF12FD0EB7
 :100F3000DB50E8240D6EFE0EDB50040DF3500D2443
 :100F4000010F040DF3CF0BF0F4CF0CF0000E0B26C5
 :100F5000040E0C220BC0DEFF0CC0DDFF840E0B6EF6
 :100F6000DECFE9FFDDCFEAFF0B50EF12020EE15CAE
 :100F700002E2E16AE552E16EE552E7CFD9FF1200E5
 :100F8000D9CFE6FFE1CFD9FF020EE126FD0EDB50FF
 :100F90000FE0FE0EEA6ADB34FE0BEA36E96E6B0EFA
 :100FA000E926000EEA22EECFDEFFEDCFDDFF0ED008
 :100FB000FE0EEA6ADB34FE0BEA36E96E670EE926BE
 :100FC000000EEA22EECFDEFFEDCFDDFFDECFE9FF40
 :100FD000DDCFEAFF020EE926000EEA22FB0EDBCF90
 :100FE000EEFFFC0EDBCFEDFFDECFE9FFDDCFEAFF4A
 :100FF000EE52FA0EDBCFEFFF400E0B6EDECFE9FFB5
 :10100000DDCFEAFF0B50EF16880E0B6EDECFE9FF47
 :10101000DDCFEAFF0B50EF12FD0EDB500CE0FE0EB1
 :10102000EA6ADB34FE0BEA36E96E6B0EE926000E47
 :10103000EA22EF740BD0FE0EEA6ADB34FE0BEA36CE
 :10104000E96E670EE926000EEA22EF74DECF0BF0A0
 :10105000DDCF0CF00BC0F3FF0CC0F4FF020EE15C1F
 :1010600003E200D0E16AE552E16EE552E7CFD9FF35
 :101070001200D9CFE6FFE1CFD9FF010EF36EFC0ECF
 :10108000DB5004E0D890F336E806FCE1F350E81CAE
 :101090000B6EFD0EDBCFE9FFFE0EDBCFEAFF0B5040
 :1010A000EF16E552E7CFD9FF120005D06D6A696AE5
 :1010B0000001606B00D012000001605113E16D6A05
 :1010C000696A160E6F6E9F0E6B6E7B0E696ED08E08
 :1010D000A28AA08AF28E6DB602D06D86FCD700017E
 :0610E000010E606F12001A
 :0A10E600DACFE4FFE2CFDAFFE9CF32
 :1010F000E4FFEACFE4FFF6CFE4FFF7CFE4FFF5CF5C
 :10110000E4FFF3CFE4FFF4CFE4FFFACFE4FF00EE17
 :1011100000F00B0EE80403E3EECFE4FFFBD700EE94
 :101120000BF0030EE80403E3EECFE4FFFBD7E65237
 :101130006EEC00F0E55200EE0DF0030EE80403E360
 :10114000E5CFEDFFFBD700EE0AF00B0EE80403E35A
 :10115000E5CFEDFFFBD7E5CFFAFFE5CFF4FFE5CF15
 :10116000F3FFE5CFF5FFE5CFF7FFE5CFF6FFE5CFDE
 :10117000EAFFE5CFE9FFE5CFDAFF1100D8CFE4FFC2
 :10118000E0CFE4FFE46EDACFE4FFE2CFDAFFE6522D
 :10119000E552E5CFDAFFE550E5CFE0FFE5CFD8FF38
 :1011A000100005D85CEC08F014D8FED712000F0E22
 :1011B000C1120001906B916B926B936BFC0E8A16BF
 :1011C000931692800E0EC16EC06E010EC26E16EFA7
 :1011D00000F0200E0001605D03E36D50020B01E0A2
 :1011E0005BD000019051911102E1000E08D090C037
 :1011F000E9FF91C0EAFFEF50800B01E0010E00090A
 :101200004BE105010051810A09E0030A05E0020AE9
 :1012100001E02FD08A702DD08A722BD0C282810E2D
 :10122000406FC2B2FED7C4CF41F500019251931175
 :1012300002E1000E08D092C0E9FF93C0EAFFEF5030
 :10124000800B01E0010E000913E1400EE66E400E36
 :10125000E66E050EE66E010EE66EE66EC0EC07F079
 :101260000B6E050EE15E0B50F3CF92F0F4CF93F0CE
 :1012700000D0400EE66E000EE66E050EE66EE66AE3
 :10128000010EE66EC0EC07F00B6E050EE15E0B5032
 :10129000F3CF90F0F4CF91F0120012001200120080
 :1012A0001200120012001E0EE66E010EE66E1AEC1F
 :1012B00007F0E552E552400EE66E000EE66E050EB2
 :1012C000E66EE66A010EE66EC0EC07F00B6E050EE8
 :1012D000E15E0B50F3CF90F0F4CF91F012006D84EB
 :1012E0000001080E946F070E956F9407000E955B32
 :1012F00094519511FAE16D941200D9CFE6FFE1CF38
 :10130000D9FFFD0EDBCF06F0FE0EDBCF07F0010E9E
 :10131000061801E1075033E0E868061802E1E868C2
 :1013200007182BE0030E061801E1075024E0040E15
 :10133000061801E107501DE0020E061801E10750F2
 :1013400016E0170E061801E107500FE0160E0618FA
 :1013500001E1075008E0150E061801E1075001E011
 :1013600010D0A1DF0FD09EDF0DD09BDF0BD097DF19
 :1013700009D093DF07D092DF05D092DF03D00000C1
 :1013800001D000D0010E00D0E552E7CFD9FF120006
 :101390001201000200000008D8040402000001024B
 :1013A000000109022000010100C03209040000020E
 :1013B000FFFFFF0007050102400001070581024011
 :1013C00000010403090434034D0069006300720046
 :1013D0006F00630068006900700020005400650021
 :1013E000630068006E006F006C006F00670079009A
 :1013F000200049006E0063002E0040034D0069008C
 :10140000630072006F0063006800690070002000D4
 :101410004C00690062007500730062002000450006
 :10142000780061006D0070006C00650020004400D1
 :1014300065007600690063006500A213C213C6133D
 :02144000FA139D
 :0E1442002A0EF66E000EF76E000EF86E000118
 :101450000900F5508B6F0900F5508C6F03E18B6725
 :1014600001D03DD00900F550866F0900F550876F17
 :101470000900F550886F09000900F550E96E090070
 :10148000F550EA6E090009000900F550896F09005E
 :10149000F5508A6F09000900F6CF8DF0F7CF8EF076
 :1014A000F8CF8FF086C0F6FF87C0F7FF88C0F8FF3F
 :1014B0000001895302E18A5307E00900F550EE6EFE
 :1014C0008907F8E28A07F9D78DC0F6FF8EC0F7FFCB
 :1014D0008FC0F8FF00018B07000E8C5BBFD7120096
 :1014E000FE0EE3CFE9FFFF0EE3CFEAFFE9CFF3FF04
 :1014F000EACFF4FFFB0EE35003E1FC0EE35009E0FA
 :10150000FB0EE30602E2FC0EE306FD0EE350EE6E78
 :04151000F1D71200FD
 :0C15140013EE00F023EE00F0F86A0A9CD1
 :1015200021EC0AF098EC0AF0D1EC08F0FBD712009D
 :021530001200A7
 :020000040030CA
 :0100000024DB
 :010001000EF0
 :010002003FBE
 :010003001EDE
 :010005008179
 :010006008178
 :010008000FE8
 :01000900C036
 :01000A000FE6
 :01000B00E014
 :01000C000FE4
 :01000D0040B2
 :00000001FF
here's my python script for PyUSB (also uses PyQt for the GUI):
 ###########################################
 # PyUSB and PIC18F2550 demo (first revision) #
 # Julius 'yus' Constante Nov. 21, 2009 #
 ###########################################

 import sys, usb
 from PyQt4.QtCore import *
 from PyQt4.QtGui import *

 class UsbPic:
 def __init__(self, vendor_id, product_id):
 busses = usb.busses() # enumerate busses
 self.handle = None
 for bus in busses:
 devices = bus.devices
 for dev in devices:
 if dev.idVendor==vendor_id and dev.idProduct==product_id: # device matches
 self.dev = dev
 self.conf = self.dev.configurations[0]
 self.intf = self.conf.interfaces[0][0]
 self.endpoints = []
 for endpoint in self.intf.endpoints:
 self.endpoints.append(endpoint)
 return

 def open(self):
 if self.handle:
 self.handle = None
 try:
 self.handle = self.dev.open()
 self.handle.detachKernelDriver(0)
 self.handle.detachKernelDriver(1)
 self.handle.setConfiguration(self.conf)
 self.handle.claimInterface(self.intf)
 self.handle.setAltInterface(self.intf)
 return True
 except:
 return False

 def write(self, ep, buff, timeout = 100):
 try:
 return self.handle.interruptWrite(ep, buff, timeout) #return bytes written
 except:
 return 0
 def read(self, ep, size, timeout = 100):
 try:
 return self.handle.interruptRead(ep, size, timeout) # return data read
 except:
 return []
 def getDeviceName(self):
 return self.handle.getString(2, 40)

 class SimpleForm(QDialog):
 def __init__(self, parent = None):
 super(SimpleForm, self).__init__(parent)
 self.setWindowTitle('PIC18F and PyUSB')
 self.setMinimumSize(270, 180)
 # create widgets/controls
 self.connect_btn = QPushButton('Connect')
 self.toggle1_btn = QPushButton('Toggle LED1')
 self.toggle2_btn = QPushButton('Toggle LED2')
 self.pot_position = QDial()
 self.pot_label = QLabel('Potentiometer Position')
 self.status_label = QLabel(' press "Connect" button')
 self.update_timer = QTimer()
 # form layout and widgets location
 layout = QGridLayout()
 layout.addWidget(self.connect_btn, 9, 0, 2, 1)
 layout.addWidget(self.pot_position, 0, 0, 8, 7)
 layout.addWidget(self.pot_label, 8, 0, 1, 7)
 layout.addWidget(self.toggle1_btn, 4, 7)
 layout.addWidget(self.toggle2_btn, 5, 7)
 layout.addWidget(self.status_label, 9, 1, 2, 7)
 self.setLayout(layout)
 # widgets initial condition
 self.toggle1_btn.setEnabled(False)
 self.toggle2_btn.setEnabled(False)
 self.pot_position.setEnabled(False) #read only
 self.pot_position.setNotchesVisible(True)
 self.pot_position.setRange(0, 255) # for PIC 8-bit ADC value
 self.pot_label.setAlignment(Qt.AlignHCenter)
 # signals
 self.connect(self.connect_btn, SIGNAL("clicked()"), self.DeviceConnect)
 self.connect(self.toggle1_btn, SIGNAL("clicked()"), self.toggleLED1)
 self.connect(self.toggle2_btn, SIGNAL("clicked()"), self.toggleLED2)
 self.connect(self.update_timer, SIGNAL("timeout()"), self.updatePotPosition)

 def DeviceConnect(self):
 self.device = UsbPic(0x04d8, 0x0204) # Microchip Vendor ID and Product ID
 if self.device.open():
 self.toggle1_btn.setEnabled(True)
 self.toggle2_btn.setEnabled(True)
 self.update_timer.start(200) # update every 200ms
 self.status_label.setText('Connected to:\n %s' %self.device.getDeviceName())
 else:
 self.toggle1_btn.setEnabled(False)
 self.toggle2_btn.setEnabled(False)
 self.update_timer.stop()
 self.status_label.setText('Warning:\n No Device Found!')

 def toggleLED1(self):
 self.device.write(1, [0x80], 1000)

 def toggleLED2(self):
 self.device.write(1, [0x82], 1000)

 def updatePotPosition(self):
 self.device.write(1, [0x81])
 byteread = self.device.read(0x81, 64)
 if len(byteread)>1:
 self.pot_position.setValue(byteread[1])

 if __name__ == '__main__':
 app = QApplication(sys.argv)
 form = SimpleForm()
 form.show()
 sys.exit(app.exec_())
And finally, the actual circuit in action:
[フレーム]
additional useful links:
Microchip USB Framework for PIC18, PIC24 & PIC32
LibUSB Win32
Subscribe to:
Comments (Atom)