NIC Bonding In Linux
2 comments 11/30/2010 08:36:00 AM Posted by Surendra Kumar AnneLabels: Administration, Advanced Servers, Network Troubleshooting
1. Link aggregation
2. Channel Bonding
3. NIC Bonding
4. NIC teaming
5. Network card Bonding
6. Ethernet bonding
7. Trunking
8. Etherchannel
9. Multi-link truning(MLT)
10.Network bonding
11.Network Fault Tolerance(NFT)
12.Port channel
13.Smartgroup
14.EtherTrunk
1. High bandwidth
2. Redundancy/resilience
Before Clustering softwares come in to existing this technique is widely used to provide redundancy to a high end server. After cluster software introduced its used to enhance the cluster redundancy.
In this post we will see how can we achieve Nic bonding.
Nic bonding will work with the help of bonding driver in kernel.
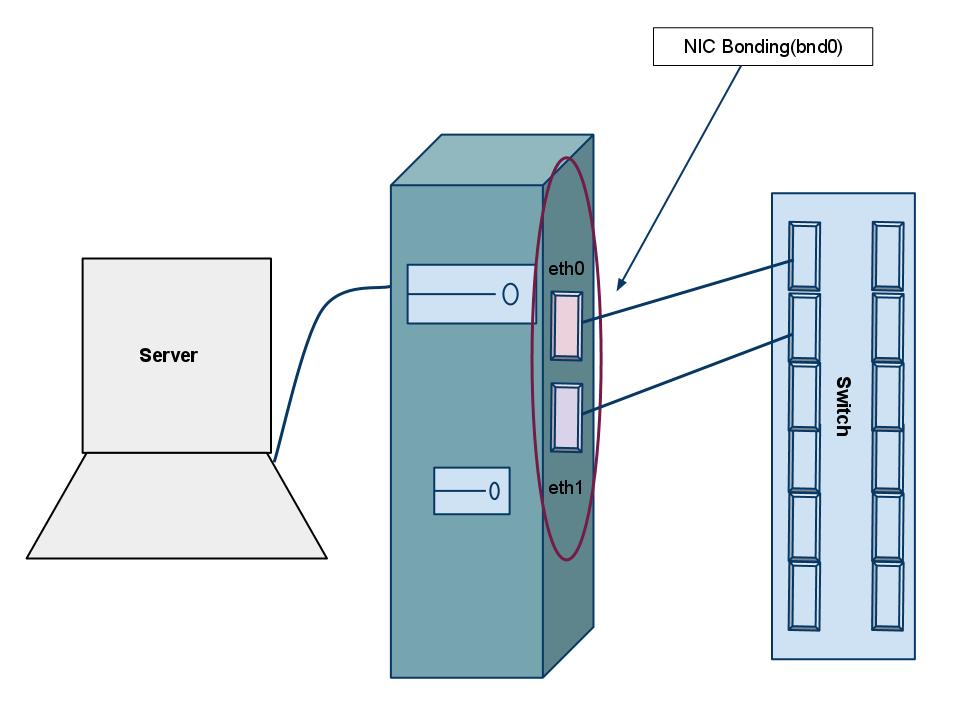
eth1
bnd0
Step1 : Create bond interface file with following content in it
vi /etc/syconfig/network-scripts/ifcfg-bnd0
DEVICE=bnd0
IPADDR=192.168.0.234
NETWORK=192.168.0.0
NETMASK=255.255.255.0
BOOTPROTO=none
ONBOOT=yes
GATEWAY=192.168.0.1
save and exit the file
Step2 : Now create a bnd0 virtual interface in modprobe.conf as shown below
alias bnd0 bonding
options bnd0 miimon=100 mode=6
Save and exit the file
Let me explain what actually the above two lines indicates
Line1 : (alias bnd0 bonding) to load the bonding module in to kernel
Line2 : Indicate the option for thie bond interface
miimon is nothing but to MONitor with MIItool to check the availability of other interfaces.
mode is to specify whether the bond is configured as load balancing or fail over. Here its load-balancing which means data transmission will be shared between two interfaces. To know more about modes click here
Step3 : Load the module in to kernel with modprob command to update this changes to kernel
#modprob bonding
Step4 : edit interface card details of both physical devices
For eth0
vi /etc/sysconfig/network-scripts/ifcfg-eth0
DEVICE=eth0
USERCTL=no
ONBOOT=yes
MASTER=bnd0
SLAVE=yes
BOOTPROTO=none
For eth1
vi /etc/sysconfig/network-scripts/ifcfg-eth1
DEVICE=eth1
USERCTL=no
ONBOOT=yes
MASTER=bnd0
SLAVE=yes
BOOTPROTO=none
Save and exit the files
The above thing is self explanatory for many admins but let me explain to new people.
DEVICE Indicates what is the device name
USERCTL Indicates that can user control this device(here its no)
ONBOOT Indicates that at the boot time do this device should be up?
MASTER Is this device has master? Then what it is(here its bnd0)
SLAVE Is this device acting as slave?
BOOTPROTO What about getting ip add from what protocol?(its set to none which indicate its a static IP)
Step5 : Restart the network service and see the output of ifconfig for your self.
#service network restart
#ifconfig
Questions & Answers
1. How can we say my data is flowing in which path?
Ans : Link aggregation(bonding driver) will take care of sending all the frames of particular session in same path. This is called as ordering of frames.
2. Can we bond more than 2 NIC?
Ans : Yes we can, follow the same procedure. In fact there is no limit but linux server do have limit to have total number of NIC cards.
Tips on implementing NIC bonding
1. Enable spanning tree for switches, with out which network speed reduces.
2. Be careful if you’re doing this over a remote ssh.
Equivalent Tool For WINscp in Linux
0 comments 10/18/2010 07:43:00 PM Posted by Surendra Kumar AnneLabels: Administration, Basics, How-To's
Is there any tool which is equivalent to do what WINscp does in Windows?
In Linux we have one utility called nautilus to do this work.
Redhat:
#yum install nautilus
Ubuntu:
#apt-get install nautilus
Try to access Nautilus as shown below in screen by screen shot manner
Go to places and the slect connect to server.
Then specify the server ip, port where ssh service is running, user name to connect, then press connect
Now it will ask for the user’s password, enter the password and connect it.
This screen shot show the remote server content.
How To Find And Remove Core Files In Linux?
0 comments 5/11/2010 11:09:00 AM Posted by Surendra Kumar AnneLabels: Administration, How-To's
What is a"Core file" ? Ans : A core file is created when a program is crashed/stoped abnormally due to some bug. This will be huge size which contains all the memory info, crash info which is used for programmers to debug the issue and find a solution or patch to that bug.
Why we system administrators are interested in that core files?
Ans : This is because of their size. As we do monitoring of systems on daily basis but suddenly your disk is full one day when you came to office, you are total blank thinking how come disk is full though there is no much user activity etc. So core files are one reason which will eat up our disk. Which you have to check for when sudden disk activity is observed.
How to find core files ?
#find / -name core
This find command will search entire filesystem for core files.. once you find them use rm command to remove those files..
#rm -rf core
So how it got its name?
A core dump file gets its name from an old memory technology using tiny magnetic cores for storage.
How To Find The RAM Utilization/Usage For A Service Or Server Or Process Or User?
0 comments 11/25/2009 10:30:00 AM Posted by Surendra Kumar AnneLabels: Administration, Process-Mgmt
This is a long time question in my mind. I used to try all sorts of commands to find what is the RAM utilization by a service. The commands are as follows.
1.#ps -ef
2.#top
3.#free
4.#cat /proc/meminfo
But none of these tools gives RAM utilization statistics for perticular user or service.
To serve this purpose there is a built in command in linux called pmap(process map). Let us have a look in to pmap usage.
Syntax:
#pmap pid-value
Example:
# pmap 1015
1015: cron
00110000 100K r-x-- /lib/libselinux.so.1
00129000 4K r---- /lib/libselinux.so.1
0012a000 4K rw--- /lib/libselinux.so.1
0012b000 36K r-x-- /lib/tls/i686/cmov/libnss_nis-2.10.1.so
00134000 4K r---- /lib/tls/i686/cmov/libnss_nis-2.10.1.so
00135000 4K rw--- /lib/tls/i686/cmov/libnss_nis-2.10.1.so
00148000 4K r-x-- [ anon ]
00149000 1272K r-x-- /lib/tls/i686/cmov/libc-2.10.1.so
00287000 8K r---- /lib/tls/i686/cmov/libc-2.10.1.so
00289000 4K rw--- /lib/tls/i686/cmov/libc-2.10.1.so
0028a000 12K rw--- [ anon ]
002aa000 44K r-x-- /lib/libpam.so.0.82.1
002b5000 4K r---- /lib/libpam.so.0.82.1
002b6000 4K rw--- /lib/libpam.so.0.82.1
004af000 76K r-x-- /lib/tls/i686/cmov/libnsl-2.10.1.so
004c2000 4K r---- /lib/tls/i686/cmov/libnsl-2.10.1.so
004c3000 4K rw--- /lib/tls/i686/cmov/libnsl-2.10.1.so
004c4000 8K rw--- [ anon ]
004cf000 108K r-x-- /lib/ld-2.10.1.so
004ea000 4K r---- /lib/ld-2.10.1.so
004eb000 4K rw--- /lib/ld-2.10.1.so
00d0f000 8K r-x-- /lib/tls/i686/cmov/libdl-2.10.1.so
00d11000 4K r---- /lib/tls/i686/cmov/libdl-2.10.1.so
00d12000 4K rw--- /lib/tls/i686/cmov/libdl-2.10.1.so
00db5000 40K r-x-- /lib/tls/i686/cmov/libnss_files-2.10.1.so
00dbf000 4K r---- /lib/tls/i686/cmov/libnss_files-2.10.1.so
00dc0000 4K rw--- /lib/tls/i686/cmov/libnss_files-2.10.1.so
00e7e000 24K r-x-- /lib/tls/i686/cmov/libnss_compat-2.10.1.so
00e84000 4K r---- /lib/tls/i686/cmov/libnss_compat-2.10.1.so
00e85000 4K rw--- /lib/tls/i686/cmov/libnss_compat-2.10.1.so
08048000 32K r-x-- /usr/sbin/cron
08050000 4K r---- /usr/sbin/cron
08051000 4K rw--- /usr/sbin/cron
082e4000 132K rw--- [ anon ]
b784a000 8K rw--- [ anon ]
b7859000 16K rw--- [ anon ]
bfb47000 84K rw--- [ stack ]
total 2088K
When we see the output of this comand it will give details as follows
1.First column will show memory location
2.second column will show RAM utilization of each file opend by this process
3.Third column will show rw permission.
4.Last one will show what are the files opened by this process
5.And last line of this output will show total size used, here it is 2088K
Usage1 : To find how much RAM a process is taking
#pmap pid
Usage2 : To find how much RAM used by an application
#pmap `pgrep firefox'
Let me explain, `` quotes are used to submit a command which will allow to submit PID value for firefox.
Usage3 : To find how much RAM utilized by Mysql server
#pmap `pgrep mysqld` grep total
Usage4 : To find how much RAM used by a particular user
#pmap `ps -ef grep krishna awk '{print 2ドル}'` grep total
Where krishna is user name.
Please comment your thoughts regarding this post:-)
How To Uninstall A Source Package?
0 comments 11/19/2009 07:28:00 AM Posted by Surendra Kumar AnneLabels: Administration, Package-Mgmt
#yum install packagename
This is installing through yum which will use rpm package manager internally
This is for installing .deb packages
#sh file.sh
This is from a shell script.
This is to install from source package.
#yum remove packagename
Uninstalling through yum... Etc...
This can be done in two ways
Way2 : If you don’t have source code with you. This is really hard way to do it, we have to go to so many locations/folders where that package created supported files. Some common locations for a package files is as follows
Etc.. so we have to go to each folder and have to remove all the files whose name contains packagename.
How To Take The Backup Of MBR(Master Boot Recorder)
2 comments 11/13/2009 07:53:00 AM Posted by Meghana M BhombhoreLabels: Administration, Basic-Security, Basics, Boot Troubleshooting, How-To's
1.How to take the backup and restore MBR? Why do you require to take the backup of your MBR?
Ans : MBR (Master Boot Recorder) is a vital part of your hard disk which contains booting information, without it its difficult to boot the system. Suppose you have windows and Linux duel boot on your machine and as you know windows is more prone to virus attacks. So it’s always better to backup your MBR to be in safe place.
2. How to take backup of your MBR?
Ans : Using dd command (dataset definition). Here are the steps to take backup of you MBR and keep it in safe place to restore your system if it get corrupted.
#dd if=/dev/hdx of=/safe/location bs=512 count=1
Let me explain the above command how it will work.
“If” in the command is nothing but to specify Input File, here we are specifying our input file as hard disk(if the hard disk is /dev/hda it is primary master, so for general purpose I given 'x'). “of” in the command is nothing but to specify Output File, here we are specifying our output file as /safe/location. Then “bs” this is nothing but block size to write in to hard disk. And then “count” nothing but how many times you want to write date this many block sizes. Here in this example count=1 that means first 512 bytes of the hard disk is copied to the specified location.
3.How to restore the MBR?
#dd if=/safe/location of=/dev/hdx bs=512 count=1
Note : Please replace “hdx” with your hard disk name.
This is bit complex, Is there any other way to restore MBR?
Yes, if you have Linux or Windows bootable CD, we can easily restore your MBR if you forgot to take backup(And this method is very much easy to do restoration of MBR when compared to previous method).
Method1 : With Redhat Linux bootable CD.
For this you have to boot your system to rescue mode, then mount your file system to rescue mode and execute below command to restore your MBR
#grub-install /dev/hdx
Note : Please replace hdx with your hard disk name. After that you just reboot your system. Your system will be live and working.
Method2 : With Windows XP bootable CD.
Step1 : Boot the system with XP bootable cd
Step2 : Press f8 to go to repair mode in Windows
Step3 : Once you got the c drive prompt just type below command
Fixmbr
This command will fix the MBR record.
Some FAQ’s
1. What is the MBR size?
Ans : MBR size is just 512 bytes.
2.What MBR conations?
Ans : Mainly MBR can be divided in two parts
a.Boot loader information block(which is of 448 bytes)
b. Partition table information(which is of just 64 bytes)
3.How many partition we can create on a hard disk?
Ans : Totally we can create four partitions as below
a.Four primary parathions.
b.Three primary and one extended partition.
c.Two primary and one extended parathion.
d.One primary and one extended parathion.
Note : In extended parathion we can create logical partitions up to 24 in number.
4.Why we cannot create more then 4 partition as mention above?
Ans : In MBR, the partition table info is just stored in 64 bytes, and one parathion information to store in MBR requires 16 bytes of space. So at most you can create only 4 partitions as mention above.
Please Comment your thoughts regarding this post:-)
Linux Virtual File System
0 comments 11/07/2009 06:20:00 AM Posted by Meghana M BhombhoreLabels: Administration, Disk-Mgmt, How-To's, Tutorials
Can we create a file system (i.e. formatting a drive/partition) with in a file system?
Looks little bit strange is int it? So follow me I will show you how to create a virtual partition and file system within a partition.
Step1 : Create a empty file with /dev/zero with size equal to 50Mb.
#dd if=/dev/zero of=/temp/vf0 count=102400
Note :
1. By default "dd" command(dataset definition) uses block of 512bytes so the size will be 102400*512=52 428 800=~50MB
2. /dev/zero is a device files which will be used create a file which conations "0" i.e. an empty file.
Clipped output:
[root@test6 ~]# dd if=/dev/zero of=/temp/vf0 count=102400
102400+0 records in
102400+0 records out
[root@test ~]# ls -lh /temp/vf0
-rw-r--r-- 1 root root 50M Nov 7 12:08 /temp/vf0
Step2 : Create ext3 file system for this virtual partition.
#mkfs -t ext3 /temp/vf0
Here it will ask "do you want to format the file or not"?, just say yes.
Step3 : Now we have to create a mount point (nothing but a directory) and mount the created partition.
# mkdir /virtdrive
# mount -o loop=/dev/loop0 /temp/vf0 /virtdrive
Note:
/dev/loop is special hardware device used to mount ISO files and virtual file systems. In Linux there are total 8 loop devices numbering from 0 to 7. So you can mount only 8 ISO files/virtual file systems by default.
Step4 : Edit /etc/fstab file to mount permanently, so that it be auto mounted at boot time too. Specify following entry in fstab file.
/temp/vf0 /virtdrive ext3 rw,loop=/dev/loop0 0 0
Step5 : Specify the fstab changes to kernel.
#mount -a
Step6 : Conform Weather mounting happen perfectly or not.
Way1 :
#cat /etc/mtab
Way2 : Change the directory to mount point you have to see lost+found folder
[root@test ~]# cd /virtdrive/
[root@test virtdrive]# ls
lost+found
[root@test virtdrive]#
Please comment your thoughts regarding this post:-)
How To Get BIOS, FIRMWARE And Installed Drivers Details
0 comments 9/21/2009 08:51:00 AM Posted by Surendra Kumar AnneLabels: Administration, Network Monitoring
1.Hardware
2.CPU information
3.Drivers installed in Linux machine.
For every operation/work in Linux there will be one command, this is true.(all you need to find out that command is use. Google to get it). So how to get BIOS info without rebooting the system. The command for this is dmidecode(DMI table decoder). Some times BIOS is called as DMI too. Just execute the command, It will just dump lots and lots of information about the sytem.
DMI TYPES
The SMBIOS specification defines the following DMI types:
Type Information
----------------------------------------
0 BIOS
1 System
2 Base Board
3 Chassis
5 Memory Controller
6 Memory Module
7 Cache
8 Port Connector
10 On Board Devices
11 OEM Strings
12 System Configuration Options
13 BIOS Language
14 Group Associations
15 System Event Log
16 Physical Memory Array
17 Memory Device
18 32-bit Memory Error
19 Memory Array Mapped Address
20 Memory Device Mapped Address
21 Built-in Pointing Device
22 Portable Battery
23 System Reset
24 Hardware Security
25 System Power Controls
26 Voltage Probe
27 Cooling Device
28 Temperature Probe
29 Electrical Current Probe
30 Out-of-band Remote Access
31 Boot Integrity Services
32 System Boot
33 64-bit Memory Error
34 Management Device
35 Management Device Component
37 Memory Channel
38 IPMI Device
39 Power Supply
Here is some examples.
Note : In RHEL4 there are no options for dmidecode command.
To find only BIOS info
#dmidecode –t 0
[root@test ~]# dmidecode --type 0
# dmidecode 2.7
SMBIOS 2.5 present.
Handle 0x0000, DMI type 0, 24 bytes.
BIOS Information
Vendor : Phoenix Technologies, LTD
Version : MS7352 1.14
Release Date : 09/03/2008
Address : 0xE0000
Runtime Size : 128 kB
ROM Size : 1024 kB
Characteristics:
ISA is supported
PCI is supported
PNP is supported
APM is supported
BIOS is upgradeable
BIOS shadowing is allowed
Boot from CD is supported
Selectable boot is supported
BIOS ROM is socketed
EDD is supported
5.25"/360 KB floppy services are supported (int 13h)
5.25"/1.2 MB floppy services are supported (int 13h)
3.5"/720 KB floppy services are supported (int 13h)
3.5"/2.88 MB floppy services are supported (int 13h)
Print screen service is supported (int 5h)
8042 keyboard services are supported (int 9h)
Serial services are supported (int 14h)
Printer services are supported (int 17h)
CGA/mono video services are supported (int 10h)
ACPI is supported
USB legacy is supported
LS-120 boot is supported
ATAPI Zip drive boot is supported
BIOS boot specification is supported
Function key-initiated network boot is supported
Targeted content distribution is supported
BIOS Revision: 1.14
Even we can specify keyword for specifying type if you forget the type number, so just type the keyword to check particular property of the styem.
Keyword Types
------------------------------
bios 0, 13
system 1, 12, 15, 23, 32
baseboard 2, 10
chassis 3
processor 4
memory 5, 6, 16, 17
cache 7
connector 8
slot 9
Suppose we want to see system details
[root@test ~]# dmidecode --type system
# dmidecode 2.7
SMBIOS 2.5 present.
Handle 0x0001, DMI type 1, 27 bytes.
System Information :
Manufacturer : Hewlett-Packard
Product Name : HP Compaq dx7400 Microtower
Version:
Serial Number: SGH83801NJ
UUID: 809AF9C0-17F0-1310-9511-C4681D1F835D
Wake-up Type: Power Switch
SKU Number: GD384AV
Family: 103C_53307F
Handle 0x0024, DMI type 32, 11 bytes.
System Boot Information
Status: No errors detected
[root@test ~]#
To get CPU info
#cat /etc/cpuinfo
To get HW info
#lshal
or
#lshw
To get PCI info
#lspci
To get USB info
#lsusb
RSYNC --The tool every Admin should know
0 comments 8/24/2009 01:28:00 AM Posted by Surendra Kumar AnneLabels: Administration, Backup/Restore-Mgmt, File Sharing Servers, How-To's, Tutorials
Let us list advantages of this command then we will know how to configure it.
Advantages of rsync :
- This tool will keep both the destination and source folder synced.
- rsync is fast, because it will not copy entire data every time it got synced, it just copes the date which got changed from previous copy.
- For security reasons, rsync will support ssh to transfer data between two machines.
- rsync is used to download RPM updated repository to local machine.
Configuration : rsync
Some points to be remembered when dealing with rsync
- This utility is the part of xinetd so there is no special package for this.
- When we are doing rsync between two systems, both the systems should be configured to allow rsync connections.
- rsync uses 873.
#yum install xinetd
Step2 : Configure rsync to allow connections, the configuration file for rsync is located in /etc/xinetd.d
#cd /etc/xinetd.d
#vi rsync
# default : off
# description: The rsync server is a good addition to an ftp server, as it \
# allows crc checksumming etc.
service rsync
{
disable = yes
socket_type = stream
wait = no
user = root
server = /usr/bin/rsync
server_args = --daemon
log_on_failure += USERID
}
In this configuration file just change disable = yes to no, then save the file and exit. Here is the updated configured file.
# description: The rsync server is a good addition to an ftp server, as it \
# allows crc checksumming etc.
service rsync
{
disable = no
socket_type = stream
wait = no
user = root
server = /usr/bin/rsync
server_args = --daemon
log_on_failure += USERID
}
Step3 : Start the rsync service, so how to do it? As i mention earlier that rsync is a part of xinetd service so just restart the xinetd service.
#service xinetd restart
Step4 : Permanently on the service
#chkconfig rsync --levels 345 on
Same configurations should be done on the other system too, in order to rsync executed properly.
Implementing ext3 partations and mounting
0 comments 8/20/2009 10:02:00 AM Posted by Surendra Kumar AnneLabels: Administration, Disk-Mgmt, Videos
[埋込みオブジェクト:http://www.youtube.com/v/VxV5-kx1X3M&hl=en&fs=1&]
Implementing ext2 mounting
0 comments 8/19/2009 10:04:00 AM Posted by Surendra Kumar AnneLabels: Administration, Disk-Mgmt, Videos
[埋込みオブジェクト:http://www.youtube.com/v/LqF_86iwjIs&hl=en&fs=1&]
Unconfiguring RAID5 in Redhat
0 comments 8/18/2009 10:03:00 AM Posted by Surendra Kumar AnneLabels: Administration, Disk-Mgmt, Videos
[埋込みオブジェクト:http://www.youtube.com/v/1J9UX75tRfA&hl=en&fs=1&]
Implementing RAID5
0 comments 8/17/2009 10:01:00 AM Posted by Surendra Kumar AnneLabels: Administration, Disk-Mgmt, Videos
[埋込みオブジェクト:http://www.youtube.com/v/gWEm1JulAvg&hl=en&fs=1&]
Unconfiguring RAID1 in Redhat
0 comments 8/16/2009 09:56:00 AM Posted by Surendra Kumar AnneLabels: Administration, Disk-Mgmt, Videos
[埋込みオブジェクト:http://www.youtube.com/v/o3sNky6zmDs&hl=en&fs=1&]
Implementing RAID1
0 comments 8/15/2009 10:00:00 AM Posted by Surendra Kumar AnneLabels: Administration, Disk-Mgmt, Videos
[埋込みオブジェクト:http://www.youtube.com/v/PrxkE2TKvdI&hl=en&fs=1&]
Unconfiguring RAID0
0 comments 8/14/2009 09:56:00 AM Posted by Surendra Kumar AnneLabels: Administration, Disk-Mgmt, Videos
[埋込みオブジェクト:http://www.youtube.com/v/EZ42aa0Aj8Y&hl=en&fs=1&]
Implementing RAID0
0 comments 8/13/2009 09:56:00 AM Posted by Surendra Kumar AnneLabels: Administration, Disk-Mgmt, Videos
Here in this Video you will see how to implement RAID0
[埋込みオブジェクト:http://www.youtube.com/v/AH2nWSW9E_Q&hl=en&fs=1&]
Installing YUM server in RHEL4
0 comments 8/05/2009 12:33:00 AM Posted by Surendra Kumar AnneLabels: Administration, Package-Mgmt
Recently I came across a strange issue.. ie implementing YUM(Yellow dog Updater and Modifier) server in RHEL4 :(. By the time of RHEL4 released there is no YUM server implementation..
How to implement RAID10?
0 comments 7/04/2009 12:15:00 AM Posted by Surendra Kumar AnneLabels: Administration, Disk-Mgmt
RAID10 can be implemented by first implement RAID1(ie mirring) then implementing RAID0(stripeset on different disks) on it.
#mdadm --create /dev/md0 --level=1 --raid-devices=2 /dev/sd[ab]1
#mdadm --create /dev/md1 --level=1 --raid-devices=2 /dev/sd[cd]1
#mdadm --create /dev/md2 --chunk=64 --level=0 --raid-devices=2 /dev/md[01]
Comments are entertained --- Surendra
Monitoring users - I
0 comments 6/21/2009 04:54:00 AM Posted by Surendra Kumar AnneLabels: Administration, Boot Troubleshooting, User-Mgmt
MONITORING USERS-I
User-management is always one of the basic tasks for Linux administrators, here we are going to see some basics user related "Monitoring Commands".
1) "finger" is a command which will give full details about user properties such as name, login, shell what he is using etc.
Syntax:
#finger username
Example:
[root@localhost ~]# finger root
Login: root Name: root
Directory: /root Shell: /bin/bash
On since Sat Jun 6 19:20 (EDT) on tty1 4 hours 12 minutes idle
On since Sun Jun 7 02:18 (EDT) on pts/0 from :0.0
On since Sun Jun 7 03:48 (EDT) on pts/1 from :0.0
16 minutes 9 seconds idle
New mail received Sun Jun 7 04:02 2009 (EDT)
Unread since Sat Jun 6 22:17 2009 (EDT)
No Plan.
Here you can see so many user related information
one security information you can see is when he loged in last time and from where he loged in etc.
2)"id" is one more command which will show the user details such as his primary group and his secondary group.
Syntax:
#id username
Example:
[root@localhost ~]# id root
uid=0(root) gid=0(root) groups=0(root),1(bin),2(daemon),3(sys),4(adm),6(disk),10(wheel) context=root:system_r:unconfined_t:SystemLow-SystemHigh
[root@localhost ~]#
3)"chage" is one more command which is used to see user related "threshold details" such as user disable time etc.
Syntax:
#chage -l username
Example:
[root@localhost ~]# chage -l root
Last password change : Jun 06, 2009
Password expires : never
Password inactive : never
Account expires : never
Minimum number of days between password change : 0
Maximum number of days between password change : 99999
Number of days of warning before password expires : 7
[root@localhost ~]#
4)"who" is one more command to see who other people logged in and from where they logged in.
Syntax:
#who
Example:
[root@localhost ~]# who
root tty1 2009年06月06日 19:20
root pts/0 2009年06月07日 02:18 (:0.0)
root pts/1 2009年06月07日 03:48 (:0.0)
[root@localhost ~]#
5)"w" is one more command which is similar to "who" command but will give some more details.
Example:
[root@localhost ~]# w
06:36:49 up 11:23, 3 users, load average: 0.54, 0.38, 0.42
USER TTY FROM LOGIN@ IDLE JCPU PCPU WHAT
root tty1 - 19:20 4:27m 0.69s 0.69s -bash
root pts/0 :0.0 02:18 0.00s 0.16s 0.02s w
root pts/1 :0.0 03:48 31:25 0.10s 0.10s bash
[root@localhost ~]#
6)"groups" is one more wonderful command which will show which user belongs to what groups, we can say its a subset of id command
Syntax:
#groups username
Example:
[root@localhost ~]# groups root
root : root bin daemon sys adm disk wheel
[root@localhost ~]#
7)"users" is one more monitoring command to see which users loged in at present in to the system
Example:
[root@localhost ~]# groups root
root : root bin daemon sys adm disk wheel
[root@localhost ~]#
Please add if you know some other user related monitoring commands.