NIC Bonding In Linux
2 comments 11/30/2010 08:36:00 AM Posted by Surendra Kumar AnneLabels: Administration, Advanced Servers, Network Troubleshooting
1. Link aggregation
2. Channel Bonding
3. NIC Bonding
4. NIC teaming
5. Network card Bonding
6. Ethernet bonding
7. Trunking
8. Etherchannel
9. Multi-link truning(MLT)
10.Network bonding
11.Network Fault Tolerance(NFT)
12.Port channel
13.Smartgroup
14.EtherTrunk
1. High bandwidth
2. Redundancy/resilience
Before Clustering softwares come in to existing this technique is widely used to provide redundancy to a high end server. After cluster software introduced its used to enhance the cluster redundancy.
In this post we will see how can we achieve Nic bonding.
Nic bonding will work with the help of bonding driver in kernel.
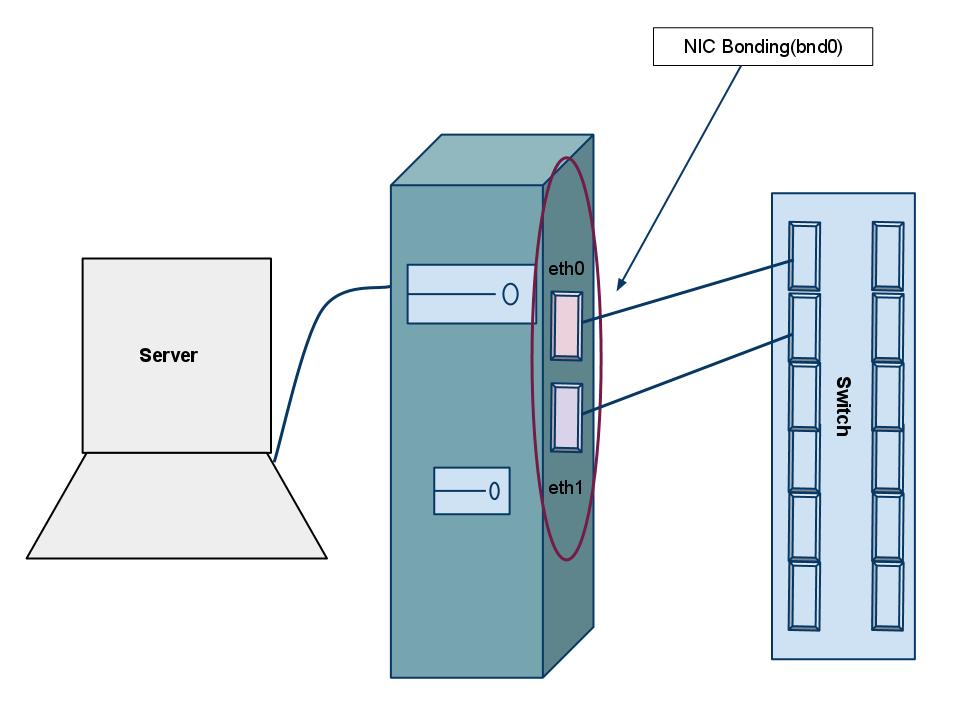
eth1
bnd0
Step1 : Create bond interface file with following content in it
vi /etc/syconfig/network-scripts/ifcfg-bnd0
DEVICE=bnd0
IPADDR=192.168.0.234
NETWORK=192.168.0.0
NETMASK=255.255.255.0
BOOTPROTO=none
ONBOOT=yes
GATEWAY=192.168.0.1
save and exit the file
Step2 : Now create a bnd0 virtual interface in modprobe.conf as shown below
alias bnd0 bonding
options bnd0 miimon=100 mode=6
Save and exit the file
Let me explain what actually the above two lines indicates
Line1 : (alias bnd0 bonding) to load the bonding module in to kernel
Line2 : Indicate the option for thie bond interface
miimon is nothing but to MONitor with MIItool to check the availability of other interfaces.
mode is to specify whether the bond is configured as load balancing or fail over. Here its load-balancing which means data transmission will be shared between two interfaces. To know more about modes click here
Step3 : Load the module in to kernel with modprob command to update this changes to kernel
#modprob bonding
Step4 : edit interface card details of both physical devices
For eth0
vi /etc/sysconfig/network-scripts/ifcfg-eth0
DEVICE=eth0
USERCTL=no
ONBOOT=yes
MASTER=bnd0
SLAVE=yes
BOOTPROTO=none
For eth1
vi /etc/sysconfig/network-scripts/ifcfg-eth1
DEVICE=eth1
USERCTL=no
ONBOOT=yes
MASTER=bnd0
SLAVE=yes
BOOTPROTO=none
Save and exit the files
The above thing is self explanatory for many admins but let me explain to new people.
DEVICE Indicates what is the device name
USERCTL Indicates that can user control this device(here its no)
ONBOOT Indicates that at the boot time do this device should be up?
MASTER Is this device has master? Then what it is(here its bnd0)
SLAVE Is this device acting as slave?
BOOTPROTO What about getting ip add from what protocol?(its set to none which indicate its a static IP)
Step5 : Restart the network service and see the output of ifconfig for your self.
#service network restart
#ifconfig
Questions & Answers
1. How can we say my data is flowing in which path?
Ans : Link aggregation(bonding driver) will take care of sending all the frames of particular session in same path. This is called as ordering of frames.
2. Can we bond more than 2 NIC?
Ans : Yes we can, follow the same procedure. In fact there is no limit but linux server do have limit to have total number of NIC cards.
Tips on implementing NIC bonding
1. Enable spanning tree for switches, with out which network speed reduces.
2. Be careful if you’re doing this over a remote ssh.
Failed To Make Swap Directory Cache (13) Permission Denied
2 comments 11/25/2010 10:35:00 PM Posted by Surendra Kumar AnneLabels: Proxy Servers
When installing squid as cache server you have to create cache folder with “squid -z” command with out quotes. But when you are trying this you will see
/usr/local/squid/sbin# ./squid -z
2010年04月29日 22:39:16
Creating Swap Directories
FATAL : Failed to make swap directory /usr/local/squid/var/cache: (13) Permission denied
Squid Cache (Version 2.5.STABLE5) : Terminated abnormally.
CPU Usage : 0.000 seconds = 0.000 user + 0.000 sys
This is due to that /usr/local/squid/var/cache folder is not owned by effective user. To resolve this issue follow below steps
Step1 : Create squid user(A normal user) if the squid user is not there
#useradd squid
Step2 : Specify the effective user entry in squid.conf file with squid as username by editing it.
#vi /usr/local/squid/etc/squid.conf
change the entry from
# cache_effective_user nouser
to
cache_effective_user squid
Save the file now
Step3 : Now change the ownership of the cache folder to squid user
#chown -R squid.squid /usr/local/squid/var/cache
Step4 : Now create cache directory with squid -z command
#squid -z
Now you will be out of issue.
How To Change The Date In Linux?
0 comments 11/25/2010 10:14:00 PM Posted by Surendra Kumar AnneLabels: Basics, How-To's
How can we change the date/time in linux?
Ans : Changing date in linux is bit confusing. If you want to change date in GUI its very much easy and if you want to change it when it comes to CLI its bit hard to remember it.
Date is the command to check whats the present date
#date
To change the date use below command
#date MMDDHHMMYYYY.ss
MM => Two digit month value
DD => Two digit day value
HH => Two digit hour value
MM => Two digit minuite value
YYYY => Four digit year value
ss => Two digit seconds value(very rare we will be using this)
Example1 : I want to change the date to Nov 24 1:36 PM 2010
#date 112413362010
Example2 : I want to change the date to Jan 9th 8:05.04 AM 2010
#date 010908052010.04
Now the date will be changed to your required date.
How To Set A PHP Path In Linux?
0 comments 11/17/2010 11:16:00 PM Posted by Surendra Kumar AnneLabels: How-To's
How can we set PHP path in linux?
Ans : When you install PHP and host some .php files on webserver your web server will not detect it. This is because your Apache server does not know how to interprit PHP files? And and where is php located? To eleminate this issue we have to set the php path in main php configuration file php.ini located in your machine. As the linux is open source and the location of this file differs from different flavors, so better option is to search for php.ini file as shown below.
find / -iname php.ini
or some common locations for Redhat and Ubuntu are shown below
For Redhat flavors
/etc/php.ini
For Ubuntu Flavors
/etc/php5/apache2/php.ini
To search for include_path and uncomment that before changes.
;include_path = ".:/usr/share/php"
After changes.
include_path = ".:/usr/share/php"
Now save and exit the file. And you have to restart the apache server to detect this settings.
For Redhat
#service httpd restart
For Ubuntu
/etc/init.d/apache2 restart
Now start coding in PHP and enjoy the php scripting.