How to create Magento 2 Product Attribute Programmatically with type : Text Area.
-
Here example - magento.stackexchange.com/a/229270/9951 add attribute for Magento2 on the fly without setupAlex– Alex2018年06月08日 21:25:20 +00:00Commented Jun 8, 2018 at 21:25
3 Answers 3
Overview of Adding Product Attribute Programmatically
- Step 1: Create file
InstallData.php - Step 2: Define the
install()method - Step 3: Create custom attribute
Step 1: Create file InstallData.php
We will start with the InstallData class which located in
app/code/Mageplaza/HelloWorld/Setup/InstallData.php.
The content for this file:
<?php
namespace Mageplaza\HelloWorld\Setup;
use Magento\Eav\Setup\EavSetup;
use Magento\Eav\Setup\EavSetupFactory;
use Magento\Framework\Setup\InstallDataInterface;
use Magento\Framework\Setup\ModuleContextInterface;
use Magento\Framework\Setup\ModuleDataSetupInterface;
class InstallData implements InstallDataInterface
{
 private $eavSetupFactory;
 public function __construct(EavSetupFactory $eavSetupFactory)
 {
 $this->eavSetupFactory = $eavSetupFactory;
 }
}
Step 2: Define the install() method
<?php
public function install(ModuleDataSetupInterface $setup, ModuleContextInterface $context)
{
}
Step 3: Create custom attribute
Here are all lines code of InstallData.php to create product attribute programmically.
<?php
namespace Mageplaza\HelloWorld\Setup;
use Magento\Eav\Setup\EavSetup;
use Magento\Eav\Setup\EavSetupFactory;
use Magento\Framework\Setup\InstallDataInterface;
use Magento\Framework\Setup\ModuleContextInterface;
use Magento\Framework\Setup\ModuleDataSetupInterface;
class InstallData implements InstallDataInterface
{
 private $eavSetupFactory;
 public function __construct(EavSetupFactory $eavSetupFactory)
 {
 $this->eavSetupFactory = $eavSetupFactory;
 }
 public function install(ModuleDataSetupInterface $setup, ModuleContextInterface $context)
 {
 $eavSetup = $this->eavSetupFactory->create(['setup' => $setup]);
 $eavSetup->addAttribute(
 \Magento\Catalog\Model\Product::ENTITY,
 'sample_attribute',
 [
 'type' => 'int',
 'backend' => '',
 'frontend' => '',
 'label' => 'Sample Atrribute',
 'input' => '',
 'class' => '',
 'source' => '',
 'global' => \Magento\Eav\Model\Entity\Attribute\ScopedAttributeInterface::SCOPE_GLOBAL,
 'visible' => true,
 'required' => true,
 'user_defined' => false,
 'default' => '',
 'searchable' => false,
 'filterable' => false,
 'comparable' => false,
 'visible_on_front' => false,
 'used_in_product_listing' => true,
 'unique' => false,
 'apply_to' => ''
 ]
 );
 }
}
As you can see, all the addAttribute method requires is: The type id of the entity which we want to add attribute The name of the attribute An array of key value pairs to define the attribute such as group, input type, source, label...
All done, please run the upgrade script php bin/magento setup:upgrade to install the module and the product attribute sample_attribute will be created.
If you want to remove product attribute, you can use method removeAttribute instead of addAttribute. It will be like this:
EDIT:
for uninstall create the app/code/Mageplaza/HelloWorld/Setup/Uninstall.php.
<?php
namespace Mageplaza\HelloWorld\Setup;
use Magento\Eav\Setup\EavSetupFactory;
use Magento\Framework\Setup\ModuleContextInterface;
use Magento\Framework\Setup\SchemaSetupInterface;
use Magento\Framework\Setup\UninstallInterface;
class Uninstall implements UninstallInterface
{
 private $eavSetupFactory;
 public function __construct(EavSetupFactory $eavSetupFactory)
 {
 $this->eavSetupFactory = $eavSetupFactory;
 }
 public function uninstall(SchemaSetupInterface $setup, ModuleContextInterface $context)
 {
 $eavSetup = $this->eavSetupFactory->create(['setup' => $setup]);
 $eavSetup->removeAttribute(
 \Magento\Catalog\Model\Product::ENTITY,
 'sample_attribute');
 }
}
Also you can follow below URL for creating custom product attribute.
-
I want to create a file upload attribute . What changes I have to do ? kindly guideephemeral– ephemeral2018年01月19日 08:16:16 +00:00Commented Jan 19, 2018 at 8:16
-
@ephemeral you can change the value of 'input' => '', You can read it here : magento.stackexchange.com/a/116829/2694Andhi Irawan– Andhi Irawan2018年02月07日 09:58:07 +00:00Commented Feb 7, 2018 at 9:58
-
I have to replace 'int ' with ? on this link i didnt find for file upload :(ephemeral– ephemeral2018年02月08日 11:21:25 +00:00Commented Feb 8, 2018 at 11:21
-
As special hint, dont let the field 'input' => '' blank. It will effect an error. magento.stackexchange.com/questions/204420/…ZFNerd– ZFNerd2018年03月15日 10:06:58 +00:00Commented Mar 15, 2018 at 10:06
-
hi @Prakash Patel, without installer can we create product attribute?Jafar Pinjar– Jafar Pinjar2019年01月08日 05:52:41 +00:00Commented Jan 8, 2019 at 5:52
If someone interested from where those magic property are:
For all attribute types you can check \Magento\Eav\Model\Entity\Setup\PropertyMapper::map method. In $this->_getValue($input, 'input', 'text') - 'input' is a key which you can use in eavSetup->addAttribute(), - 'text' - is default value for 'input`.
Special for catalog attributes (product,category) you can check \Magento\Eav\Model\Entity\Setup\PropertyMapperAbstract\PropertyMapper::map.
Mappers for other attribute types in image bellow:
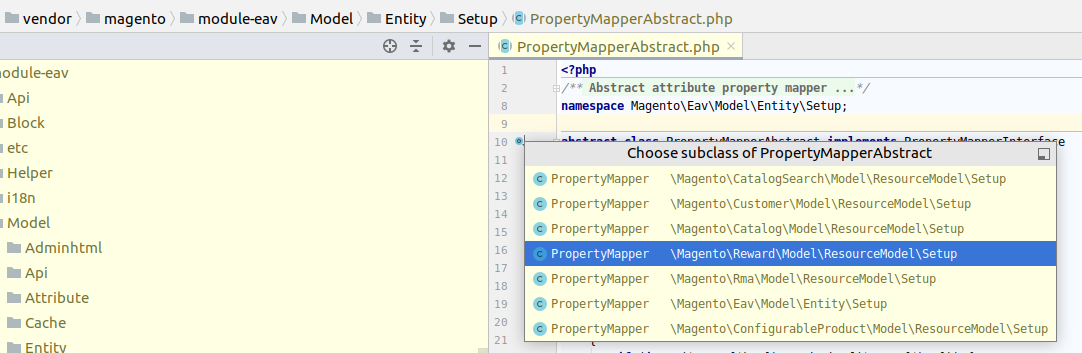
Note: if you don't specify some property in eavSetup->addAttribute() which don't have default value - null will be used.
The official documentation suggests to use data patches as of Magento 2.3.
Create a <Vendor>/<Module_Name>/Setup/Patch/Data/<Patch_Name>.php file and let it implement the Magento\Framework\Setup\Patch\DataPatchInterface.
Here's a simple example of such a patch file.
<?php
namespace MyVendor\MyModule\Setup\Patch\Data;
use Magento\Catalog\Model\Product;
use Magento\Catalog\Setup\CategorySetup;
use Magento\Catalog\Setup\CategorySetupFactory;
use Magento\Eav\Model\Entity\Attribute\ScopedAttributeInterface;
use Magento\Framework\Setup\ModuleDataSetupInterface;
use Magento\Framework\Setup\Patch\DataPatchInterface;
use Magento\Framework\Setup\Patch\PatchRevertableInterface;
class CreateMyCustomAttribute implements DataPatchInterface
{
 public function __construct(
 private ModuleDataSetupInterface $moduleDataSetup,
 private CategorySetupFactory $categorySetupFactory
 ) {
 }
 public function apply(): void
 {
 $this->moduleDataSetup->getConnection()->startSetup();
 /** @var CategorySetup $categorySetup */
 $categorySetup = $this->categorySetupFactory->create(['setup' => $this->moduleDataSetup]);
 $categorySetup->addAttribute(Product::ENTITY, 'my_custom_attribute', [
 'type' => 'text',
 'label' => 'My custom attribute',
 'input' => 'textarea',
 'required' => false,
 'frontend_class' => 'validate-length maximum-length-255',
 'global' => ScopedAttributeInterface::SCOPE_GLOBAL,
 'visible' => true,
 'searchable' => false,
 'comparable' => false,
 'group' => 'General',
 // etc.
 ]);
 $this->moduleDataSetup->getConnection()->endSetup();
 }
 public static function getDependencies(): array
 {
 return [];
 }
 public function getAliases(): array
 {
 return [];
 }
}
Additionally to the apply method, which is called when the module gets installed, you can make the patch revertable. This way you can remove data from the database which is not needed anymore.
To make the patch revertable, you have to implement Magento\Framework\Setup\Patch\PatchRevertableInterface:
use Magento\Framework\Setup\ModuleDataSetupInterface;
use Magento\Framework\Setup\Patch\DataPatchInterface;
+ use Magento\Framework\Setup\Patch\PatchRevertableInterface;
- class CreateMyCustomAttribute implements DataPatchInterface
+ class CreateCinovoCommodityCategoryAttribute
+ implements DataPatchInterface, PatchRevertableInterface
{
and add a `revert' method:
+ public function revert(): void
+ {
+ $this->moduleDataSetup->getConnection()->startSetup();
+
+ /** @var CategorySetup $categorySetup */
+ $categorySetup = $this->categorySetupFactory->create(['setup' => $this->moduleDataSetup]);
+ $categorySetup->removeAttribute(Product::ENTITY, 'my_custom_attribute');
+
+ $this->moduleDataSetup->getConnection()->endSetup();
+ }