Showing posts with label Baby Lock. Show all posts
Showing posts with label Baby Lock. Show all posts
Monday, August 25, 2025
Two - toned (Color block) Hoodie DIY
Several weeks ago, my daughter's boyfriend asked me to create a matching two-tone hoodie for her birthday. Since this was a surprise, I needed to be very careful not to spill the beans. Now, she has already received the hoodie (and yes, she really loves it!), I get to share a tutorial on how I accomplished this highly secret mission. hahaha.
He provided two hoodies and stay tape. I just needed to find the time to work on them when she was not around.
* You will need
Two different color hoodies
Stay tape
Jersey needle
Thread
* How to
1. I asked him to wash them first. I guess you don't have to, but I felt that it would be better. I ironed them and made sure they had no wrinkles.
2. Lay one hoodie on the cutting table completely flat; no wrinkles on the front and back. Make sure the shoulder seams and side seams are straight. These things sound tedious, but these things make the finished result much cleaner and better. Determine the cutting line. I decided to cut from one of the shoulders to the opposite side of the side seam line a few inches above the bottom line.
3. Use the part of the hoodie you just cut, cut the other hoodie the same way. I pinned the shoulder and the side together, so it will stay better when I cut. I used my cutting mat and rotary cutter for this. If you don't have these tools, you can draw a line and cut it with the scissors. Pining near the cutting line helps to keep the fabric aligned better.
4. Swap the hoodies to create two sets of two-toned hoodies.
5. Take one set of the hoodie parts and sew together. To prevent the fabric from stretching out and becoming wavy, I used stay tape. This one wasn't adhesive tape, so I pinned it with the seams. Take the right sides of the hoodies parts together and place stay tape on top of the one side of the seam line and pin all three layers together and sew. I used the jersey needle to sew with my sewing machine.
6. I used my Baby Lock Victory to serge all around the seam. Having the serger made this process very quick and I was able to sew with confidence.
7. Press the seam with an iron and do the same process with the other set of hoodie parts.
Mission complete! The seam lines are crisp and clean and my daughter and her boyfriend loved the result.
Labels:
Baby Lock
,
baby lock ambassador
,
Baby Lock serger Victory
,
Color block hoodie
,
DIY
,
sewing
,
tutorial
,
Two -tone hoodie
Saturday, February 1, 2025
Meet My New Serger! ~ Baby Lock Victory
Hello everyone! This is the very first post of 2025 and I have exciting news to share. I have been an ambassador for Baby Lock for the last several years, and I created some fun projects with the sewing machines Aria and Sashiko. They are such excellent machines and I recommend them wholeheartedly. Now I have an opportunity to work with their serger, Victory!
Look at this beauty… decades ago, my husband bought me a simple serger as a surprise and it has been a good machine, but I always wanted to try a Baby Lock serger. I had a feeling that I would love their serger as much as I love my sewing machine.
Victory is on the more affordable side of sergers among Baby Lock, and it has all the bells and whistles that I wanted. The main feature that I was curious about and interested in for YEARS was the JET-AIR THREADING. With just the touch of a lever, thread is sent through the tubular loopers. The NEEDLE THREADING SYSTEM will make threading the top threads a breeze. Hold the needle threader in place for quick and easy threading. I really didn't care for threading my previous serger… Now I can spend less time threading and more time sewing and having fun.
Two bright LED lights help me clearly see every stitch, fabric and thread color. Having no tension adjustments and an adjustable presser foot height of up to 6 mm is AMAZING!
Also, I really love this ACCESSORY STORAGE! It's like when a girl is showing off her dress, and she says "Look! there are pockets!" Hehehe
I started looking through the manual and played with my new serger. I am already in love with my Victory. All of my major projects in 2024 were quilts. I have a feeling that I am going to do a lot more garment sewing this year.
Labels:
Baby Lock
,
baby lock ambassador
,
Serger
,
sewing
,
Victory
Monday, September 2, 2024
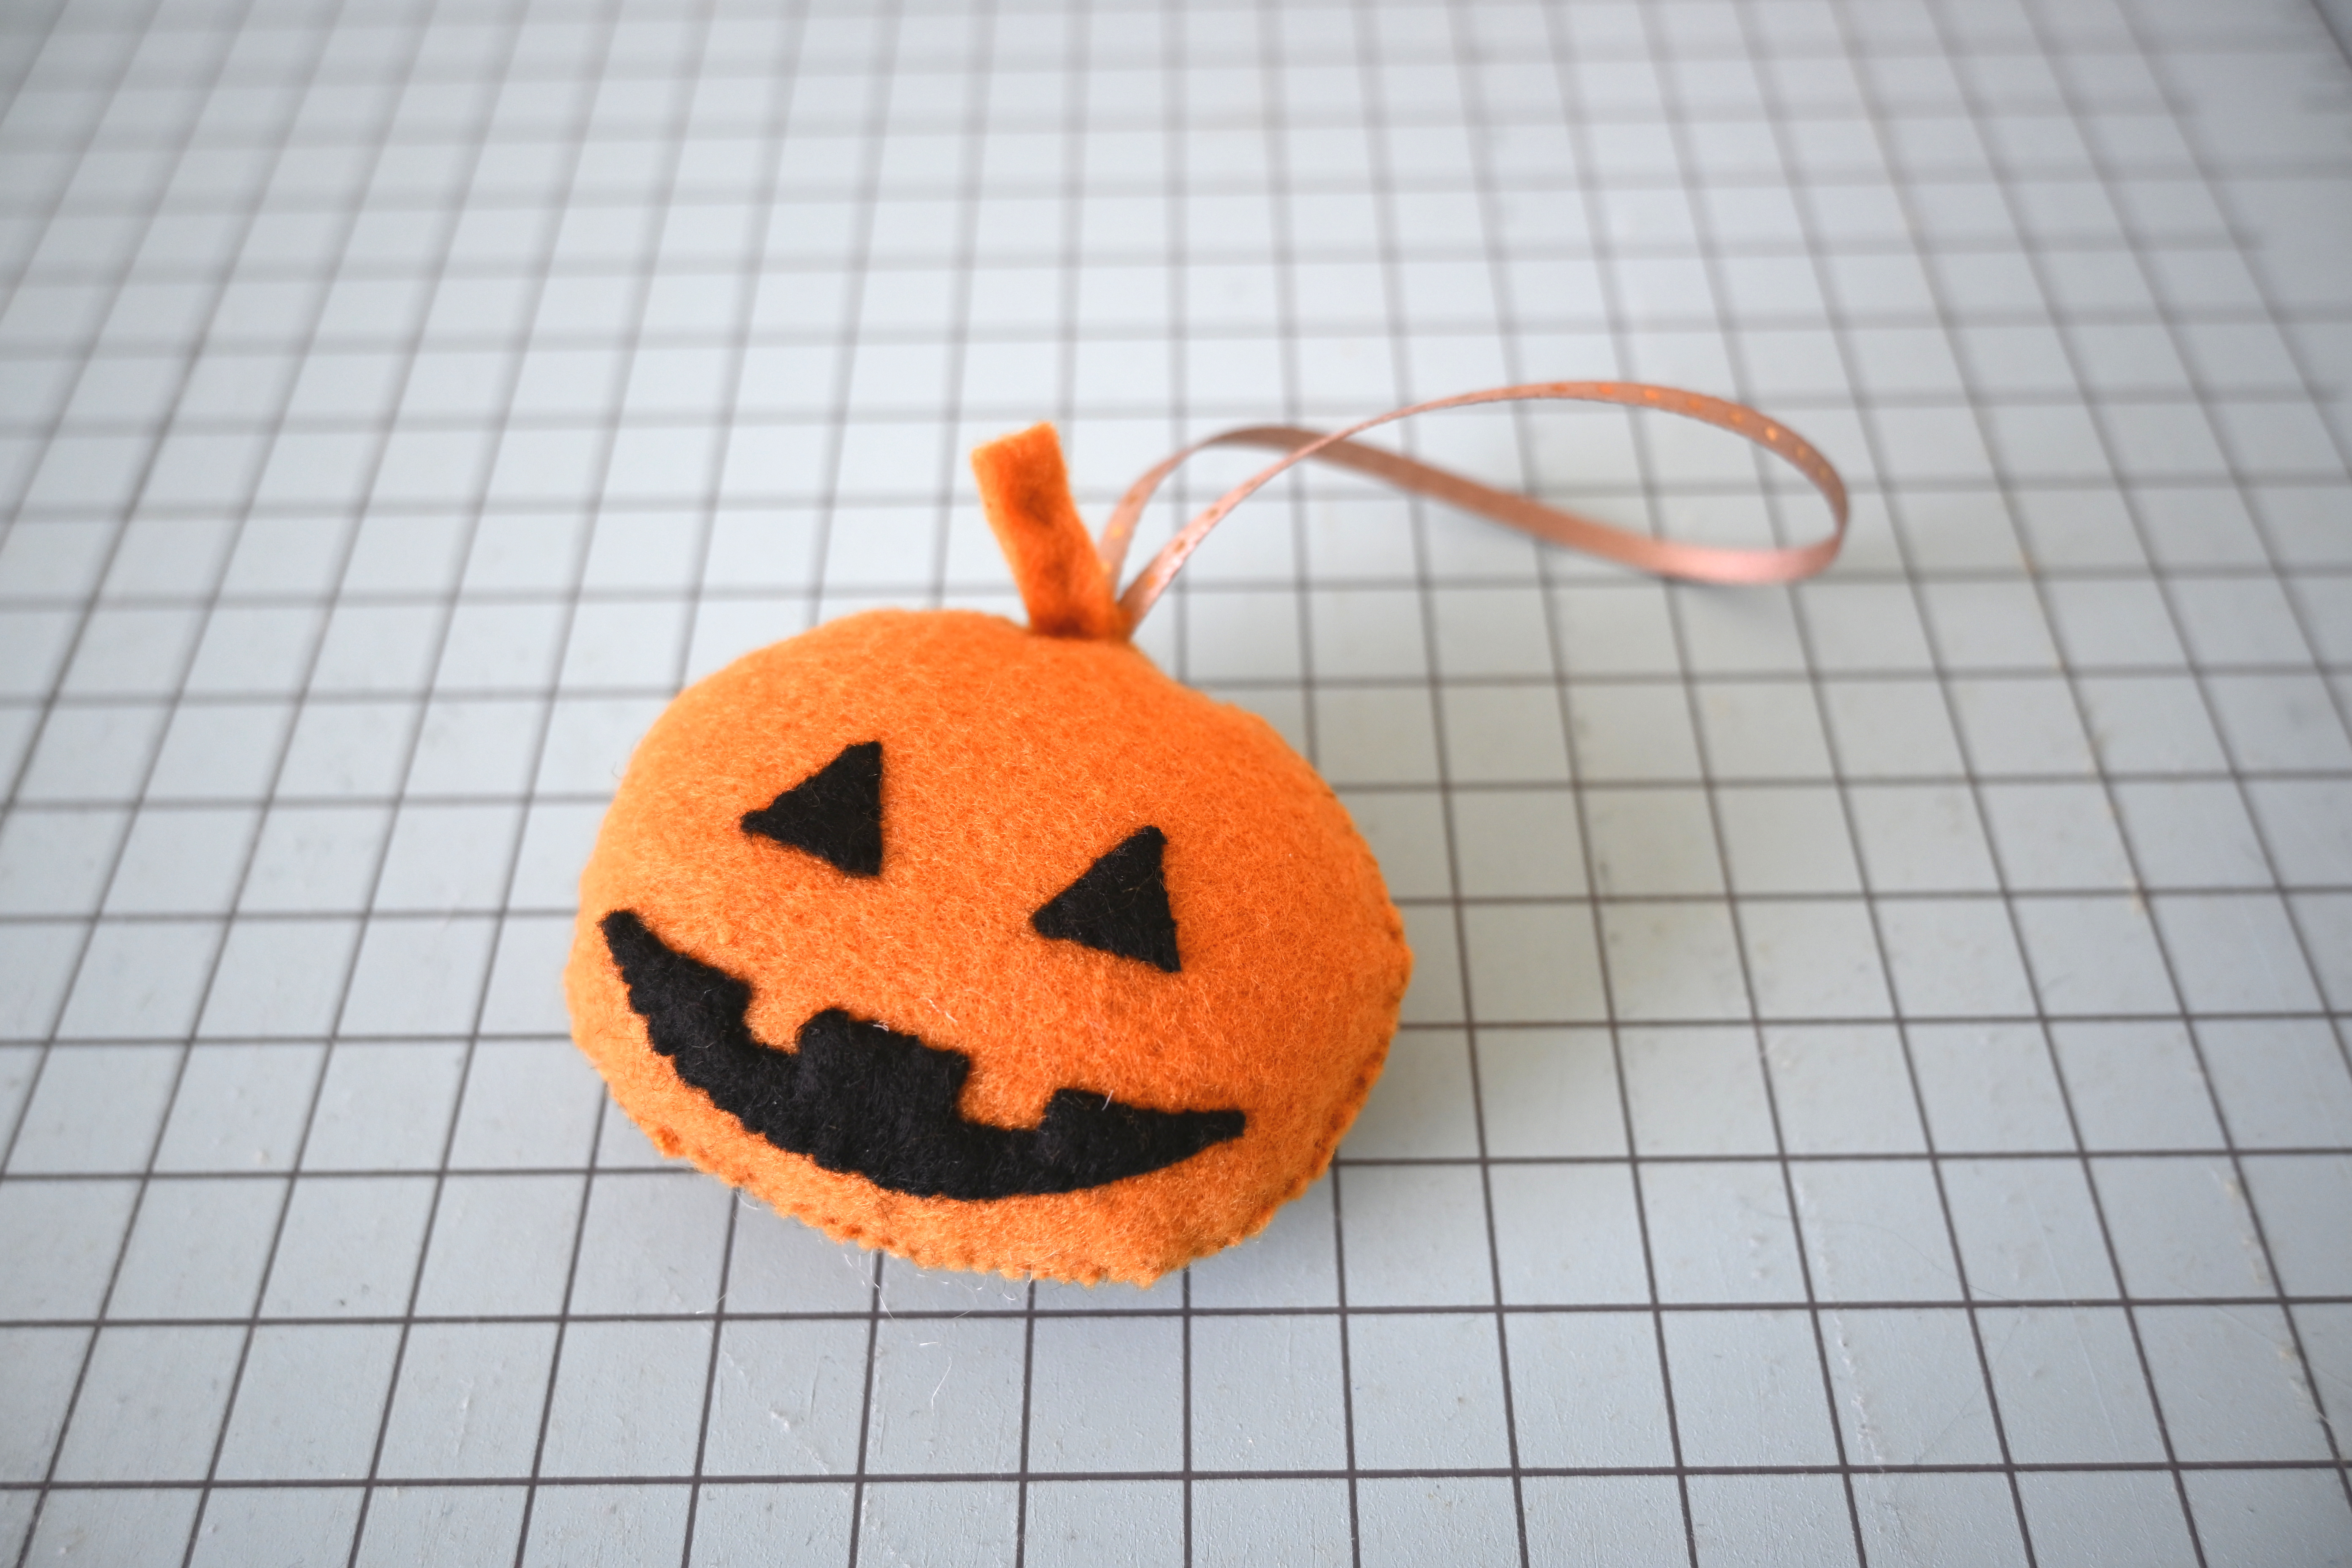
Felt Pumpkin Tutorial with Printable Pattern
October last year, I did a tutorial post to make Halloween Trick or Treat Bag. It was a post to showcase what that Baby Lock Sashiko machine can do. It was one of my most popular posts. Then, I found out that many people were interested in how to make the felt pumpkin I made to accessorize the bag.
The felt pumpkin was something I made up at the last minute and hand sewed, so I didn't include that in the tutorial. Today, I am going to share the tutorial and a printable pattern! I hope you will enjoy it.
* You will need
Pattern
Orange and black felt (you could use wool too)
Orange and black embroidery thread
Stuffing
Thin Ribbon
* How to
1. Print out the pattern and cut them out.
2.Use the pattern and cut out the necessary parts.
3. On the original felt pumpkin, I embroidered the eyes and mouth, but I decided to cut the shapes out of the black felt and applique them instead. I wanted to show you different options. I used 1 strand of thread and stitched with whip stitch. You could do this with blanket stitch if that is what you prefer.
4. Fold the long orange felt piece in half and stitch the middle to make a stem.
5. Stitch down the stem and ribbon to the inside of the back piece of pumpkin.
6. Put the front and back of the pumpkin pieces together. Start from the bottom and leave about 1 1/2" open to stuff. I used whip stitch with 2 strands of thread. To secure the stem and the ribbon I sewed the top area twice.
7. Time to enjoy!
You could make this as a home decoration or a gift. Instead of sewing in the ribbon, you could add a pin on the back to make a cute badge too. There are many ways to enjoy this little felt project.
If you are curious about the Halloween trick or treat bag, please hop over to my tutorial to check it out!
Labels:
Baby Lock
,
baby lock sewing
,
gift
,
Halloween
,
sewing
,
Trick or Treat bag
,
tutorial
Wednesday, July 17, 2024
Jen Kingwell Halo Quilt Finished!
I finished piecing this quilt in September of last year (no I didn't remember this info, I just went back and saw my post on Instagram), and I finally finished hand quilting it last month. I have a good excuse for why it took so long... I was making two other quilts for my son who was getting married. That will be another post, but today, I am ready to share this one. The pattern is designed by one of my most favorite Aussie quilt designer Jen Kingwell and called Halo.
Not only do I love scrappy quilts, I just love her authentic design and warmth. To kick start this quilt, I went through all my fabrics from scrap bins to fat quarters to larger pieces. It was so fun to coordinate fabrics and unexpectedly to find great combinations. That is one of the thrills of quilt making in my opinion.
I started a quilt group over a year ago and we meet twice a month. I hand quilted this during those times and machine pieced other quilts when I was by myself.
Oh, how I love the look of the stitches going through the quilt!
When people ask me who this quilt is for; my answer is, "For me!".
I will have some posts soon about my son's quilt and his wedding quilt. Until then, Happy quilting!
Labels:
Baby Lock
,
baby lock ambassador
,
Halo
,
hand quilting
,
Jen Kingwell
,
quilt
Friday, March 29, 2024
Laptop Sleeve with Baby Lock Sashiko
I have been sewing for many years, but my children have had very little interest in what I do. They think it's great that I have something I love to do and respect what I do, but that's about it. So when my daughter asked me to make a laptop sleeve for her, I was so excited. Hold on, it is coming right up!
There are various sizes in laptops, so I can't give exact measurements to suit everyone in this tutorial. Please measure your laptop to come up with numbers before you cut the necessary pieces; use this tutorial as a guide. Also, this sleeve is to protect the laptop from scratches and minor spills, but not from drops. Lastly, I used 1/2" seam in most places except for the sewing zipper.
2. As I mentioned in the beginning of this post, my measurements are just a guide to give you an idea. I cut 2 pieces of 12" x 10" for the larger panel and 2 pieces of 12" x 4" for the smaller panel from large floral print fabric. I wanted to use various scraps to run through in between the large and the small panels. I cut them 4" wide and randomly pieced and trimmed them to be 12" long.
3. Piece the large panel, pieced strip and small panel together. Press with iron.
4. Cut 2 pieces of thin muslin and batting larger than your finished piece and lay them flat on the table. Layer them with the pieced panel to get ready to machine quilt. I used pins to secure them together. Make another panel.
5. I set the stitch setting on my Sashiko machine before I started quilting. Stitch length to 2 and stitch spacing to 3. This is a great feature to achieve the exact look you are going for. I used smaller stitch setting for my Halloween Trick or Treat Bag project. I wanted different quilt designs on the front and back to have fun with the Sashiko machine (who said it has to be exactly the same! haha) and here are the results. 6. Trim off the excess. I wanted slightly rounded corners on the top, so I used random objects I found in my sewing room, traced them (mine are 2" in diameter) and trimmed them. 7. Find the center of the top seam of the panel and on the zipper. Pin the right side of the zipper to the right side of the panel. Switch the walking foot to zipper foot and sew slowly and carefully, especially the rounded corner. Do the same with other panel. There are some great tutorials on how to attach zippers on Youtube if you are unsure how to do this process.
8. Put together the panels right sides together and sew the sides and the bottom. Make sure to leave the zipper open during this process, otherwise you won't be able to turn the fabric inside out! Trim the bottom corners for a clean finish.
9. Sew the liner. I cut 2 pieces of 12" x 16". I started to sew about 2" from the top seam and ended 2" before the top. You will need that opening to fold the sides to fit and stitch to the zipper and create the rounded corners. Press the seam with an iron for a clean finish and press the top seam slightly more the 1/2" except the corners.
10. Put together the quilted panel and the liner and hand stitch the liner to the zipper. I carefully created the round corner as I was stitching. There are other methods to do this, but I just did what I was comfortable with.
It is time for a test drive. I inserted my daughter's laptop and it was a perfect fit! This tutorial could apply to other devices such as iPads and Kindles. Isn't it fun to think about how you can have your very own personalized laptop sleeve? I hope you enjoyed my tutorial!
There are various sizes in laptops, so I can't give exact measurements to suit everyone in this tutorial. Please measure your laptop to come up with numbers before you cut the necessary pieces; use this tutorial as a guide. Also, this sleeve is to protect the laptop from scratches and minor spills, but not from drops. Lastly, I used 1/2" seam in most places except for the sewing zipper.
You Will Need:
- Fabric for front and back - I wanted a pieced look but you can make this from a solid piece of fabric.
- Batting
- Thin muslin
- Lining fabric
- 18" zipper - purchase a zipper 2" longer than your fabric panel width
- Thread
How to
1. Measure your laptop. My laptop was 10" high x 14" wide x 7/8" thick. Considering the seam allowance, enough room to store the laptop in and pull it out with ease, I wanted the finished pieced fabric to be 12" x 16". So basically I added 2" to the original height and the width. It is pretty easy to do this when you choose to do it with non pieced fabric. If you decided to do a pieced look, make sure that your pieced panels are large enough.2. As I mentioned in the beginning of this post, my measurements are just a guide to give you an idea. I cut 2 pieces of 12" x 10" for the larger panel and 2 pieces of 12" x 4" for the smaller panel from large floral print fabric. I wanted to use various scraps to run through in between the large and the small panels. I cut them 4" wide and randomly pieced and trimmed them to be 12" long.
3. Piece the large panel, pieced strip and small panel together. Press with iron.
4. Cut 2 pieces of thin muslin and batting larger than your finished piece and lay them flat on the table. Layer them with the pieced panel to get ready to machine quilt. I used pins to secure them together. Make another panel.
5. I set the stitch setting on my Sashiko machine before I started quilting. Stitch length to 2 and stitch spacing to 3. This is a great feature to achieve the exact look you are going for. I used smaller stitch setting for my Halloween Trick or Treat Bag project. I wanted different quilt designs on the front and back to have fun with the Sashiko machine (who said it has to be exactly the same! haha) and here are the results. 6. Trim off the excess. I wanted slightly rounded corners on the top, so I used random objects I found in my sewing room, traced them (mine are 2" in diameter) and trimmed them. 7. Find the center of the top seam of the panel and on the zipper. Pin the right side of the zipper to the right side of the panel. Switch the walking foot to zipper foot and sew slowly and carefully, especially the rounded corner. Do the same with other panel. There are some great tutorials on how to attach zippers on Youtube if you are unsure how to do this process.
8. Put together the panels right sides together and sew the sides and the bottom. Make sure to leave the zipper open during this process, otherwise you won't be able to turn the fabric inside out! Trim the bottom corners for a clean finish.
9. Sew the liner. I cut 2 pieces of 12" x 16". I started to sew about 2" from the top seam and ended 2" before the top. You will need that opening to fold the sides to fit and stitch to the zipper and create the rounded corners. Press the seam with an iron for a clean finish and press the top seam slightly more the 1/2" except the corners.
10. Put together the quilted panel and the liner and hand stitch the liner to the zipper. I carefully created the round corner as I was stitching. There are other methods to do this, but I just did what I was comfortable with.
It is time for a test drive. I inserted my daughter's laptop and it was a perfect fit! This tutorial could apply to other devices such as iPads and Kindles. Isn't it fun to think about how you can have your very own personalized laptop sleeve? I hope you enjoyed my tutorial!
Labels:
Baby Lock
,
baby lock ambassador
,
Baby Lock Sashiko
,
Laptop sleeve
,
Machine quiltig
,
Quilting
,
sewing
Subscribe to:
Comments
(
Atom
)