Thursday, July 15, 2021
Install PyQt5 for Python3 on Raspberry Pi OS
To install PyQt5 on Raspberry Pi OS, for Python3, enter the command:
$ sudo apt install python3-pyqt5
Currently, it's 5.11.3.
Tuesday, July 13, 2021
Install bluepy on Raspberry Pi, for Python3, and examples.
bluepy
is a Python interface to Bluetooth LE on Linux.
To install
bluepy on Raspberry Pi for Python3, enter the command:
$ sudo apt-get install python3-pip libglib2.0-dev
$ sudo pip3 install bluepy
bluepy examples:
from bluepy.btle import Scanner, DefaultDelegate
class ScanDelegate(DefaultDelegate):
 def __init__(self):
 DefaultDelegate.__init__(self)
 def handleDiscovery(self, dev, isNewDev, isNewData):
 if isNewDev:
 print("Discovered device", dev.addr)
 elif isNewData:
 print("Received new data from", dev.addr)
scanner = Scanner().withDelegate(ScanDelegate())
devices = scanner.scan(10.0)
for dev in devices:
 print("Device %s (%s), RSSI=%d dB" % (dev.addr, dev.addrType, dev.rssi))
 for (adtype, desc, value) in dev.getScanData():
 print(" %s = %s" % (desc, value))
from bluepy import btle
class MyDelegate(btle.DefaultDelegate):
 def __init__(self):
 btle.DefaultDelegate.__init__(self)
 # ... initialise here
 def handleNotification(self, cHandle, data):
 print("\n- handleNotification -\n")
 print(data)
 # ... perhaps check cHandle
 # ... process 'data'
# Initialisation -------
p = btle.Peripheral("3c:71:bf:0d:dd:6a")
p.setDelegate( MyDelegate() )
# Setup to turn notifications on, e.g.
svc = p.getServiceByUUID("6E400001-B5A3-F393-E0A9-E50E24DCCA9E")
ch = svc.getCharacteristics("6E400003-B5A3-F393-E0A9-E50E24DCCA9E")[0]
# ch.write( setup_data )
setup_data = b"\x0100円"
p.writeCharacteristic(ch.valHandle+1, setup_data)
# Main loop --------
while True:
 if p.waitForNotifications(1.0):
 # handleNotification() was called
 continue
 print("Waiting...")
 # Perhaps do something else here
Next:
Thursday, April 8, 2021
ESP32/MicroPython server + Raspberry Pi/Python client, transmit image via WiFi TCP socket.
In this exercise, ESP32 (ESP32-DevKitC V4)/MicroPython play the role of AP, act as socket server. Raspberry Pi connect to ESP32 WiFi network, run Python code to load image, act as client and transmit the image to ESP32 server. The ESP32 server display the image on a 240*240 IPS (ST7789 SPI) LCD. It's is role reversed version of my previous exercise "Raspberry Pi/Python Server send image to ESP32/MicroPython Client via WiFi TCP socket".
protocol:
Client			|	 |	Server
(Raspberry Pi/Python)	|	 |	(ESP32/MicroPython)
			|	 |
			|	 |	Reset
			||	Setup AP
			|	|	Setup socket server
(connect to ESP32 WiFi)	|	|
			|	|
connect to ESP32 server	|	 |	accepted
			|<-- ACK ---|
send the 0th line	|---------->|	display the 0th line
			|<-- ACK ---|	send ACK
send the 1st line	|---------->|	display the 1st line
			|<-- ACK ---|	send ACK
			.
			.
			.
send the 239th line	|---------->|	display the 239th line
			|<-- ACK ---|	send ACK
close socket		|  |	close socket
			|	 |
from os import uname
from sys import implementation
import machine
import network
import socket
import ubinascii
import utime
import st7789py as st7789
from fonts import vga1_16x32 as font
import ustruct as struct
"""
ST7789 Display ESP32-DevKitC (SPI2)
SCL GPIO18
SDA GPIO23
 GPIO19 (miso not used)
ST7789_rst GPIO5
ST7789_dc GPIO4
"""
#ST7789 use SPI(2)
st7789_res = 5
st7789_dc = 4
pin_st7789_res = machine.Pin(st7789_res, machine.Pin.OUT)
pin_st7789_dc = machine.Pin(st7789_dc, machine.Pin.OUT)
disp_width = 240
disp_height = 240
ssid = "ssid"
AP_ssid = "ESP32"
password = "password"
serverIP = '192.168.1.30'
serverPort = 80
print(implementation.name)
print(uname()[3])
print(uname()[4])
print()
#spi2 = machine.SPI(2, baudrate=40000000, polarity=1)
pin_spi2_sck = machine.Pin(18, machine.Pin.OUT)
pin_spi2_mosi = machine.Pin(23, machine.Pin.OUT)
pin_spi2_miso = machine.Pin(19, machine.Pin.IN)
spi2 = machine.SPI(2, sck=pin_spi2_sck, mosi=pin_spi2_mosi, miso=pin_spi2_miso,
 baudrate=40000000, polarity=1)
print(spi2)
display = st7789.ST7789(spi2, disp_width, disp_width,
 reset=pin_st7789_res,
 dc=pin_st7789_dc,
 xstart=0, ystart=0, rotation=0)
display.fill(st7789.BLACK)
mac = ubinascii.hexlify(network.WLAN().config('mac'),':').decode()
print("MAC: " + mac)
print()
#init ESP32 as STA
wlan = network.WLAN(network.STA_IF)
wlan.active(True)
wlan.disconnect()
utime.sleep(1)
def do_connect():
 global wlan
 print('connect to network...')
 display.fill(st7789.BLACK)
 display.text(font, "connect...", 10, 10)

 wlan.active(True)
 if not wlan.isconnected():
 print('...')
 wlan.connect(ssid, password)
 while not wlan.isconnected():
 pass

 print()
 print('network config:')
 print("interface's IP/netmask/gw/DNS addresses")
 #print(wlan.ifconfig())
 myIP = wlan.ifconfig()[0]
 print(myIP)

 display.fill(st7789.BLACK)
 display.text(font, myIP, 10, 10)

def do_setupAP():
 global wlan
 print('setup AP...')
 display.fill(st7789.BLACK)
 display.text(font, "setup AP...", 10, 10)
 utime.sleep(1)

 ap = network.WLAN(network.AP_IF)
 ap.active(True)
 ap.config(essid=AP_ssid, password=password)
 while ap.active() == False:
 pass

 print(ap.active())
 print()
 print('network config:')
 myIP = ap.ifconfig()
 print(myIP)

 display.fill(st7789.BLACK)
 display.text(font, myIP[0], 10, 10)
def do_setupServer():
 global wlan
 global display

 addr = socket.getaddrinfo('0.0.0.0', serverPort)[0][-1]
 s = socket.socket()
 s.bind(addr)
 s.listen(1)

 print('listening on', addr)
 display.text(font, ':'+str(serverPort), 10, 50)

 while True:
 print('waiting connection...')
 cl, addr = s.accept()
 cl.settimeout(5)
 print('client connected from:', addr)

 display.fill(st7789.BLACK)
 display.text(font, addr[0], 10, 10)

 cl.sendall('ACK')
 print('Firt ACK sent')

 display.set_window(0, 0, disp_width-1, disp_height-1)
 pin_st7789_dc.on()
 for j in range(disp_height):

 try:
 buff = cl.recv(disp_width*3)
 #print('recv ok: ' + str(j))
 except:
 print('except: ' + str(j))

 for i in range(disp_width):
 offset= i*3
 spi2.write(struct.pack(st7789._ENCODE_PIXEL,
 (buff[offset] & 0xf8) << 8 |
 (buff[offset+1] & 0xfc) << 3 |
 buff[offset+2] >> 3))
 #print('send ACK : ' + str(j))
 cl.sendall(bytes("ACK","utf-8"))
 #print('ACK -> : ' + str(j))
 utime.sleep(1)
 cl.close()
 print('socket closed')

#do_connect()
do_setupAP()
try:
 do_setupServer()
except:
 print('error')
 display.text(font, "Error", 10, 200)
finally:
 print('wlan.disconnect()')
 wlan.disconnect()

print('\n- bye -')import sys
from pkg_resources import require
import time
import matplotlib.image as mpimg
import socket
#HOST = '192.168.1.34' # The server's hostname or IP address
HOST = '192.168.4.1'
PORT = 80 # The port used by the server
from PyQt5.QtWidgets import (QApplication, QWidget, QPushButton, QLabel,
QFileDialog, QHBoxLayout, QVBoxLayout)
from PyQt5.QtGui import QPixmap, QImage
print(sys.version)
class AppWindow(QWidget):
camPreviewState = False #not in Preview
fileToUpload = ""
def __init__(self):
super().__init__()
lbSysInfo = QLabel('Python:\n' + sys.version)
vboxInfo = QVBoxLayout()
vboxInfo.addWidget(lbSysInfo)
#setup UI
btnOpenFile = QPushButton("Open File", self)
btnOpenFile.clicked.connect(self.evBtnOpenFileClicked)
self.btnUpload = QPushButton("Upload", self)
self.btnUpload.clicked.connect(self.evBtnUploadClicked)
self.btnUpload.setEnabled(False)
vboxCamControl = QVBoxLayout()
vboxCamControl.addWidget(btnOpenFile)
vboxCamControl.addWidget(self.btnUpload)
vboxCamControl.addStretch()
self.lbImg = QLabel(self)
self.lbImg.resize(240, 240)
self.lbImg.setStyleSheet("border: 1px solid black;")
hboxCam = QHBoxLayout()
hboxCam.addWidget(self.lbImg)
hboxCam.addLayout(vboxCamControl)
self.lbPath = QLabel(self)
vboxMain = QVBoxLayout()
vboxMain.addLayout(vboxInfo)
vboxMain.addLayout(hboxCam)
vboxMain.addWidget(self.lbPath)
vboxMain.addStretch()
self.setLayout(vboxMain)
self.setGeometry(100, 100, 500,400)
self.show()
#wait client response in 3 byte len
def wait_RESP(self, sock):
#sock.settimeout(10)
res = str()
data = sock.recv(4)
return data.decode("utf-8")
def sendImageToServer(self, imgFile):
print(imgFile)
imgArray = mpimg.imread(imgFile)
with socket.socket(socket.AF_INET, socket.SOCK_STREAM) as s:
s.connect((HOST, PORT))
print(self.wait_RESP(s))
for j in range(240):
time.sleep(0.1)
b = bytes(imgArray[j])
#print('send img : ' + str(j))
s.sendall(bytes(b))
#print('img sent : ' + str(j))
ans = self.wait_RESP(s)
#print(ans + " : " + str(j))
print('image sent finished')
s.close()
def evBtnUploadClicked(self):
print("evBtnUploadClicked()")
print(self.fileToUpload)
self.sendImageToServer(self.fileToUpload)
def evBtnOpenFileClicked(self):
options = QFileDialog.Options()
options |= QFileDialog.DontUseNativeDialog
targetPath, _ = QFileDialog.getOpenFileName(
self, 'Open file', '/home/pi/Desktop',
'Image files (*.jpg)', options=options)
if targetPath:
print(targetPath)
self.lbPath.setText(targetPath)
with open(targetPath):
pixmap = QPixmap(targetPath)
#accept 240x240 image only
if pixmap.width()==240 and pixmap.height()==240:
self.lbImg.setPixmap(pixmap)
self.btnUpload.setEnabled(True)
self.fileToUpload = targetPath
else:
self.btnUpload.setEnabled(False)
def evBtnOpenFileClickedX(self):
targetPath="/home/pi/Desktop/image.jpg"
print(targetPath)
self.lbPath.setText(targetPath)
try:
with open(targetPath):
pixmap = QPixmap(targetPath)
self.lbImg.setPixmap(pixmap)
#as a exercise, get some info from pixmap
print('\npixmap:')
print(pixmap)
print(type(pixmap))
print(str(pixmap.width()) + " : " + str(pixmap.height()))
print()
print('convert to Image')
qim = pixmap.toImage()
print(qim)
print(type(qim))
print()
print('read a pixel from image')
qrgb = qim.pixel(0, 0)
print(hex(qrgb))
print(type(qrgb))
r, g, b = qRed(qrgb), qGreen(qrgb), qBlue(qrgb)
print([hex(r), hex(g), hex(b)])
print()
except FileNotFoundError:
print('File Not Found Error')
if __name__ == '__main__':
print('run __main__')
app = QApplication(sys.argv)
window = AppWindow()
sys.exit(app.exec_())
print("- bye -")
Wednesday, March 24, 2021
Raspberry Pi/Python Server send image to ESP32/MicroPython Client via WiFi TCP socket
protocol:
Server			|	|	Client
(Raspberry Pi/Python)	|	|	(ESP32/MicroPython)
			|	|
Start			|	|	Reset
			|	|
Setup as 		|	|
socketserver.TCPServer	|	|
			|	|
			|	|	Join the WiFi network
		|	|	Connect to server with socket
			|	|
			|<-- ACK ---|	send ACK
send the 0th line	|---------->|	display the 0th line
			|<-- ACK ---|	send ACK
send the 1st line	|---------->|	display the 1st line
			.
			.
			.
send the 239th line	|---------->|	display the 239th line
			|<-- ACK ---|	send ACK
close socket		|	|	close socket
			|	|
wait next		|	|	bye
Client side:
(ESP32/MicroPython)
The ESP32 used is a ESP32-DevKitC V4, display is a 240*240 IPS (ST7789 SPI) LCD. Library setup and connection, refer to former post "ESP32 (ESP32-DevKitC V4)/MicroPython + 240*240 IPS (ST7789 SPI) using russhughes/st7789py_mpy lib".
upyESP32_ImgClient_20210324c.py, MicroPython code run on ESP32. Modify ssid/password and serverIP for your WiFi network.from os import uname
from sys import implementation
import machine
import network
import socket
import ubinascii
import utime
import st7789py as st7789
from fonts import vga1_16x32 as font
import ustruct as struct
"""
ST7789 Display ESP32-DevKitC (SPI2)
SCL GPIO18
SDA GPIO23
GPIO19 (miso not used)
ST7789_rst GPIO5
ST7789_dc GPIO4
"""
#ST7789 use SPI(2)
st7789_res = 5
st7789_dc = 4
pin_st7789_res = machine.Pin(st7789_res, machine.Pin.OUT)
pin_st7789_dc = machine.Pin(st7789_dc, machine.Pin.OUT)
disp_width = 240
disp_height = 240
ssid = "your ssid"
password = "your password"
serverIP = '192.168.1.30'
serverPort = 9999
print(implementation.name)
print(uname()[3])
print(uname()[4])
print()
spi2 = machine.SPI(2, baudrate=40000000, polarity=1)
print(spi2)
display = st7789.ST7789(spi2, disp_width, disp_width,
reset=pin_st7789_res,
dc=pin_st7789_dc,
xstart=0, ystart=0, rotation=0)
display.fill(st7789.BLACK)
mac = ubinascii.hexlify(network.WLAN().config('mac'),':').decode()
print("MAC: " + mac)
print()
#init ESP32 as STA
wlan = network.WLAN(network.STA_IF)
wlan.active(True)
wlan.disconnect()
utime.sleep(1)
def do_connect():
global wlan
print('connect to network...')
display.fill(st7789.BLACK)
display.text(font, "connect...", 10, 10)
wlan.active(True)
if not wlan.isconnected():
print('...')
wlan.connect(ssid, password)
while not wlan.isconnected():
pass
print()
print('network config:')
print("interface's IP/netmask/gw/DNS addresses")
print(wlan.ifconfig())
display.fill(st7789.BLACK)
display.text(font, "connected", 10, 10)
def do_scan():
global wlan
print('scan network...')
wlan.active(True)
for network in wlan.scan():
print(network)
def do_connectServer():
global wlan
global display
addr = socket.getaddrinfo(serverIP, serverPort)[0][-1]
print(addr)
s = socket.socket()
s.connect(addr)
print('---')
display.fill(st7789.BLACK)
display.text(font, "waiting...", 10, 10)
print('Send ACK')
s.sendall(bytes("ACK","utf-8"))
display.set_window(0, 0, disp_width-1, disp_height-1)
pin_st7789_dc.on()
for j in range(disp_height):
buff = s.recv(disp_width*3)
for i in range(disp_width):
offset= i*3
spi2.write(struct.pack(st7789._ENCODE_PIXEL,
(buff[offset] & 0xf8) << 8 |
(buff[offset+1] & 0xfc) << 3 |
buff[offset+2] >> 3))
s.sendall(bytes("ACK","utf-8"))
s.close()
print('socket closed')
do_connect()
try:
do_connectServer()
except:
print('error')
display.text(font, "Error", 10, 200)
finally:
print('wlan.disconnect()')
wlan.disconnect()
print('\n- bye -')
Server Side:
(Raspberry Pi/Python)
The server will send Desktop/image.jpg with fixed resolution 240x240 (match with the display in client side). My former post "min. version of RPi/Python Code to control Camera Module with preview on local HDMI" is prepared for this purpose to capture using Raspberry Pi Camera Module .
pyMyTCP_ImgServer_20210324c.py, Python3 code run on Raspberry Pi.import socketserver
import platform
import matplotlib.image as mpimg
imageFile = '/home/pi/Desktop/image.jpg'
print("sys info:")
for info in platform.uname():
print(info)
class MyTCPHandler(socketserver.BaseRequestHandler):
#wait client response in 3 byte len
def wait_RESPONSE(self, client):
client.settimeout(10)
res = str()
data = client.recv(4)
return data.decode("utf-8")
def handle(self):
msocket = self.request
print("{} connected:".format(self.client_address[0]))
imgArray = mpimg.imread(imageFile)
self.wait_RESPONSE(msocket) #dummy assume 'ACK' received
print('first RESPONSE received')
for j in range(240):
b = bytes(imgArray[j])
msocket.sendall(bytes(b))
self.wait_RESPONSE(msocket) #dummy assume 'ACK' received
print('image sent finished')
msocket.close()
if __name__ == "__main__":
HOST, PORT = "localhost", 9999
# Create the server, binding to localhost on port 9999
#with socketserver.TCPServer((HOST, PORT), MyTCPHandler) as server:
with socketserver.TCPServer(('', PORT), MyTCPHandler) as server:
# Activate the server; this will keep running until you
# interrupt the program with Ctrl-C
server.serve_forever()Next:
Saturday, February 20, 2021
Pico/MicroPython + ESP-01S (AT Command) act as TCP Client connect to Raspberry Pi/Python TCP Server
This exercise program Raspberry Pi Pico in MicroPython, using ESP-01S (ESP8266) as WiFi co-processor, act as TCP Client.
The ESP-01S is flashed with AT command firmware, version:
AT version:1.7.4.0(May 11 2020 19:13:04)
SDK version:3.0.4(9532ceb)
compile time:May 27 2020 10:12:17
Bin version(Wroom 02):1.7.4
import uos
import machine
import utime
"""
Raspberry Pi Pico/MicroPython + ESP-01S exercise
ESP-01S(ESP8266) with AT-command firmware:
AT version:1.7.4.0(May 11 2020 19:13:04)
Pico send AT command to ESP-01S via UART,
- set in station mode
- join AP
- connect to server ip:port 9999
- send text and wait response
"""
#server port & ip hard-coded,
#have to match with server side setting
server_ip="192.168.12.147"
server_port=9999
print()
print("Machine: \t" + uos.uname()[4])
print("MicroPython: \t" + uos.uname()[3])
#indicate program started visually
led_onboard = machine.Pin(25, machine.Pin.OUT)
led_onboard.value(0) # onboard LED OFF/ON for 0.5/1.0 sec
utime.sleep(0.5)
led_onboard.value(1)
utime.sleep(1.0)
led_onboard.value(0)
uart0 = machine.UART(0, baudrate=115200)
print(uart0)
def sendCMD_waitResp(cmd, uart=uart0, timeout=2000):
 print("CMD: " + cmd)
 uart.write(cmd)
 waitResp(uart, timeout)
 print()

def waitResp(uart=uart0, timeout=2000):
 prvMills = utime.ticks_ms()
 resp = b""
 while (utime.ticks_ms()-prvMills)<timeout:
 if uart.any():
 resp = b"".join([resp, uart.read(1)])
 print("resp:")
 try:
 print(resp.decode())
 except UnicodeError:
 print(resp)

# send CMD to uart,
# wait and show response without return
def sendCMD_waitAndShow(cmd, uart=uart0):
 print("CMD: " + cmd)
 uart.write(cmd)
 while True:
 print(uart.readline())

def espSend(text="test", uart=uart0):
 sendCMD_waitResp('AT+CIPSEND=' + str(len(text)) + '\r\n')
 sendCMD_waitResp(text)

sendCMD_waitResp('AT\r\n') #Test AT startup
sendCMD_waitResp('AT+GMR\r\n') #Check version information
#sendCMD_waitResp('AT+RESTORE\r\n') #Restore Factory Default Settings
sendCMD_waitResp('AT+CWMODE?\r\n') #Query the Wi-Fi mode
sendCMD_waitResp('AT+CWMODE=1\r\n') #Set the Wi-Fi mode 1 = Station mode
#sendCMD_waitResp('AT+CWMODE=2\r\n') #Set the Wi-Fi mode 2 = S0ftAP mode
sendCMD_waitResp('AT+CWMODE?\r\n') #Query the Wi-Fi mode again
#sendCMD_waitResp('AT+CWLAP\r\n', timeout=10000) #List available APs
sendCMD_waitResp('AT+CWJAP="ssid","password"\r\n', timeout=5000) #Connect to AP
sendCMD_waitResp('AT+CIFSR\r\n') #Obtain the Local IP Address
#sendCMD_waitResp('AT+CIPSTART="TCP","192.168.12.147",9999\r\n')
sendCMD_waitResp('AT+CIPSTART="TCP","' +
 server_ip +
 '",' +
 str(server_port) +
 '\r\n')
espSend()
while True:
 print('Enter something:')
 msg = input()
 #sendCMD_waitResp('AT+CIPSTART="TCP","192.168.12.147",9999\r\n')
 sendCMD_waitResp('AT+CIPSTART="TCP","' +
 server_ip +
 '",' +
 str(server_port) +
 '\r\n')
espSend(msg)"""
ref:
https://docs.python.org/3/library/socketserver.html
"""
import socketserver
import platform
print("sys info:")
for info in platform.uname():
print(info)
class MyTCPHandler(socketserver.BaseRequestHandler):
"""
The request handler class for our server.
It is instantiated once per connection to the server, and must
override the handle() method to implement communication to the
client.
"""
def handle(self):
# self.request is the TCP socket connected to the client
self.data = self.request.recv(1024).strip()
print("{} wrote:".format(self.client_address[0]))
print(self.data)
# just send back the same data, but upper-cased
self.request.sendall(self.client_address[0].encode())
self.request.sendall(self.data.upper())
self.request.sendall(b'\r\n')
if __name__ == "__main__":
HOST, PORT = "localhost", 9999
# Create the server, binding to localhost on port 9999
#with socketserver.TCPServer((HOST, PORT), MyTCPHandler) as server:
with socketserver.TCPServer(('', PORT), MyTCPHandler) as server:
# Activate the server; this will keep running until you
# interrupt the program with Ctrl-C
server.serve_forever()
Next:
~ TCP socket communication between (RPi Pico+ESP-01S) and ESP32 via WiFi
Friday, February 19, 2021
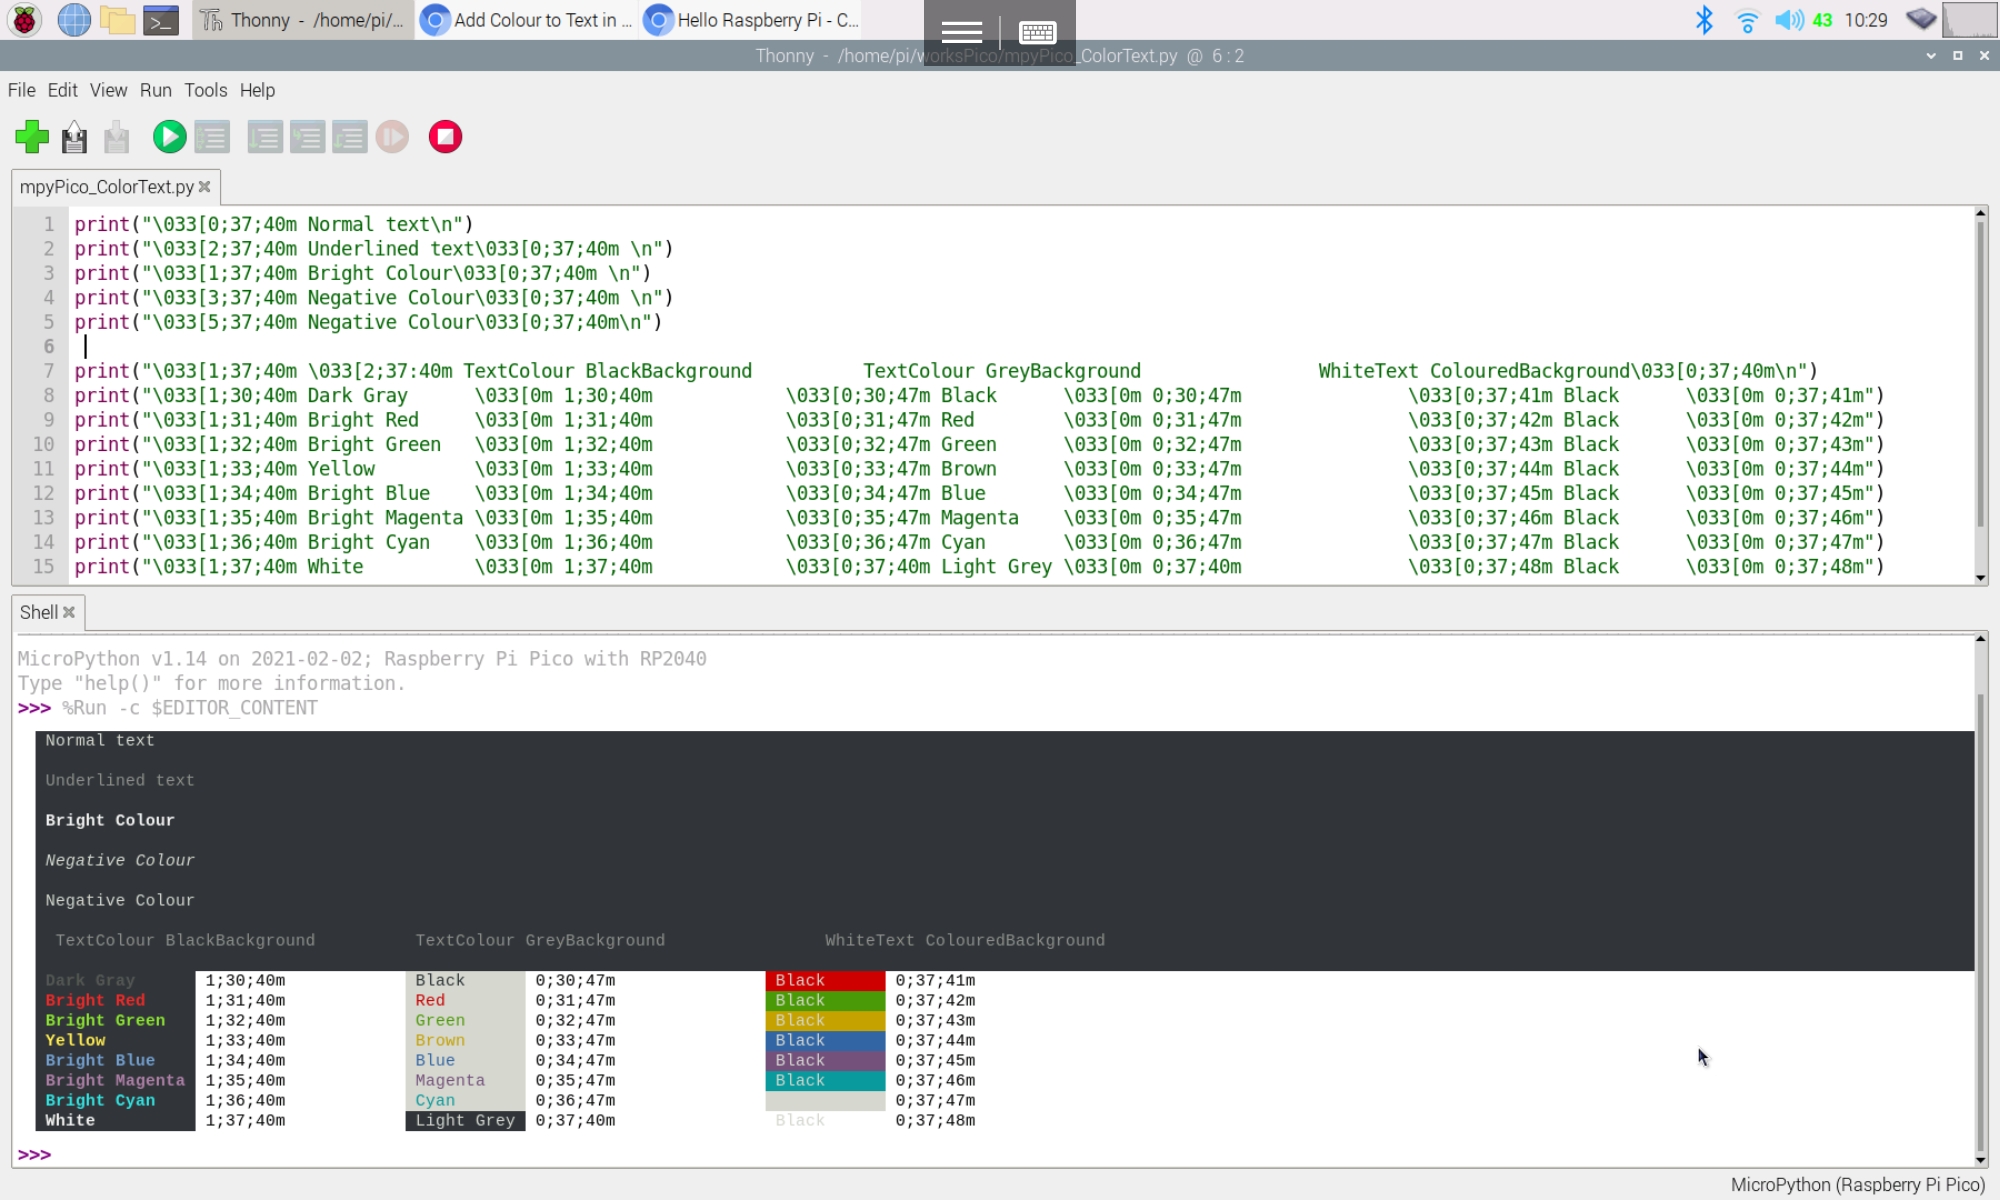
Python tips: print() text in color
Found a simple approach to print() text in color for Python REPL:
To make some of your text more readable, you can use ANSI escape codes to change the colour of the text output in your python program. A good use case for this is to to highlight errors.
~ read here: ozzmaker - Add Colour to Text in Python
Test on Raspberry Pi/Thonny with interpreter of MicroPython on Raspberry Pi Pico:
Wednesday, February 3, 2021
Raspberry Pi/Python remote control LED on Raspberry Pi Pico/MicroPython with HC-08 + ILI9341 SPI Display via Bluetooth
Raspberry Pi Pico/MicroPython exercise to work with HC-08 BLE 4.0 module, to communication with Raspberry Pi/Python. The ILI9341 SPI screen is used to display related information only. HC-08 connect to Pico via UART(0), as a BLE server. Once connected, Pico monitor the incoming data, if matched pattern of "#LEDON\r\n"/"#LEDOFF\r\n" received, it turn ON/OFF its onboard LED accordingly.
In the Raspberry Pi/Python, using bluepy library, act as client connect to Pico/HC-08 BLE server, setup a simple tkinter GUI, send "#LEDON\r\n"/"#LEDOFF\r\n" command if user click on the toggle button.
It's a group result of my previouse exercises:
~ Python on Raspberry Pi to read ESP32 BLE_server, using bluepy
~ Raspberry Pi Pico/MicroPython + 320x240 ILI9341 SPI Display, using jeffmer/micropython-ili9341 library
~ Raspberry Pi Pico/MicroPython + HC-08 BLE 4.0 UART Module
Connection between Raspberry Pi Pico and HC-08/ILI9341:
MicroPython/Python Code:
MicrcoPython code run on Raspberry Pi Pico, mpyPico_ili9341_HC08.py:
"""
Exercise on Raspberry Pi Pico/MicroPython
with 320x240 ILI9341 SPI Display
+ HC-08 Bluetooth UART Module(ver:HC-08 V3.1,2017年07月07日)
"""
from ili934xnew import ILI9341, color565
from machine import Pin, SPI
from micropython import const
import os
import glcdfont
import tt14
import tt24
import tt32
import time
#2 sec timeout is arbitrarily chosen
def sendCMD_waitResp(cmd, timeout=2000):
 print("CMD: " + cmd)
 uart.write(cmd)
 waitResp(timeout)
 print()

def waitResp(timeout=2000):
 prvMills = time.ticks_ms()
 resp = b""
 while (time.ticks_ms()-prvMills)<timeout:
 if uart.any():
 resp = b"".join([resp, uart.read(1)])
 print(resp)
 display.print(resp.decode('utf_8'))
def sendCMD_waitRespLine(cmd, timeout=2000):
 print("CMD: " + cmd)
 uart.write(cmd)
 waitRespLine(timeout)
 print()

def waitRespLine(timeout=2000):
 prvMills = time.ticks_ms()
 line = b""
 while (time.ticks_ms()-prvMills)<timeout:
 if uart.any():
 line = line+uart.readline()
 print(line)
 display.print(line.decode('utf_8'))
SCR_WIDTH = const(320)
SCR_HEIGHT = const(240)
SCR_ROT = const(2)
CENTER_Y = int(SCR_WIDTH/2)
CENTER_X = int(SCR_HEIGHT/2)
print(os.uname())
TFT_CLK_PIN = const(6)
TFT_MOSI_PIN = const(7)
TFT_MISO_PIN = const(4)
TFT_CS_PIN = const(13)
TFT_RST_PIN = const(14)
TFT_DC_PIN = const(15)
fonts = [glcdfont,tt14,tt24,tt32]
text = 'RPi Pico+ili9341+HC-08'
print(text)
#print uart info
#using UART(0)
#UART_TX = GP0
#UART_RX = GP1
uart = machine.UART(0, baudrate=9600,
 bits=8, parity=None, stop=1)
print(uart)
led_onboard = machine.Pin(25, machine.Pin.OUT)
led_onboard.value(0)
spi = SPI(
 0,
 baudrate=40000000,
 miso=Pin(TFT_MISO_PIN),
 mosi=Pin(TFT_MOSI_PIN),
 sck=Pin(TFT_CLK_PIN))
print(spi)
display = ILI9341(
 spi,
 cs=Pin(TFT_CS_PIN),
 dc=Pin(TFT_DC_PIN),
 rst=Pin(TFT_RST_PIN),
 w=SCR_WIDTH,
 h=SCR_HEIGHT,
 r=SCR_ROT)
display.erase()
display.set_pos(0,0)
#indicate program started visually
display.set_font(tt24)
display.print(text)
time.sleep(1)
"""
for i in range(20):
 display.scroll(1)
 time.sleep(0.01)
"""
led_onboard.value(1)
time.sleep(0.5)
led_onboard.value(0)
"""
for i in range(20):
 display.scroll(-1)
 time.sleep(0.01)
"""
#-----------------------------------
#clear bufer in UART
display.set_font(tt14)
waitResp()
sendCMD_waitResp("AT")
sendCMD_waitRespLine("AT+RX")
display.set_font(tt24)
while True:
 char = uart.read(1)
 print(char)

 if char == b'#':
 print("match")
 bleCmd = uart.readline()
 if bleCmd == b'LEDON\r\n':
 led_onboard.value(1)
 display.fill_rectangle(0, 280, 200, 20, color565(0, 0, 0))
 display.set_pos(0, 280)
 display.print("- LED ON -")
 print("- LED ON -")
 if bleCmd == b'LEDOFF\r\n':
 led_onboard.value(0)
 display.fill_rectangle(0, 280, 200, 20, color565(0, 0, 0))
 display.set_pos(0, 280)
 display.print("- LED OFF -")
 print("- LED OFF -")

 else:
 print(bleCmd)
 #display.print(char.decode('utf_8'))
print("- bye-")
Python code run on Raspberry Pi 4, pyBLE_Pico_HC08.py:
from bluepy import btle
import time
import tkinter as tk
HC08_Char = None
def toggle():
 if toggle_btn.config('relief')[-1] == 'sunken':
 toggle_btn.config(relief="raised")
 HC08_Char.write(b'#LEDOFF\r\n')
 toggle_btn['text'] = 'Turn LED ON'
 else:
 toggle_btn.config(relief="sunken")
 HC08_Char.write(b'#LEDON\r\n')
 toggle_btn['text'] = 'Turn LED OFF'
MAC = "F8:33:31:E2:A0:42"
SERVICE_UUID = "FFE0"
CHARACTERISTIC_UUID = "FFE1"
print("Connect to:" + MAC)
dev = btle.Peripheral(MAC)
print("\n--- dev ----------------------------")
print(type(dev))
print(dev)
print("\n--- dev.services -------------------")
for svc in dev.services:
 print(str(svc))
print("\n------------------------------------")
print("Get Serice By UUID: " + SERVICE_UUID)
service_uuid = btle.UUID(SERVICE_UUID)
service = dev.getServiceByUUID(service_uuid)
print(service)
print("\n--- service.getCharacteristics() ---")
print(type(service.getCharacteristics()))
print(service.getCharacteristics())
#----------------------------------------------
characteristics = dev.getCharacteristics()
print("\n--- dev.getCharacteristics() -------")
print(type(characteristics))
print(characteristics)
for char in characteristics:
 print("----------")
 print(type(char))
 print(char)
 print(char.uuid)
 if(char.uuid == CHARACTERISTIC_UUID ):
 print("=== !CHARACTERISTIC_UUID matched! ==")
 HC08_Char = char
 print(char)
 print(dir(char))
 print(char.getDescriptors)
 print(char.propNames)
 print(char.properties)
 print(type(char.read()))
 print(char.read())
if HC08_Char != None:
 for i in range(3):
 HC08_Char.write(b'#LEDON\r\n')
 time.sleep(0.5)
 HC08_Char.write(b'#LEDOFF\r\n')
 time.sleep(0.5)
 root = tk.Tk()
 label = tk.Label( root, text="Toggle button to Turn ON/OFF the Pico LED via HC-08/BLE")
 label.pack(pady=10)
 toggle_btn = tk.Button(text="Turn LED ON", width=12, relief="raised", command=toggle)
 toggle_btn.pack(pady=10)
 root.geometry("500x200")
 #Place tkinter window center
 root.eval('tk::PlaceWindow %s center' % root.winfo_pathname(root.winfo_id()))
 root.title("helloraspberrypi.blogspot.com")
 root.mainloop()
else:
 print("Target HC-08 Not found!!!")
dev.disconnect()
print("--- bye ---")
Next:
~ ESP32 BLE Client remote control Raspberry Pi Pico/HC-08 via Bluetooth, almost same function to this exercise have ESP32 BLE client to replace Raspberry Pi/Python.
~ More exercise for Raspberry Pi Pico
Sunday, January 24, 2021
BLE Notification example: Python/Raspberry Pi read notification from ESP32 BLE server to display Analog Input
It's a Python example run on Raspberry Pi, using libraries bluepy/matplotlib, connect to ESP32 BLE Server (run on ESP32-DevKitC V4), handle notification, and plot the value graphically. It's modified from last exercise of Python/Raspberry Pi handle Notification from ESP32 BLE_notify example.
# Python3 example on Raspberry Pi to handle notification from
# ESP32 BLE_notify example.
#
# To install bluepy for Python3:
# $ sudo pip3 install bluepy
from bluepy import btle
import matplotlib.pyplot as plt
value = [0]*30
plt.ylim([0, 256])
plt.plot(value)
plt.draw()
plt.pause(0.01)
class MyDelegate(btle.DefaultDelegate):
 def __init__(self):
 btle.DefaultDelegate.__init__(self)
 # ... initialise here
 def handleNotification(self, cHandle, data):
 # ... perhaps check cHandle
 # ... process 'data'
 #print(type(data))
 #print(dir(data))
 print(data)
 print(data[0])

 value.pop(0)
 value.append(data[0])
 plt.clf()
 plt.ylim([0, 256])
 plt.plot(value)
 plt.draw()
 plt.pause(0.01)

# Initialisation -------
address = "24:0a:c4:e8:0f:9a"
service_uuid = "4fafc201-1fb5-459e-8fcc-c5c9c331914b"
char_uuid = "beb5483e-36e1-4688-b7f5-ea07361b26a8"
p = btle.Peripheral(address)
p.setDelegate(MyDelegate())
# Setup to turn notifications on, e.g.
svc = p.getServiceByUUID(service_uuid)
ch = svc.getCharacteristics(char_uuid)[0]
"""
setup_data for bluepy noification-
"""
setup_data = b"\x01\x00"
#ch.write(setup_data)
p.writeCharacteristic(ch.valHandle + 1, setup_data)
ch_data = p.readCharacteristic(ch.valHandle + 1)
print(type(ch_data))
print(ch_data)
print("=== Main Loop ===")
while True:
 if p.waitForNotifications(1.0):
 # handleNotification() was called
 continue
 #print("Waiting...")
 # Perhaps do something else here
Wednesday, January 20, 2021
Python/Raspberry Pi handle Notification from ESP32 BLE_notify example
It's a Python3 example code (using bluepy library) run on Raspberry Pi, connect to ESP32 BLE server (programmed with BLE_notify example), and handle the Notification from ESP32.
Where address, service_uuid and char_uuid have to match with ESP32 side.
pyBLE_test_waitNotification_20210120a.py"""
ref:
bluepy Documentation: Working with notifications
http://ianharvey.github.io/bluepy-doc/notifications.html
"""
# Python3 example on Raspberry Pi to handle notification from
# ESP32 BLE_notify example.
#
# To install bluepy for Python3:
# $ sudo pip3 install bluepy
from bluepy import btle
class MyDelegate(btle.DefaultDelegate):
def __init__(self):
btle.DefaultDelegate.__init__(self)
# ... initialise here
def handleNotification(self, cHandle, data):
# ... perhaps check cHandle
# ... process 'data'
#print(type(data))
#print(dir(data))
print(data)
print(data[0])
# Initialisation -------
address = "24:0a:c4:e8:0f:9a"
service_uuid = "4fafc201-1fb5-459e-8fcc-c5c9c331914b"
char_uuid = "beb5483e-36e1-4688-b7f5-ea07361b26a8"
p = btle.Peripheral(address)
p.setDelegate(MyDelegate())
# Setup to turn notifications on, e.g.
svc = p.getServiceByUUID(service_uuid)
ch = svc.getCharacteristics(char_uuid)[0]
"""
print(type(ch))
print(ch)
print(dir(ch))
peripheral = ch.peripheral
print(type(peripheral))
print(peripheral)
propNames = ch.propNames
print(type(propNames))
print(propNames)
properties = ch.properties
print(type(properties))
print(properties)
"""
"""
Remark for setup_data for bluepy noification-
Actually I don't understand how come setup_data = b"\x01\x00",
and ch.valHandle + 1.
Just follow suggestion by searching in internet:
https://stackoverflow.com/questions/32807781/
ble-subscribe-to-notification-using-gatttool-or-bluepy
"""
setup_data = b"\x01\x00"
#ch.write(setup_data)
p.writeCharacteristic(ch.valHandle + 1, setup_data)
ch_data = p.readCharacteristic(ch.valHandle + 1)
print(type(ch_data))
print(ch_data)
print("=== Main Loop ===")
while True:
if p.waitForNotifications(1.0):
# handleNotification() was called
continue
#print("Waiting...")
# Perhaps do something else here
Next:
Sunday, January 17, 2021
Python on Raspberry Pi to read ESP32 BLE_server, using bluepy
This Python exercise run on Raspberry Pi using bluepy library, read ESP32 (Arduino Framework) BLE_server example (with BLE_client also) .
To install bluepy for Python3, enter the command:
$ sudo pip3 install bluepy
Python code, pyBLE_test_20210117a.py
from bluepy import btle
MAC = "24:0a:c4:e8:0f:9a"
SERVICE_UUID = "4fafc201-1fb5-459e-8fcc-c5c9c331914b"
CHARACTERISTIC_UUID = "beb5483e-36e1-4688-b7f5-ea07361b26a8"
print("Connect to:" + MAC)
dev = btle.Peripheral(MAC)
print("\n--- dev ----------------------------")
print(type(dev))
print(dev)
print("\n--- dev.services -------------------")
for svc in dev.services:
 print(str(svc))

print("\n------------------------------------")
print("Get Serice By UUID: " + SERVICE_UUID)
service_uuid = btle.UUID(SERVICE_UUID)
service = dev.getServiceByUUID(service_uuid)
print(service)
print("\n--- service.getCharacteristics() ---")
print(type(service.getCharacteristics()))
print(service.getCharacteristics())
#----------------------------------------------
characteristics = dev.getCharacteristics()
print("\n--- dev.getCharacteristics() -------")
print(type(characteristics))
print(characteristics)
for char in characteristics:
 print("----------")
 print(type(char))
 print(char)
 print(char.uuid)
 if(char.uuid == CHARACTERISTIC_UUID ):
 print("=== !CHARACTERISTIC_UUID matched! ==")
 print(char)
 print(dir(char))
 print(char.getDescriptors)
 print(char.propNames)
 print(char.properties)
 print(type(char.read()))
 print(char.read())

#print("=== dev ============================")
#print(dir(dev))
#print("=== service ========================")
#print(dir(service))
Tuesday, December 29, 2020
Raspberry Pi/Python as Bluetooth classic client, bi-direction communication with ESP32
Raspberry Pi/Python act as GUI Bluetooth classic client, using tkinter/pybluez:
Connect to bluetooth classic server with hard-coded MAC.
User enter text to sent on bottom Text Frame, send to server.
Display the data received from server on upper Text frame.
The server side, run on ESP32 (NodeMCU ESP-32S), with SPI ST7735 IPS screen. It echo back received data. ESP32 (Arduino framework) code: Arduino-er: ESP-32S as Bluetooth classic Server, bi-direction communication with Raspberry Pi/Python.
Python code, pySPPClient.py.
import sys
from tkinter import *
from bluetooth import *
from threading import Thread
import time
rqsStopBtHandler = False
buf_size = 255
def btHandler():
 global rqsStopBtHandler
 rqsStopBtHandler = False

 print("btHandler Started")

 #Set sock.settimeout(),
 #to prevent program blocked by sock.recv()
 #and cannot end btHandler
 sock.settimeout(1.0)
 while rqsStopBtHandler!=True:
 try:
 datarx = sock.recv(buf_size)
 datarxToStr = datarx.decode("utf-8")
 print(datarxToStr)
 textCenter.insert(INSERT, datarxToStr)
 except Exception:
 continue

 print("btHandler End")

def startBtHandler():
 btThread = Thread(target=btHandler)
 btThread.start()

def close_window():
 global rqsStopBtHandler
 rqsStopBtHandler = True
 sock.close()
 print("Socket closed")
 print("Window closed")
 root.destroy()
def cmdSend():
 stringSent = textBottom.get(1.0, END)
 print(stringSent)
 sock.send(stringSent)
 #sock.send("\n")
 print("- Sent")

#===============================================
#Prepare Bluetooth Classic
print("Python version: ")
print(sys.version)
print("tkinter version: ", TkVersion)
print("=============================")
print("Connect to ESP32 Bluetooth Classic SPP Server")
#addr = "24:0A:C4:E8:0F:9A"
addr = "3C:71:BF:0D:DD:6A"
print(addr)
service_matches = find_service( address = addr )
if len(service_matches) == 0:
 print("couldn't find the ESP32 Bluetooth Classic SPP service")
 sys.exit(0)

for s in range(len(service_matches)):
 print("\nservice_matches: [" + str(s) + "]:")
 print(service_matches[s])

first_match = service_matches[0]
port = first_match["port"]
name = first_match["name"]
host = first_match["host"]
port=1
print("connecting to \"%s\" on %s, port %s" % (name, host, port))
# Create the client socket
sock=BluetoothSocket(RFCOMM)
sock.connect((host, port))
print("connected")
#===============================================
#Prepare GUI
root = Tk()
root.configure(bg="darkgray")
root.wm_title("SPP Client")
root.protocol("WM_DELETE_WINDOW", close_window)
rootFrame = Frame(root)
rootFrame.pack()
labelTitle = Label(root,
 text="helloraspberrypi.blogspot.com",
 font=("Helvetica", 18),
 fg="White", bg="darkgray")
labelTitle.pack()
frameCenter = Frame(root, bg="lightgray")
frameCenter.pack()
textCenter= Text(frameCenter, width=26, height=10, font=("Helvetica", 18))
textCenter.pack(padx=10,pady=5)
frameBottom = Frame(root, bg="gray")
frameBottom.pack(expand=True, fill='both')
textBottom = Text(frameBottom, width=26, height=10, font=("Helvetica", 18))
textBottom.insert(INSERT, "Enter text here")
textBottom.pack(padx=10,pady=5)
buttonSend = Button(frameBottom, text="Send", command=cmdSend)
buttonSend.pack(padx=10,pady=5)
startBtHandler()
root.mainloop()
print("--- bye ---")
Related:
Friday, December 25, 2020
Raspberry Pi/Python remote control ESP32/Servos via Bluetooth Classic
Last exercise show how Python (on Raspberry Pi) Bluetooth communicate with ESP32 SerialToSerialBT, using pybluez. This exercise extended to send simple single character command to ESP32 via Bluetooth Classic, to control remote servos; with GUI using Tkinter.
import sys
from tkinter import *
from bluetooth import *
print("Python version: ")
print(sys.version)
print("tkinter version: ", TkVersion)
print("=============================");
print("Connect to ESP BT Servo Server")
addr = "24:0A:C4:E8:0F:9A"
print(addr)
service_matches = find_service( address = addr )
if len(service_matches) == 0:
 print("couldn't find the ESP32 BT Servo service")
 sys.exit(0)

for s in range(len(service_matches)):
 print("\nservice_matches: [" + str(s) + "]:")
 print(service_matches[s])

first_match = service_matches[0]
port = first_match["port"]
name = first_match["name"]
host = first_match["host"]
port=1
print("connecting to \"%s\" on %s, port %s" % (name, host, port))
# Create the client socket
sock=BluetoothSocket(RFCOMM)
sock.connect((host, port))
print("connected")
def close_window():
 sock.close()
 print("Socket closed")
 print("Window closed")
 root.destroy()
#prepare GUI
root = Tk()
root.geometry("380x200")
root.configure(bg="lightgray")
root.wm_title("Bluetooth Servo Client")
root.protocol("WM_DELETE_WINDOW", close_window)
CMD_ORG = 'O'
CMD_XDEC = 'A'
CMD_XDEC10 = 'B'
CMD_XINC = 'C'
CMD_XINC10 = 'D'
CMD_YDEC = 'E'
CMD_YDEC10 = 'F'
CMD_YINC = 'G'
CMD_YINC10 = 'H'
def cmdO():
 sock.send(CMD_ORG)
 print("0, 0")
def cmdXdec():
 sock.send(CMD_XDEC)
 print("X-")

def cmdXdec10():
 sock.send(CMD_XDEC10)
 print("X-10")
def cmdXinc():
 sock.send(CMD_XINC)
 print("X+")

def cmdXinc10():
 sock.send(CMD_XINC10)
 print("X+10")

def cmdYdec():
 sock.send(CMD_YDEC)
 print("Y-")

def cmdYdec10():
 sock.send(CMD_YDEC10)
 print("Y-10")
def cmdYinc():
 sock.send(CMD_YINC)
 print("Y+")

def cmdYinc10():
 sock.send(CMD_YINC10)
 print("Y+10")
ButtonO = Button(root, text="0", command = cmdO, width=6)
ButtonXdec = Button(root, text="X-", command = cmdXdec, width=6)
ButtonXinc = Button(root, text="X+", command = cmdXinc, width=6)
ButtonYdec = Button(root, text="Y-", command = cmdYdec, width=6)
ButtonYinc = Button(root, text="Y+", command = cmdYinc, width=6)
ButtonXdec10 = Button(root, text="X-10", command = cmdXdec10, width=6)
ButtonXinc10 = Button(root, text="X+10", command = cmdXinc10, width=6)
ButtonYdec10 = Button(root, text="Y-10", command = cmdYdec10, width=6)
ButtonYinc10 = Button(root, text="Y+10", command = cmdYinc10, width=6)
ButtonO.grid(row=2, column=2)
ButtonXdec.grid(row=2, column=1)
ButtonXinc.grid(row=2, column=3)
ButtonYdec.grid(row=3, column=2)
ButtonYinc.grid(row=1, column=2)
ButtonXdec10.grid(row=2, column=0)
ButtonXinc10.grid(row=2, column=4)
ButtonYdec10.grid(row=4, column=2)
ButtonYinc10.grid(row=0, column=2)
root.mainloop()
print("\n--- bye ---\n")
Saturday, December 19, 2020
Python (on Raspberry Pi) Bluetooth communicate with ESP32 SerialToSerialBT, using pybluez
It's a simple Python example using pybluez extension module, run on Raspberry Pi 4/Raspberry Pi OS, to communicate with ESP32 SerialToSerialBT example.
pybluez (or https://github.com/pybluez/pybluez)is a Python extension module allowing access to system Bluetooth resources.
Install pybluez for Python3, enter the command in Terminal:
$ sudo pip3 install pybluez
Copy and modify pybluez/examples/simple/rfcomm-client.py in Raspberry Pi Thonny.
It's my modified version, pyBTSimpleClient.py
from bluetooth import *
def input_and_send():
 print("\nType something\n")
 while True:
 data = input()
 if len(data) == 0: break
 sock.send(data)
 sock.send("\n")

def rx_and_echo():
 sock.send("\nsend anything\n")
 while True:
 data = sock.recv(buf_size)
 if data:
 print(data)
 sock.send(data)

#MAC address of ESP32
addr = "24:0A:C4:E8:0F:9A"
#uuid = "94f39d29-7d6d-437d-973b-fba39e49d4ee"
#service_matches = find_service( uuid = uuid, address = addr )
service_matches = find_service( address = addr )
buf_size = 1024;
if len(service_matches) == 0:
 print("couldn't find the SampleServer service =(")
 sys.exit(0)
for s in range(len(service_matches)):
 print("\nservice_matches: [" + str(s) + "]:")
 print(service_matches[s])

first_match = service_matches[0]
port = first_match["port"]
name = first_match["name"]
host = first_match["host"]
port=1
print("connecting to \"%s\" on %s, port %s" % (name, host, port))
# Create the client socket
sock=BluetoothSocket(RFCOMM)
sock.connect((host, port))
print("connected")
#input_and_send()
rx_and_echo()
sock.close()
print("\n--- bye ---\n")
Thursday, November 5, 2020
psutil, process and system utilities for Python
psutil (process and system utilities) is a cross-platform library for retrieving information on running processes and system utilization (CPU, memory, disks, network, sensors) in Python.
In my trial on Ubuntu Desktop for Raspberry Pi, it's installed by default.
Links:
- GitHub - giampaolo /psutil
- psutil documentation
Install Thonny on Ubuntu for Raspberry Pi
Thonny is a very great cross-platform Python IDE.
To install Thonny on Ubuntu Desktop for Raspberry Pi, simple enter the command in Terminal:
$ sudo apt install thonny
After installed, you can enter "thonny" in Terminal, or search "thonny" in Activities.
Wednesday, March 25, 2020
Python examples to display Novel Coronavirus (COVID-19).
Monday, January 28, 2019
A friendly video tutorial to get started with TensorFlow and Deep Learning
Getting Started with TensorFlow and Deep Learning | SciPy 2018 Tutorial | Josh Gordon
Monday, June 27, 2016
picamera updated 1.11
Picamera updated 1.11, now support Camera V2. If you not yet updated, run the command to update:
$ sudo apt-get update
$ sudo apt-get upgrade
Suggested to update firmware also:
$ sudo rpi-update
Release 1.11 (2016年06月19日) Change log (https://picamera.readthedocs.io/en/release-1.11/changelog.html):
1.11 on the surface consists mostly of enhancements, but underneath includes a major re-write of picamera’s core:
- Direct capture to buffer-protocol objects, such as numpy arrays (#241)
- Add request_key_frame() method to permit manual request of an I-frame during H264 recording; this is now used implicitly by split_recording() (#257)
- Added timestamp attribute to query camera’s clock (#212)
- Added framerate_delta to permit small adjustments to the camera’s framerate to be performed “live” (#279)
- Added clear() and copy_to() methods to PiCameraCircularIO (#216)
- Prevent setting attributes on the main PiCamera class to ease debugging in educational settings (#240)
- Due to the core re-writes in this version, you may require cutting edge firmware (sudo rpi-update) if you are performing unencoded captures, unencoded video recording, motion estimation vector sampling, or manual sensor mode setting.
- Added property to control preview’s resolution separately from the camera’s resolution (required for maximum resolution previews on the V2 module - #296).
There are also several bug fixes:
- Fixed basic stereoscopic operation on compute module (#218)
- Fixed accessing framerate as a tuple (#228)
- Fixed hang when invalid file format is specified (#236)
- Fixed multiple bayer captures with capture_sequence() and capture_continuous() (#264)
- Fixed usage of “falsy” custom outputs with motion_output (#281)
Hardware Limits (http://picamera.readthedocs.io/en/release-1.11/fov.html#hardware-limits):
The are additional limits imposed by the GPU hardware that performs all image and video processing:
- The maximum resolution for MJPEG recording depends partially on GPU memory. If you get “Out of resource” errors with MJPEG recording at high resolutions, try increasing gpu_mem in /boot/config.txt.
- The maximum horizontal resolution for default H264 recording is 1920. Any attempt to recording H264 video at higher horizontal resolutions will fail.
- However, H264 high profile level 4.2 has slightly higher limits and may succeed with higher resolutions.
- The maximum resolution of the V2 camera can cause issues with previews. Currently, picamera runs previews at the same resolution as captures (equivalent to -fp in raspistill). You may need to increase gpu_mem in /boot/config.txt to achieve full resolution operation with the V2 camera module.
- The maximum framerate of the camera depends on several factors. With overclocking, 120fps has been achieved on a V2 module but 90fps is the maximum supported framerate.
- The maximum exposure time is currently 6 seconds on the V1 camera module, and 10 seconds on the V2 camera module. Remember that exposure time is limited by framerate, so you need to set an extremely slow framerate before setting shutter_speed.
Monday, June 20, 2016
Raspberry Pi display on 128x64 I2C OLED with SSD1306, using Python
This post show how to install rm-hull/ssd1306 on Raspberry Pi, and run the example to display on 0.96" 128x64 I2C OLED with SSD1306 driver, using Python.
rm-hull/ssd1306 interfacing OLED matrix displays with the SSD1306 (or SH1106) driver in Python using I2C on the Raspberry Pi.
Before install rm-hull/ssd1306, we have to enable I2C on the Raspberry Pi.
Connect a 0.96" 128x64 I2C OLED to Raspberry Pi 2 as shown:
3V3, GND, SDA and SCL respectively.
(my OLED support both 3.3V and 5V)
Download rm-hull/ssd1306 with:
$ wget https://github.com/rm-hull/ssd1306/archive/master.zip
Install the library, switch to the unpacked download folder:
$ sudo python setup.py install
Install some packages:
$ sudo apt-get install i2c-tools python-smbus python-pip
$ sudo pip install pillow
That's, now you can try the example, refer to the video.
Remark@2017年05月07日:
Somebody commented with error of:
error in luma.oled setup command : 'extras_require' must be a dictionary whose values are strings or lists of strings containing valid project/version requirement specifiers.
I google to found that it may be because of the version of setuptools.
Install and upgrade setuptools:
$ sudo -H pip install --upgrade pip setuptools
(reference: https://github.com/rm-hull/luma.examples/issues/44)
Related:
- NodeMCU/ESP8266 + OLED 0.96" 128x64 I2C SSD1306 using esp8266-oled-ssd1306 library
Updated@2017年05月14日:
The driver renamed rm-hull/luma.oled, and updated to support SSD1306 / SSD1322 / SSD1325 / SSD1331 / SH1106 OLED.
Friday, April 29, 2016
Python on Raspberry Pi + Camera Module to take photos for timelapse
To run the Python on update Raspbian Jessie (2016年03月18日), we have to install python-imaging-tk:
$ sudo apt-get install python-imaging-tk
In you desktop, create a shell script, doLapse.sh, and make it executable to run the Python code. Such that you can easy run it.
doLapse.sh
cd ~/pyLapse
python2 myPiLapse.py
The myPiLapse.py is the Python script (Python 2) to take photos. Select "Timelapse" tab and click the "Start TimeLapse" button to start and click the "Stop TimeLapse" button to stop. All the photos will be save in sub-directory named with timestamp.
myPiLapse.py
import picamera
import Tkinter as tk
import ttk
import time
from PIL import ImageTk, Image
from threading import Thread
import io
import sys
from pkg_resources import require
from fractions import Fraction
from time import sleep
import tkFont
import os
#reference:
# http://picamera.readthedocs.org/en/latest/api_camera.html
RQS_0=0
RQS_QUIT=1
RQS_CAPTURE=2
RQS_STARTLAPSE = 3
RQS_STOPLAPSE = 4
RQS_LAPSEEND = 5
rqs=RQS_0
rqsUpdateSetting=True
LAPSE_RQS_0 = 0
LAPSE_RQS_STOP = 1
lapse_rqs = LAPSE_RQS_0
PREFIX_IMAGE = "img_"
PREFIX_LAPSE = "lapse_"
prefix = PREFIX_IMAGE
def camHandler():
 global rqs
 rqs = RQS_0
 timelapsing = False

 camera = picamera.PiCamera()
 #stream = io.BytesIO()
 #set default
 camera.sharpness = 0
 camera.contrast = 0
 camera.brightness = 50
 camera.saturation = 0
 camera.ISO = 0
 camera.video_stabilization = False
 camera.exposure_compensation = 0
 camera.exposure_mode = 'auto'
 camera.meter_mode = 'average'
 camera.awb_mode = 'auto'
 camera.image_effect = 'none'
 camera.color_effects = None
 #camera.rotation = 0
 camera.rotation = 270
 camera.hflip = False
 camera.vflip = False
 camera.crop = (0.0, 0.0, 1.0, 1.0)
 #camera.resolution = (1024, 768)
 camera.resolution = (400, 300)
 #end of set default
 #camera.start_preview()
 while rqs != RQS_QUIT:
 #check if need update setting
 global rqsUpdateSetting
 if ((rqsUpdateSetting == True) and (timelapsing == False)):
 rqsUpdateSetting = False
 camera.sharpness = scaleSharpness.get()
 camera.contrast = scaleContrast.get()
 camera.brightness = scaleBrightness.get()
 camera.saturation = scaleSaturation.get()
 camera.exposure_compensation = scaleExpCompensation.get()
 camera.iso = varIso.get()
 camera.drc_strength = varDrc.get()
 camera.exposure_mode = varExpMode.get()
 camera.meter_mode = varMeterMode.get()
 camera.rotation = varRotation.get()
 camera.vflip = varVFlip.get()
 camera.hflip = varHFlip.get()
 camera.image_denoise = varDenoise.get()
 awb_mode_setting = varAwbMode.get()
 labelAwbVar.set(awb_mode_setting)
 camera.awb_mode = awb_mode_setting
 if awb_mode_setting == "off":
 gr = scaleGainRed.get()
 gb = scaleGainBlue.get()
 gAwb = (gr, gb)
 camera.awb_gains = gAwb
 labelAwbVar.set(awb_mode_setting + " : "
 + str(gAwb))
 image_effect_setting = varImageEffect.get()
 labelImageEffectVar.set(image_effect_setting)
 camera.image_effect = image_effect_setting
 if image_effect_setting == 'solarize':
 if cbSolarize_yuv_Var.get():
 yuv = 1
 else:
 yuv = 0
 solarize_para = (
 yuv,
 scSolarize_x0_Var.get(),
 scSolarize_y0_Var.get(),
 scSolarize_y1_Var.get(),
 scSolarize_y2_Var.get())
 labelImageEffectVar.set(image_effect_setting + " " + str(solarize_para))
 camera.image_effect_params = solarize_para
 elif image_effect_setting == 'colorpoint':
 camera.image_effect_params = quadrantVar.get()
 labelImageEffectVar.set(image_effect_setting + " " + str(quadrantVar.get()))
 elif image_effect_setting == 'colorbalance':
 colorbalance_para = (
 scColorbalance_lens_Var.get(),
 scColorbalance_r_Var.get(),
 scColorbalance_g_Var.get(),
 scColorbalance_b_Var.get(),
 scColorbalance_u_Var.get(),
 scColorbalance_v_Var.get())
 labelImageEffectVar.set(image_effect_setting + " " + str(colorbalance_para))
 camera.image_effect_params = colorbalance_para
 elif image_effect_setting == 'colorswap':
 labelImageEffectVar.set(image_effect_setting + " " + str(cbColorswap_dir_Var.get()))
 camera.image_effect_params = cbColorswap_dir_Var.get()
 elif image_effect_setting == 'posterise':
 labelImageEffectVar.set(image_effect_setting + " " + str(scPosterise_steps_Var.get()))
 camera.image_effect_params = scPosterise_steps_Var.get()
 elif image_effect_setting == 'blur':
 labelImageEffectVar.set(image_effect_setting + " " + str(scBlur_size_Var.get()))
 camera.image_effect_params = scBlur_size_Var.get()
 elif image_effect_setting == 'film':
 film_para = (
 scFilm_strength_Var.get(),
 scFilm_u_Var.get(),
 scFilm_v_Var.get())
 labelImageEffectVar.set(image_effect_setting + " " + str(film_para))
 camera.image_effect_params = film_para
 elif image_effect_setting == 'watercolor':
 if cbWatercolor_uv_Var.get():
 watercolor_para = (
 scWatercolor_u_Var.get(),
 scWatercolor_v_Var.get())
 labelImageEffectVar.set(image_effect_setting + " " + str(watercolor_para))
 camera.image_effect_params = watercolor_para
 else:
 watercolor_para = ()
 labelImageEffectVar.set(image_effect_setting + " " + str(watercolor_para))
 camera.image_effect_params = watercolor_para
 if rqs == RQS_CAPTURE:
 global prefix
 print("Capture")
 rqs=RQS_0
 timeStamp = time.strftime("%Y%m%d-%H%M%S")
 jpgFile=prefix+timeStamp+'.jpg'

 #camera.resolution = (2592, 1944) #set photo size
 varRes = varResolution.get()
 if varRes == '640x480':
 settingResolution = (640, 480)
 elif varRes == '800x600':
 settingResolution = (800, 600)
 elif varRes == '1280x720':
 settingResolution = (1280, 720)
 elif varRes == '1296x730':
 settingResolution = (1296, 730)
 elif varRes == '1296x972':
 settingResolution = (1296, 972)
 elif varRes == '1600x1200':
 settingResolution = (1600, 1200)
 elif varRes == '1920x1080':
 settingResolution = (1920, 1080)
 else:
 settingResolution = (2592, 1944)
 camera.resolution = settingResolution
 shutterSpeedSetting = varShutterSpeed.get()
 settingQuality = varQuality.get()

 if shutterSpeedSetting == 'normal':
 camera.capture(jpgFile, quality=settingQuality)
 else:
 orgFrameRate = camera.framerate
 if shutterSpeedSetting == '6 sec':
 camera.framerate = Fraction(1, 6)
 camera.shutter_speed = 6000000
 elif shutterSpeedSetting == '5 sec':
 camera.framerate = Fraction(1, 5)
 camera.shutter_speed = 5000000
 elif shutterSpeedSetting == '4 sec':
 camera.framerate = Fraction(1, 4)
 camera.shutter_speed = 4000000
 elif shutterSpeedSetting == '3 sec':
 camera.framerate = Fraction(1, 3)
 camera.shutter_speed = 3000000
 elif shutterSpeedSetting == '2 sec':
 camera.framerate = Fraction(1, 2)
 camera.shutter_speed = 2000000
 elif shutterSpeedSetting == '1 sec':
 camera.framerate = Fraction(1, 1)
 camera.shutter_speed = 1000000
 elif shutterSpeedSetting == '1/2 sec':
 camera.framerate = Fraction(1, 1)
 camera.shutter_speed = 500000
 elif shutterSpeedSetting == '1/4 sec':
 camera.framerate = Fraction(1, 1)
 camera.shutter_speed = 250000
 #sleep(1)
 camera.capture(jpgFile, quality=settingQuality)
 camera.framerate = orgFrameRate
 camera.shutter_speed = 0
 camera.resolution = (400, 300) #resume preview size

 labelCapVal.set(jpgFile)
 elif rqs == RQS_STARTLAPSE:
 rqs=RQS_0
 labelLapseText.set("Timelapse started.")
 btnStartLapse.config(state=tk.DISABLED)
 btnStopLapse.config(state=tk.NORMAL)
 timelapsing = True
 lapseDir = time.strftime("%Y%m%d-%H%M%S")
 os.makedirs(lapseDir)

 prefix = lapseDir + "/" + PREFIX_LAPSE
 camera.shutter_speed = camera.exposure_speed
 camera.exposure_mode = 'off'
 g = camera.awb_gains
 camera.awb_mode = 'off'
 camera.awb_gains = g

 startTimelapseHandle()
 elif rqs == RQS_STOPLAPSE:
 rqs=RQS_0
 global lapse_rqs
 lapse_rqs = LAPSE_RQS_STOP
 labelLapseText.set("Timelapse stopped.")
 btnStartLapse.config(state=tk.NORMAL)
 btnStopLapse.config(state=tk.DISABLED)
 prefix = PREFIX_IMAGE
 timelapsing = False
 rqsUpdateSetting = True
 elif rqs == RQS_LAPSEEND:
 rqs=RQS_0
 labelLapseText.set("Timelapse ended.")
 btnStartLapse.config(state=tk.NORMAL)
 btnStopLapse.config(state=tk.DISABLED)
 prefix = PREFIX_IMAGE
 timelapsing = False
 rqsUpdateSetting = True
 else:
 stream = io.BytesIO()
 camera.capture(stream, format='jpeg', quality=40)
 stream.seek(0)
 tmpImage = Image.open(stream)
 tmpImg = ImageTk.PhotoImage(tmpImage)
 previewPanel.configure(image = tmpImg)
 #sleep(0.5)

 print("Quit")
 #camera.stop_preview()
def startCamHandler():
 camThread = Thread(target=camHandler)
 camThread.start()
def TimelapseHandle():
 global lapse_rqs
 global rqs
 global prefix
 print("TimelapseHandle started")
 numberOfShot = scaleNumOfShot.get()
 interval = scaleIntervalSec.get()

 while True:

 if lapse_rqs == LAPSE_RQS_STOP:
 lapse_rqs = LAPSE_RQS_0
 print('LAPSE_RQS_STOP')
 break
 print(numberOfShot)
 rqs = RQS_CAPTURE
 if numberOfShot != 0:
 numberOfShot = numberOfShot-1
 labelLapseText.set(str(numberOfShot))
 if numberOfShot == 0:
 break;

 sleep(interval)

 rqs = RQS_LAPSEEND
 print("TimelapseHandle ended")

def startTimelapseHandle():
 print("TimelapseHandle starting...")
 global lapse_rqs
 lapse_rqs = LAPSE_RQS_0
 timelapseThread = Thread(target=TimelapseHandle)
 timelapseThread.start()
def quit():
 print("quit()")
 global rqs
 global lapse_rqs
 rqs=RQS_QUIT
 lapse_rqs=LAPSE_RQS_STOP
 global tkTop
 tkTop.destroy()
def capture():
 global rqs
 rqs = RQS_CAPTURE
 labelCapVal.set("capturing")
def cbScaleSetting(new_value):
 global rqsUpdateSetting
 rqsUpdateSetting = True
def cbButtons():
 global rqsUpdateSetting
 rqsUpdateSetting = True

def lapseScaleSetting(new_value):
 #do nothing
 pass
def cmdStartLapse():
 global rqs
 labelLapseText.set("Timelapse starting...")
 rqs = RQS_STARTLAPSE
def cmdStopLapse():
 global rqs
 labelLapseText.set("Timelapse stopping...")
 rqs = RQS_STOPLAPSE
tkTop = tk.Tk()
tkTop.wm_title("helloraspberrypi.blogspot.com")
tkTop.geometry('1000x650')
myFont = tkFont.Font(size=16)
previewWin = tk.Toplevel(tkTop)
previewWin.title('Preview')
previewWin.geometry('400x300')
previewPanel = tk.Label(previewWin)
previewPanel.pack(side = "bottom", fill = "both", expand = "yes")
#tkButtonQuit = tk.Button(tkTop, text="Quit", command=quit).pack()
tkButtonCapture = tk.Button(
 tkTop, text="Capture", command=capture)
tkButtonCapture.pack()
SCALE_WIDTH = 980;
labelCapVal = tk.StringVar()
tk.Label(tkTop, textvariable=labelCapVal).pack()
notebook = ttk.Notebook(tkTop)
frame1 = ttk.Frame(notebook)
frame2 = ttk.Frame(notebook)
frame3 = ttk.Frame(notebook)
frame4 = ttk.Frame(notebook)
frame5 = ttk.Frame(notebook)
notebook.add(frame1, text='Setting')
notebook.add(frame2, text='White Balance')
notebook.add(frame3, text='Image Effect')
notebook.add(frame4, text='Control')
notebook.add(frame5, text='Timelapse')
notebook.pack()
# Tab Setting
tk.Label(frame1, text=require('picamera')).pack()
scaleSharpness = tk.Scale(
 frame1,
 from_=-100, to=100,
 length=SCALE_WIDTH,
 orient=tk.HORIZONTAL,
 label="sharpness",
 command=cbScaleSetting)
scaleSharpness.set(0)
scaleSharpness.pack(anchor=tk.CENTER)
scaleContrast = tk.Scale(
 frame1,
 from_=-100, to=100,
 length=SCALE_WIDTH,
 orient=tk.HORIZONTAL,
 label="contrast",
 command=cbScaleSetting)
scaleContrast.set(0)
scaleContrast.pack(anchor=tk.CENTER)
scaleBrightness = tk.Scale(
 frame1,
 from_=0, to=100,
 length=SCALE_WIDTH,
 orient=tk.HORIZONTAL,
 label="brightness",
 command=cbScaleSetting)
scaleBrightness.set(50)
scaleBrightness.pack(anchor=tk.CENTER)
scaleSaturation = tk.Scale(
 frame1,
 from_=-100, to=100,
 length=SCALE_WIDTH,
 orient=tk.HORIZONTAL,
 label="saturation",
 command=cbScaleSetting)
scaleSaturation.set(0)
scaleSaturation.pack(anchor=tk.CENTER)
scaleExpCompensation = tk.Scale(
 frame1,
 from_=-25, to=25,
 length=SCALE_WIDTH,
 orient=tk.HORIZONTAL,
 label="exposure_compensation",
 command=cbScaleSetting)
scaleExpCompensation.set(0)
scaleExpCompensation.pack(anchor=tk.CENTER)
lfExpMode = ttk.LabelFrame(frame1, text="Exposure Mode")
lfExpMode.pack(fill="x")
varExpMode = tk.StringVar()
varExpMode.set('auto')
tk.Radiobutton(lfExpMode, variable=varExpMode,
 text='off',value='off',command=cbButtons).pack(anchor=tk.W, side=tk.LEFT)
tk.Radiobutton(lfExpMode, variable=varExpMode,
 text='auto',value='auto',command=cbButtons).pack(anchor=tk.W, side=tk.LEFT)
tk.Radiobutton(lfExpMode, variable=varExpMode,
 text='night',value='night',command=cbButtons).pack(anchor=tk.W, side=tk.LEFT)
tk.Radiobutton(lfExpMode, variable=varExpMode,
 text='nightpreview',value='nightpreview',command=cbButtons).pack(anchor=tk.W, side=tk.LEFT)
tk.Radiobutton(lfExpMode, variable=varExpMode,
 text='backlight',value='backlight',command=cbButtons).pack(anchor=tk.W, side=tk.LEFT)
tk.Radiobutton(lfExpMode, variable=varExpMode,
 text='spotlight',value='spotlight',command=cbButtons).pack(anchor=tk.W, side=tk.LEFT)
tk.Radiobutton(lfExpMode, variable=varExpMode,
 text='sports',value='sports',command=cbButtons).pack(anchor=tk.W, side=tk.LEFT)
tk.Radiobutton(lfExpMode, variable=varExpMode,
 text='snow',value='snow',command=cbButtons).pack(anchor=tk.W, side=tk.LEFT)
tk.Radiobutton(lfExpMode, variable=varExpMode,
 text='beach',value='beach',command=cbButtons).pack(anchor=tk.W, side=tk.LEFT)
tk.Radiobutton(lfExpMode, variable=varExpMode,
 text='verylong',value='verylong',command=cbButtons).pack(anchor=tk.W, side=tk.LEFT)
tk.Radiobutton(lfExpMode, variable=varExpMode,
 text='fixedfps',value='fixedfps',command=cbButtons).pack(anchor=tk.W, side=tk.LEFT)
tk.Radiobutton(lfExpMode, variable=varExpMode,
 text='antishake',value='antishake',command=cbButtons).pack(anchor=tk.W, side=tk.LEFT)
tk.Radiobutton(lfExpMode, variable=varExpMode,
 text='fireworks',value='fireworks',command=cbButtons).pack(anchor=tk.W, side=tk.LEFT)
lfMeterMode = ttk.LabelFrame(frame1, text="Meter Mode")
lfMeterMode.pack(fill="x")
varMeterMode = tk.StringVar()
varMeterMode.set('average')
tk.Radiobutton(lfMeterMode, variable=varMeterMode,
 text='average',value='average',command=cbButtons).pack(anchor=tk.W, side=tk.LEFT)
tk.Radiobutton(lfMeterMode, variable=varMeterMode,
 text='spot',value='spot',command=cbButtons).pack(anchor=tk.W, side=tk.LEFT)
tk.Radiobutton(lfMeterMode, variable=varMeterMode,
 text='backlit',value='backlit',command=cbButtons).pack(anchor=tk.W, side=tk.LEFT)
tk.Radiobutton(lfMeterMode, variable=varMeterMode,
 text='matrix',value='matrix',command=cbButtons).pack(anchor=tk.W, side=tk.LEFT)
# Tab White Balance
lfAwbMode = ttk.LabelFrame(frame2, text="awb_mode")
lfAwbMode.pack(fill="x")
lfAwbGains = ttk.LabelFrame(frame2, text="awb_gains")
lfAwbGains.pack(fill="x")
labelAwbVar = tk.StringVar()
tk.Label(lfAwbMode, textvariable=labelAwbVar).pack()
#--
AWB_MODES = [
 ("off (set by awb_gains)", "off"),
 ("auto", "auto"),
 ("sunlight", "sunlight"),
 ("cloudy", "cloudy"),
 ("shade", "shade"),
 ("tungsten", "tungsten"),
 ("fluorescent", "fluorescent"),
 ("incandescent", "incandescent"),
 ("flash", "flash"),
 ("horizon", "horizon"),
 ]
varAwbMode = tk.StringVar()
varAwbMode.set("auto")
for text, awbmode in AWB_MODES:
 awbModeBtns = tk.Radiobutton(
 lfAwbMode,
 text=text,
 variable=varAwbMode,
 value=awbmode,
 command=cbButtons)
 awbModeBtns.pack(anchor=tk.W)
#--
scaleGainRed = tk.Scale(
 lfAwbGains,
 from_=0.0, to=8.0,
 resolution=0.1,
 length=SCALE_WIDTH,
 orient=tk.HORIZONTAL,
 label="Red",
 command=cbScaleSetting)
scaleGainRed.set(0.0)
scaleGainRed.pack(anchor=tk.CENTER)
scaleGainBlue = tk.Scale(
 lfAwbGains,
 from_=0.0, to=8.0,
 resolution=0.1,
 length=SCALE_WIDTH,
 orient=tk.HORIZONTAL,
 label="Blue",
 command=cbScaleSetting)
scaleGainBlue.set(0.0)
scaleGainBlue.pack(anchor=tk.CENTER)
# Tab Image Effect
#For Image effects, ref:
#http://picamera.readthedocs.org/en/latest/api_camera.html?highlight=effect#picamera.camera.PiCamera.image_effect
labelImageEffectVar = tk.StringVar()
tk.Label(frame3, textvariable=labelImageEffectVar).pack()
#-- image_effect
varImageEffect = tk.StringVar()
varImageEffect.set('none')
lfNoParaOpts1 = ttk.Frame(frame3)
lfNoParaOpts1.pack(fill="x")
tk.Radiobutton(lfNoParaOpts1, variable=varImageEffect,
 text='none',value='none',command=cbButtons).pack(anchor=tk.W, side=tk.LEFT)
tk.Radiobutton(lfNoParaOpts1, variable=varImageEffect,
 text='negative',value='negative',command=cbButtons).pack(anchor=tk.W, side=tk.LEFT)
tk.Radiobutton(lfNoParaOpts1, variable=varImageEffect,
 text='sketch',value='sketch',command=cbButtons).pack(anchor=tk.W, side=tk.LEFT)
tk.Radiobutton(lfNoParaOpts1, variable=varImageEffect,
 text='denoise',value='denoise',command=cbButtons).pack(anchor=tk.W, side=tk.LEFT)
tk.Radiobutton(lfNoParaOpts1, variable=varImageEffect,
 text='emboss',value='emboss',command=cbButtons).pack(anchor=tk.W, side=tk.LEFT)
tk.Radiobutton(lfNoParaOpts1, variable=varImageEffect,
 text='oilpaint',value='oilpaint',command=cbButtons).pack(anchor=tk.W, side=tk.LEFT)
tk.Radiobutton(lfNoParaOpts1, variable=varImageEffect,
 text='hatch',value='hatch',command=cbButtons).pack(anchor=tk.W, side=tk.LEFT)
tk.Radiobutton(lfNoParaOpts1, variable=varImageEffect,
 text='gpen',value='gpen',command=cbButtons).pack(anchor=tk.W, side=tk.LEFT)
lfNoParaOpts2 = ttk.Frame(frame3)
lfNoParaOpts2.pack(fill="x")
tk.Radiobutton(lfNoParaOpts2, variable=varImageEffect,
 text='pastel',value='pastel',command=cbButtons).pack(anchor=tk.W, side=tk.LEFT)
tk.Radiobutton(lfNoParaOpts2, variable=varImageEffect,
 text='saturation',value='saturation',command=cbButtons).pack(anchor=tk.W, side=tk.LEFT)
tk.Radiobutton(lfNoParaOpts2, variable=varImageEffect,
 text='washedout',value='washedout',command=cbButtons).pack(anchor=tk.W, side=tk.LEFT)
tk.Radiobutton(lfNoParaOpts2, variable=varImageEffect,
 text='cartoon',value='cartoon',command=cbButtons).pack(anchor=tk.W, side=tk.LEFT)
tk.Radiobutton(lfNoParaOpts2, variable=varImageEffect,
 text='deinterlace1',value='deinterlace1',command=cbButtons).pack(anchor=tk.W, side=tk.LEFT)
tk.Radiobutton(lfNoParaOpts2, variable=varImageEffect,
 text='deinterlace2',value='deinterlace2',command=cbButtons).pack(anchor=tk.W, side=tk.LEFT)
lfSolarize = ttk.LabelFrame(frame3, text="solarize")
lfSolarize.pack(fill="x")
tk.Radiobutton(lfSolarize, variable=varImageEffect,
 text='solarize',value='solarize',command=cbButtons).pack(anchor=tk.W, side=tk.LEFT)
cbSolarize_yuv_Var = tk.BooleanVar()
tk.Checkbutton(lfSolarize, text="yuv",
 variable=cbSolarize_yuv_Var, command=cbButtons).pack(anchor=tk.W, side=tk.LEFT)
scSolarize_x0_Var = tk.IntVar()
scSolarize_x0_Var.set(128)
tk.Scale(lfSolarize, from_=0, to=255,
 orient=tk.HORIZONTAL, length=200, label="x0",
 variable=scSolarize_x0_Var, command=cbScaleSetting).pack(anchor=tk.W, side=tk.LEFT)
scSolarize_y0_Var = tk.IntVar()
scSolarize_y0_Var.set(128)
tk.Scale(lfSolarize, from_=0, to=255,
 orient=tk.HORIZONTAL, length=200, label="y0",
 variable=scSolarize_y0_Var, command=cbScaleSetting).pack(anchor=tk.W, side=tk.LEFT)
scSolarize_y1_Var = tk.IntVar()
scSolarize_y1_Var.set(128)
tk.Scale(lfSolarize, from_=0, to=255,
 orient=tk.HORIZONTAL, length=200, label="y1",
 variable=scSolarize_y1_Var, command=cbScaleSetting).pack(anchor=tk.W, side=tk.LEFT)
scSolarize_y2_Var = tk.IntVar()
scSolarize_y2_Var.set(0)
tk.Scale(lfSolarize, from_=0, to=255,
 orient=tk.HORIZONTAL, length=200, label="y2",
 variable=scSolarize_y2_Var, command=cbScaleSetting).pack(anchor=tk.W, side=tk.LEFT)
lfwatercolor = ttk.LabelFrame(frame3, text="watercolor")
lfwatercolor.pack(fill="x")
tk.Radiobutton(lfwatercolor, variable=varImageEffect,
 text='watercolor',value='watercolor',command=cbButtons).pack(anchor=tk.W, side=tk.LEFT)
cbWatercolor_uv_Var = tk.BooleanVar()
cbWatercolor_uv_Var.set(False)
tk.Checkbutton(lfwatercolor, text="uv",
 variable=cbWatercolor_uv_Var, command=cbButtons).pack(anchor=tk.W, side=tk.LEFT)
scWatercolor_u_Var = tk.IntVar()
scWatercolor_u_Var.set(0)
tk.Scale(lfwatercolor, from_=0, to=255,
 orient=tk.HORIZONTAL, length=200, label="u",
 variable=scWatercolor_u_Var, command=cbScaleSetting).pack(anchor=tk.W, side=tk.LEFT)
scWatercolor_v_Var = tk.IntVar()
scWatercolor_v_Var.set(0)
tk.Scale(lfwatercolor, from_=0, to=255,
 orient=tk.HORIZONTAL, length=200, label="v",
 variable=scWatercolor_v_Var, command=cbScaleSetting).pack(anchor=tk.W, side=tk.LEFT)
lffilm = ttk.LabelFrame(frame3, text="film")
lffilm.pack(fill="x")
tk.Radiobutton(lffilm, variable=varImageEffect,
 text='film',value='film',command=cbButtons).pack(anchor=tk.W, side=tk.LEFT)
scFilm_strength_Var = tk.IntVar()
scFilm_strength_Var.set(0)
tk.Scale(lffilm, from_=0, to=255,
 orient=tk.HORIZONTAL, length=200, label="strength",
 variable=scFilm_strength_Var, command=cbScaleSetting).pack(anchor=tk.W, side=tk.LEFT)
scFilm_u_Var = tk.IntVar()
scFilm_u_Var.set(0)
tk.Scale(lffilm, from_=0, to=255,
 orient=tk.HORIZONTAL, length=200, label="u",
 variable=scFilm_u_Var, command=cbScaleSetting).pack(anchor=tk.W, side=tk.LEFT)
scFilm_v_Var = tk.IntVar()
scFilm_v_Var.set(0)
tk.Scale(lffilm, from_=0, to=255,
 orient=tk.HORIZONTAL, length=200, label="v",
 variable=scFilm_v_Var, command=cbScaleSetting).pack(anchor=tk.W, side=tk.LEFT)
lfblur = ttk.LabelFrame(frame3, text="blur")
lfblur.pack(fill="x")
tk.Radiobutton(lfblur, variable=varImageEffect,
 text='blur',value='blur',command=cbButtons).pack(anchor=tk.W, side=tk.LEFT)
scBlur_size_Var = tk.IntVar()
scBlur_size_Var.set(1)
tk.Scale(lfblur, from_=1, to=2,
 orient=tk.HORIZONTAL, length=100, label="size",
 variable=scBlur_size_Var, command=cbScaleSetting).pack(anchor=tk.W, side=tk.LEFT)
lfcolorswap = ttk.LabelFrame(frame3, text="colorswap")
lfcolorswap.pack(fill="x")
tk.Radiobutton(lfcolorswap, variable=varImageEffect,
 text='colorswap',value='colorswap',command=cbButtons).pack(anchor=tk.W, side=tk.LEFT)
cbColorswap_dir_Var = tk.BooleanVar()
cbColorswap_dir_Var.set(False)
tk.Checkbutton(lfcolorswap, text="dir - 0:RGB to BGR/1:RGB to BRG",
 variable=cbColorswap_dir_Var, command=cbButtons).pack(anchor=tk.W, side=tk.LEFT)
lfposterise = ttk.LabelFrame(frame3, text="posterise")
lfposterise.pack(fill="x")
tk.Radiobutton(lfposterise, variable=varImageEffect,
 text='posterise',value='posterise',command=cbButtons).pack(anchor=tk.W, side=tk.LEFT)
scPosterise_steps_Var = tk.IntVar()
scPosterise_steps_Var.set(4)
tk.Scale(lfposterise, from_=2, to=32,
 orient=tk.HORIZONTAL, length=200, label="steps",
 variable=scPosterise_steps_Var, command=cbScaleSetting).pack(anchor=tk.W, side=tk.LEFT)
lfcolorpoint = ttk.LabelFrame(frame3, text="colorpoint")
lfcolorpoint.pack(fill="x")
tk.Radiobutton(lfcolorpoint, variable=varImageEffect,
 text='colorpoint',value='colorpoint',command=cbButtons).pack(anchor=tk.W, side=tk.LEFT)
quadrantVar = tk.IntVar()
quadrantVar.set(0)
tk.Radiobutton(lfcolorpoint, text="green",
 variable=quadrantVar, value=0, command=cbButtons).pack(anchor=tk.W, side=tk.LEFT)
tk.Radiobutton(lfcolorpoint, text="red/yellow",
 variable=quadrantVar, value=1, command=cbButtons).pack(anchor=tk.W, side=tk.LEFT)
tk.Radiobutton(lfcolorpoint, text="blue",
 variable=quadrantVar, value=2, command=cbButtons).pack(anchor=tk.W, side=tk.LEFT)
tk.Radiobutton(lfcolorpoint, text="purple",
 variable=quadrantVar, value=3, command=cbButtons).pack(anchor=tk.W, side=tk.LEFT)
lfcolorbalance = ttk.LabelFrame(frame3, text="colorbalance: I can't see the effect!")
lfcolorbalance.pack(fill="x")
tk.Radiobutton(lfcolorbalance, variable=varImageEffect,
 text='colorbalance',value='colorbalance',command=cbButtons).pack(anchor=tk.W, side=tk.LEFT)
scColorbalance_lens_Var = tk.DoubleVar()
scColorbalance_lens_Var.set(0)
tk.Scale(lfcolorbalance, from_=0, to=256,
 orient=tk.HORIZONTAL, length=140, label="lens",
 variable=scColorbalance_lens_Var, command=cbScaleSetting).pack(anchor=tk.W, side=tk.LEFT)
scColorbalance_r_Var = tk.DoubleVar()
scColorbalance_r_Var.set(1)
tk.Scale(lfcolorbalance, from_=0, to=256,
 orient=tk.HORIZONTAL, length=140, label="r",
 variable=scColorbalance_r_Var, command=cbScaleSetting).pack(anchor=tk.W, side=tk.LEFT)
scColorbalance_g_Var = tk.DoubleVar()
scColorbalance_g_Var.set(1)
tk.Scale(lfcolorbalance, from_=0, to=256,
 orient=tk.HORIZONTAL, length=140, label="g",
 variable=scColorbalance_g_Var, command=cbScaleSetting).pack(anchor=tk.W, side=tk.LEFT)
scColorbalance_b_Var = tk.DoubleVar()
scColorbalance_b_Var.set(1)
tk.Scale(lfcolorbalance, from_=0, to=256,
 orient=tk.HORIZONTAL, length=140, label="b",
 variable=scColorbalance_b_Var, command=cbScaleSetting).pack(anchor=tk.W, side=tk.LEFT)
scColorbalance_u_Var = tk.IntVar()
scColorbalance_u_Var.set(0)
tk.Scale(lfcolorbalance, from_=0, to=255,
 orient=tk.HORIZONTAL, length=140, label="u",
 variable=scColorbalance_u_Var, command=cbScaleSetting).pack(anchor=tk.W, side=tk.LEFT)
scColorbalance_v_Var = tk.IntVar()
scColorbalance_v_Var.set(0)
tk.Scale(lfcolorbalance, from_=0, to=255,
 orient=tk.HORIZONTAL, length=140, label="v",
 variable=scColorbalance_v_Var, command=cbScaleSetting).pack(anchor=tk.W, side=tk.LEFT)
# Tab Control
lfISO = ttk.LabelFrame(frame4, text="ISO")
lfISO.pack(fill="x")
varIso = tk.IntVar()
tk.Radiobutton(lfISO, variable=varIso,
 text='auto',value='0',command=cbButtons).pack(anchor=tk.W, side=tk.LEFT)
tk.Radiobutton(lfISO, variable=varIso,
 text='100',value='100',command=cbButtons).pack(anchor=tk.W, side=tk.LEFT)
tk.Radiobutton(lfISO, variable=varIso,
 text='200',value='200',command=cbButtons).pack(anchor=tk.W, side=tk.LEFT)
tk.Radiobutton(lfISO, variable=varIso,
 text='320',value='320',command=cbButtons).pack(anchor=tk.W, side=tk.LEFT)
tk.Radiobutton(lfISO, variable=varIso,
 text='400',value='400',command=cbButtons).pack(anchor=tk.W, side=tk.LEFT)
tk.Radiobutton(lfISO, variable=varIso,
 text='500',value='500',command=cbButtons).pack(anchor=tk.W, side=tk.LEFT)
tk.Radiobutton(lfISO, variable=varIso,
 text='640',value='640',command=cbButtons).pack(anchor=tk.W, side=tk.LEFT)
tk.Radiobutton(lfISO, variable=varIso,
 text='800',value='800',command=cbButtons).pack(anchor=tk.W, side=tk.LEFT)
lfDRC = ttk.LabelFrame(frame4, text="Dynamic Range Compression")
lfDRC.pack(fill="x")
varDrc = tk.StringVar()
varDrc.set('off')
tk.Radiobutton(lfDRC, variable=varDrc,
 text='off',value='off',command=cbButtons).pack(anchor=tk.W, side=tk.LEFT)
tk.Radiobutton(lfDRC, variable=varDrc,
 text='low',value='low',command=cbButtons).pack(anchor=tk.W, side=tk.LEFT)
tk.Radiobutton(lfDRC, variable=varDrc,
 text='medium',value='medium',command=cbButtons).pack(anchor=tk.W, side=tk.LEFT)
tk.Radiobutton(lfDRC, variable=varDrc,
 text='high',value='high',command=cbButtons).pack(anchor=tk.W, side=tk.LEFT)
lfRotation = ttk.LabelFrame(frame4, text="Rotation")
lfRotation.pack(fill="x")
varRotation = tk.IntVar()
varRotation.set(270)
tk.Radiobutton(lfRotation, variable=varRotation,
 text='0',value='0',command=cbButtons).pack(anchor=tk.W, side=tk.LEFT)
tk.Radiobutton(lfRotation, variable=varRotation,
 text='90',value='90',command=cbButtons).pack(anchor=tk.W, side=tk.LEFT)
tk.Radiobutton(lfRotation, variable=varRotation,
 text='180',value='180',command=cbButtons).pack(anchor=tk.W, side=tk.LEFT)
tk.Radiobutton(lfRotation, variable=varRotation,
 text='270',value='270',command=cbButtons).pack(anchor=tk.W, side=tk.LEFT)
lfFlip = ttk.LabelFrame(frame4, text="Flip")
lfFlip.pack(fill="x")
varHFlip = tk.BooleanVar()
varHFlip.set(False)
tk.Checkbutton(lfFlip, text="hflip",
 variable=varHFlip, command=cbButtons).pack(anchor=tk.W, side=tk.LEFT)
varVFlip = tk.BooleanVar()
varVFlip.set(False)
tk.Checkbutton(lfFlip, text="vflip",
 variable=varVFlip, command=cbButtons).pack(anchor=tk.W, side=tk.LEFT)
# Resolution
lfResolution = ttk.LabelFrame(frame4, text="Resolution")
lfResolution.pack(fill="x")
varResolution = tk.StringVar()
varResolution.set('1280x720')
tk.Radiobutton(lfResolution, variable=varResolution,
 text='640x480',value='640x480').pack(anchor=tk.W, side=tk.LEFT)
tk.Radiobutton(lfResolution, variable=varResolution,
 text='800x400',value='800x600').pack(anchor=tk.W, side=tk.LEFT)
tk.Radiobutton(lfResolution, variable=varResolution,
 text='1280x720',value='1280x720').pack(anchor=tk.W, side=tk.LEFT)
tk.Radiobutton(lfResolution, variable=varResolution,
 text='1296x730',value='1296x730').pack(anchor=tk.W, side=tk.LEFT)
tk.Radiobutton(lfResolution, variable=varResolution,
 text='1296x972',value='1296x972').pack(anchor=tk.W, side=tk.LEFT)
tk.Radiobutton(lfResolution, variable=varResolution,
 text='1600x1200',value='1600x1200').pack(anchor=tk.W, side=tk.LEFT)
tk.Radiobutton(lfResolution, variable=varResolution,
 text='1920x1080',value='1920x1080').pack(anchor=tk.W, side=tk.LEFT)
tk.Radiobutton(lfResolution, variable=varResolution,
 text='2592x1944',value='2592x1944').pack(anchor=tk.W, side=tk.LEFT)
# Quality
lfQuality = ttk.LabelFrame(frame4, text="Quality")
lfQuality.pack(fill="x")
varQuality = tk.IntVar()
varQuality.set(85)
tk.Scale(lfQuality, from_=10, to=100,
 orient=tk.HORIZONTAL, length=600, label="%",
 variable=varQuality).pack(anchor=tk.W, side=tk.LEFT)
lfDenoise = ttk.LabelFrame(frame4, text="image_denoise")
lfDenoise.pack(fill="x")
varDenoise = tk.BooleanVar()
varDenoise.set(True)
tk.Checkbutton(lfDenoise, text="image_denoise",
 variable=varDenoise, command=cbButtons).pack(anchor=tk.W, side=tk.LEFT)
# Shutter Speed
lfShuuterSpeed = ttk.LabelFrame(frame4, text="Slow Shutter (caution: NOT work as expected)")
lfShuuterSpeed.pack(fill="x")
frameShuuterSpeed1 = tk.Frame(lfShuuterSpeed)
frameShuuterSpeed1.pack(fill="x")
frameShuuterSpeed2 = tk.Frame(lfShuuterSpeed)
frameShuuterSpeed2.pack(fill="x")
varShutterSpeed = tk.StringVar()
varShutterSpeed.set('normal')
tk.Radiobutton(frameShuuterSpeed1, variable=varShutterSpeed,
 text='normal',value='normal').pack(anchor=tk.W, side=tk.LEFT)
tk.Radiobutton(frameShuuterSpeed2, variable=varShutterSpeed,
 text='1/4 sec',value='1/4 sec').pack(anchor=tk.W, side=tk.LEFT)
tk.Radiobutton(frameShuuterSpeed2, variable=varShutterSpeed,
 text='1/2 sec',value='1/2 sec').pack(anchor=tk.W, side=tk.LEFT)
tk.Radiobutton(frameShuuterSpeed2, variable=varShutterSpeed,
 text='1 sec',value='1 sec').pack(anchor=tk.W, side=tk.LEFT)
tk.Radiobutton(frameShuuterSpeed2, variable=varShutterSpeed,
 text='2 sec',value='2 sec').pack(anchor=tk.W, side=tk.LEFT)
tk.Radiobutton(frameShuuterSpeed2, variable=varShutterSpeed,
 text='3 sec',value='3 sec').pack(anchor=tk.W, side=tk.LEFT)
tk.Radiobutton(frameShuuterSpeed2, variable=varShutterSpeed,
 text='4 sec',value='4 sec').pack(anchor=tk.W, side=tk.LEFT)
tk.Radiobutton(frameShuuterSpeed2, variable=varShutterSpeed,
 text='5 sec',value='5 sec').pack(anchor=tk.W, side=tk.LEFT)
tk.Radiobutton(frameShuuterSpeed2, variable=varShutterSpeed,
 text='6 sec',value='6 sec').pack(anchor=tk.W, side=tk.LEFT)
#---------------------------------------
#TimeLapse
lfTimelapse = ttk.LabelFrame(frame5, text="Timelapse")
lfTimelapse.pack(fill="x")
btnStartLapse = tk.Button(
 lfTimelapse, text="Start TimeLapse", state=tk.NORMAL,
 font=myFont, command=cmdStartLapse)
btnStartLapse.pack(anchor=tk.W, side=tk.LEFT)
btnStopLapse = tk.Button(
 lfTimelapse, text="Stop TimeLapse", state=tk.DISABLED,
 font=myFont, command=cmdStopLapse)
btnStopLapse.pack(anchor=tk.W, side=tk.LEFT)
labelLapseText = tk.StringVar()
tk.Label(lfTimelapse, textvariable=labelLapseText).pack(anchor=tk.W, side=tk.LEFT)
lfInterval = ttk.LabelFrame(frame5, text="interval")
lfInterval.pack(fill="x")
scaleIntervalSec = tk.Scale(
 lfInterval,
 from_=5, to=60,
 resolution=5,
 length=SCALE_WIDTH,
 orient=tk.HORIZONTAL,
 label="second",
 font=myFont,
 command=lapseScaleSetting)
scaleIntervalSec.set(5)
scaleIntervalSec.pack(anchor=tk.CENTER)
lfNumOfShot = ttk.LabelFrame(frame5, text="Number of shot")
lfNumOfShot.pack(fill="x")
scaleNumOfShot= tk.Scale(
 lfNumOfShot,
 from_=0, to=300,
 resolution=1,
 length=SCALE_WIDTH,
 orient=tk.HORIZONTAL,
 label="# (0 = continue until 'Stop Timelapse' button pressed)",
 font=myFont,
 command=lapseScaleSetting)
scaleNumOfShot.set(0)
scaleNumOfShot.pack(anchor=tk.CENTER)
labelLockedSetting = tk.StringVar()
tk.Label(frame5, textvariable=labelLockedSetting).pack()
#=======================================
print("start")
startCamHandler()
tk.mainloop()
Once photos taking stopped, switch to the new directory under pyLapse. All the photos named with timestamp.
Samples:
- Raspberry Pi Camera Module Timelapse video
- Assembling of 2WD Smart Robot Car
- Thunder (timelapse) captured by Raspberry Pi NoIR Camera Module
- Raspberry Pi NoIR Camera V2 Timelapse
- RPi Camera Module NoIR V2 Timelapse - 2016年05月08日