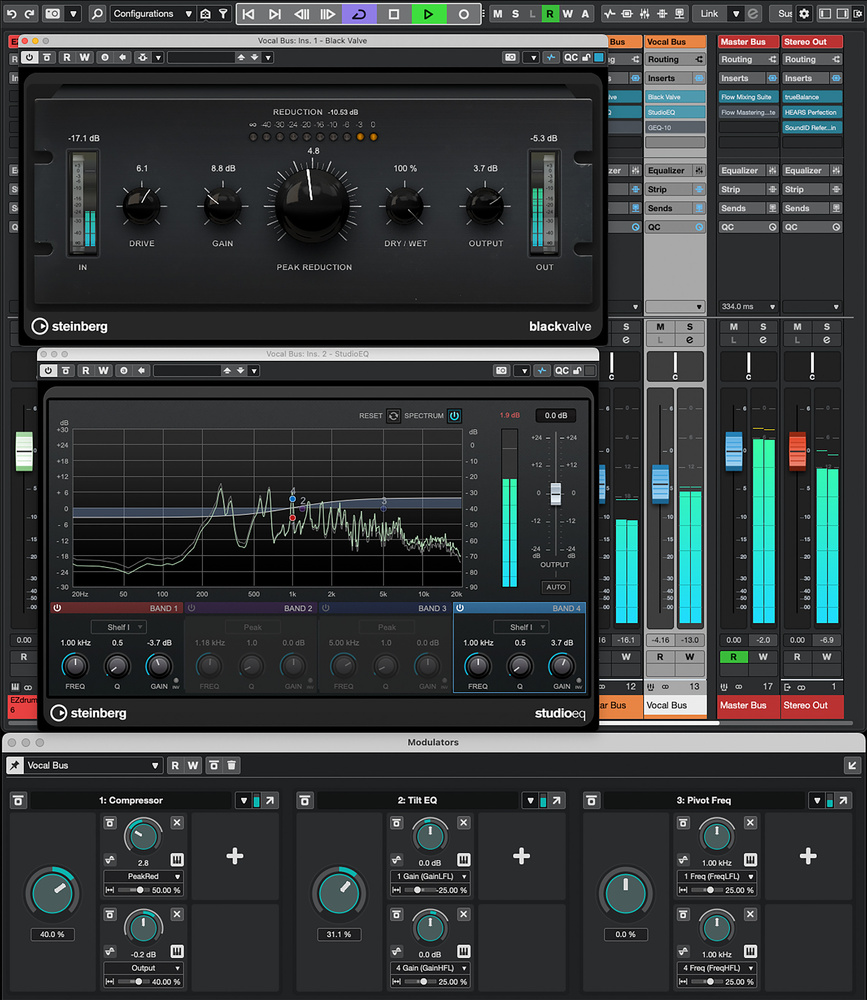
Three Macro Knob Modulators provide broad‐brush control over compression and EQ on each of the main audio busses (group channels) within this project Three Macro Knob Modulators provide broad‐brush control over compression and EQ on each of the main audio busses (group channels) within this project
Could Flow‐style macro controls, courtesy of Cubase’s powerful Modulators, enable you to mix more quickly?
When I’m mixing, after making some initial adjustments to individual tracks that are very obviously required, I’ll often shift my focus pretty quickly to the buses — both my various instrument subgroups and the stereo master. My intention is to make rapid progress by applying broad‐brush strokes to the mix, before my ears grow too accustomed to the sound. In general, this will involve setting an initial static mix balance between the instrument groups using the faders, and then some decisions around compression and EQ.
I recently explored — and was impressed by — Softube’s Flow Mixing Suite (my review is in this very issue), and found it really useful at this stage of a mix, and its macro controls particularly intrigued me. They’re a set of knobs that can each be mapped to control one or more key parameters in a multi‐plug‐in signal chain. For example, a single ‘compression’ macro control might influence both the threshold and make‐up gain controls of a dynamics plug‐in, so that as you turn the macro control, it applies more compression by lowering the threshold, but simultaneously increases the make‐up gain to compensate for the loss in level. As well as saving you having to turn two knobs to achieve one task, this approach means you don’t have to keep opening/closing individual plug‐ins, and you can keep your screen relatively uncluttered.
But of course, impressive as it is, the Softube system works only with Softube’s plug‐ins, and so, with this experience fresh in my mind, I decided to see if I might emulate the approach in Cubase, using the Pro version’s Modulator feature. It worked pretty well, and below I’ll take you through some examples.
There isn’t a tilt EQ in Cubase’s stock plug‐in collection... but with a little bit of Modulator magic you can create one based on the stock Studio EQ.
One‐knob Wonder
Let’s start with that compressor example. For this experiment, I instantiated Cubase’s Black Valve plug‐in on my project’s main lead vocal bus, but you could apply the same principles to any of Cubase’s stock compressors, used on any audio signal. With my vocal bus (a group channel) selected, I opened the Modulator panel in the Project window’s Lower Zone, then popped that open as a separate floating window (use the arrow button, located top right of the pane). That let me see it alongside the MixConsole, not just in the Project window.
In the Modulator panel, I selected the Macro Knob Modulator type and hit Add Modulator. In the Macro Knob panel, I used the Rename options from the drop‐down menu to give this knob a suitable name (imaginatively, ‘Compressor’) rather than the default ‘Macro Knob’ label.
With Black Valve, I wanted to assign this Macro Knob to provide simultaneous control over both the Peak Reduction and Output level (in other words make‐up gain) controls. As you increase the Peak Reduction value, more compression is applied in response to the peaks, usually reducing both the signal’s dynamic range and its peak loudness. A positive tweak to the Output control can compensate for the loss in level.
The Modulators panel makes it easy to establish control assignments to perform both actions at once. Clicking on the large ‘+’ plus icon in the Add Connection sub‐panel lets you add a new assignment. Then, simply hit the Learn button and the next control you touch either in the channel or any of its associated plug‐ins is automatically linked to the Macro Knob. The second assignment can be added in exactly the same fashion using the ‘+’ icon that appears in the next Add Connection sub‐panel.
The smaller knobs in the two Connection sub‐panels can now be adjusted to set the starting point positions of the two Black Valve controls. Adjusting the Modulation Depth sliders (at the bottom of each Connection sub‐panel) determines how sensitive each of the target parameters will be when you adjust the main Macro Knob. In this example, based on a little experimentation with the track’s contents, I set +50 for Peak Reduction and +40 for Output. Note that setting a negative Modulation Depth would allow you to reduce the value of a target parameter while increasing the value of the Modulation Knob, and I’ll come back to this in our next example.
Ta‐da! We now have a single Macro Knob that lets us adjust both of our main Black Valve parameters in a single mix move. This might not initially sound like such a big deal, but when you go through this process across multiple tracks and multiple mix adjustments, the time‐saving credits soon add up — especially in those initial stages of mix balancing when you really do need to keep your ears and perspective fresh.
EQ Envy
Something else from my Flow Mixing Suite experience that I really enjoyed was their Tonelux Tilt EQ plug‐in. There isn’t a tilt EQ in Cubase’s stock plug‐in collection — which is a shame, since they can provide a really simple means to adjust the overall tonality of a track/sound without the complexity of adjusting multiple bands on a more conventional EQ — but with a little bit of Modulator magic you can create one based on the stock Studio EQ.
As shown in the main screenshot, to achieve this I set Studio EQ’s bands 1 and 4 to Shelf I mode and, initially, set the frequency of both to 1000Hz. This frequency forms the ‘pivot’ around which the EQ will ‘tilt’; more on this in a minute. I then configured a new Macro Knob Modulator (labelled ‘EQ Tilt’) and mapped two parameter connections to it: one to the Gain for band 1, one for that of band 4. The Modulation Depth sliders, though, I set differently. For Gain on band 1, I set this to ‐25, and for Gain on band 4 it was +25. As a result, when adjusting the Macro Knob, one gain increases when the other decreases. Since we can ‘tilt’ the tonal balance around the pivot frequency with a single control, it’s super‐quick and easy to make a sound a touch darker or brighter — in much the same way as you can with the Tilt‐Shelf preset in Fabfilter’s Pro‐Q 4!
As an additional touch, I added another Macro Knob Modulator, making two connections — to the Frequency setting of both the same bands (1 and 4) and both with identical Modulation Depth settings of +25. Adjusting this Macro Knob then shifts the frequency around which my tilt EQ pivots. Which is rather neat!
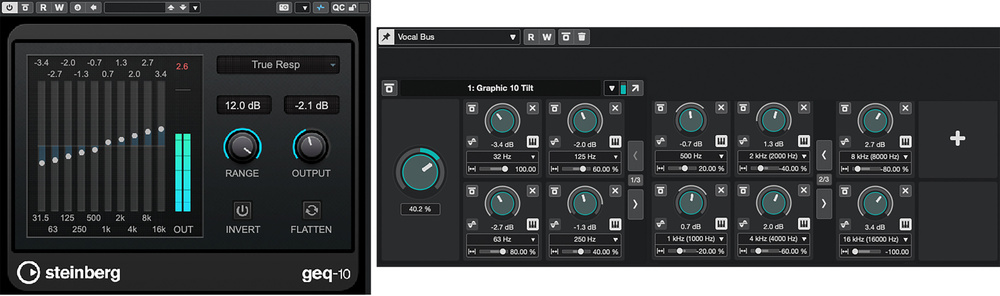
With 10 parameter connections to a Macro Knob, you can also turn the GEQ‐10 plug‐in into a tilt EQ. With 10 parameter connections to a Macro Knob, you can also turn the GEQ‐10 plug‐in into a tilt EQ.
EQ Part Two
Individual Modulators can have many multiples of connections added to them (I lost the will to test this once I got past 30, but they’re added as sets of four, and you can easily step through multiple banks of four connection sub‐panels to configure them). So as an alternative to Studio EQ, I also tried to emulate a tilt EQ using the GEQ‐10 graphic EQ plug‐in. The second screen shows this, and I’ve stitched together the image to show all the connection sub‐panels (10 in total) so you can see precisely how this works.
Each of the 10 connections is linked to a single frequency band slider in the plug‐in, but the various Modulation Depth sliders provide the key configuration step. A combination of both positive and negative Modulation Depth settings is required, while the actual depth values are low around the pivot point and increase towards the very low‐ and very high‐frequency bands (or another shape if you adjust the Modulation Depth settings). The aforementioned video clip (linked to above) demonstrates this and Studio EQ in use. It’s kind of cool to watch one Macro Knob move all these other controls in concert!
Off The Shelf
As I commented at the start of this workshop, with this Modulator‐controlled compression and tilt EQ combo set up on each of your main instrument buses, and the Modulator panel floating as a separate window beneath your MixConsole, as you select a channel fader to sit each channel in the mix, your two (or perhaps three) Macro Knobs for that channel come into focus within the Modulator panel and give you broad‐brush control over the dynamics (compression) and tonal balance (tilt EQ) of said channel. You could take it further, of course, for example by inversely linking the input and output levels of saturation or tape emulation plug‐ins... Having demonstrated the principles, I’ll leave you to explore such things.
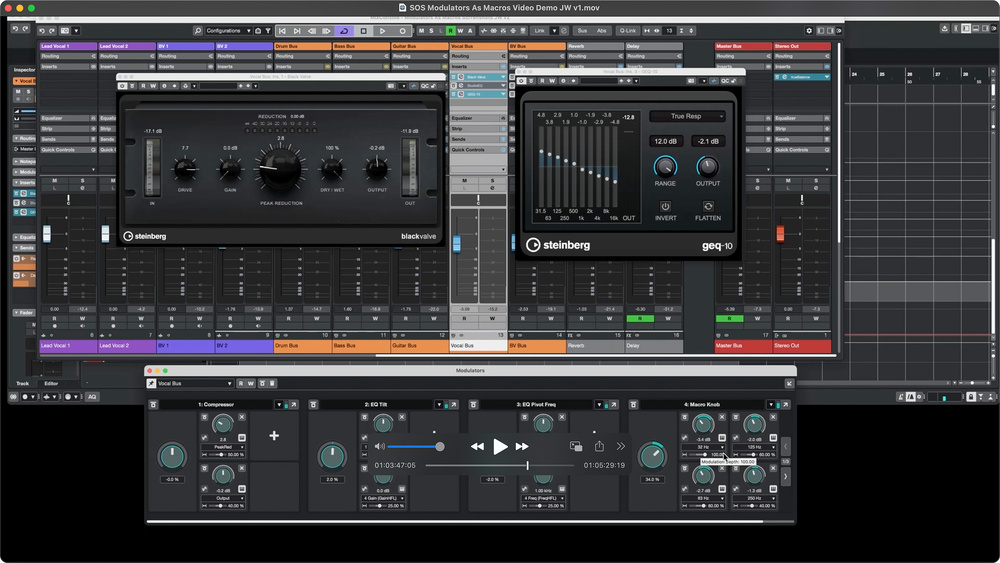
Refer to the short video at the top of this page, in which I demonstrate how to use Modulators to turn regular Cubase plug‐ins into a tilt EQ. Refer to the short video at the top of this page, in which I demonstrate how to use Modulators to turn regular Cubase plug‐ins into a tilt EQ.
Also note that you have the option of configuring these Macro Knobs as Quick Controls — and these, in turn, can be mapped to physical rotary controls on your master keyboard or control surface via MIDI Remote. So if you like to get hands‐on with your mixing, you can still do that. Either way, your new macro controls let you quickly experiment with your initial static mix for a project before digging into the details.