Adding single rows in Google Sheets is a simple and straightforward process. However, using the same process to insert multiple rows can be tedious and time-consuming. Thankfully, there are more efficient ways to go about this.
In this article, we’ll explore some easy ways you can insert multiple rows in Google Sheets that will streamline your workflow and save you lots of valuable time. Whether you’re working with small or large sets of data, these tips will come in handy.
1. The Insert Tab
Before we dive into how to insert multiple rows, let’s quickly recap how to insert a single row above or below an existing one using the Insert tab on the main menu.
So, for example, if you want to insert a row above or below row 10, you’ll click on row 10, then on the Insert tab, select Rows from the drop-down menu, and choose either Insert 1 row above or Insert 1 row below.

Using a pretty similar process, you can insert multiple rows into Google Sheets. So, for example, let’s say you want to add 5 rows above row 10.
You’ll start by selecting 5 rows starting from row 10—so click row 10, press the Shift key on your keyboard, and select the 5th row down below from row 10, which is row 14.

With these five rows selected, click the Insert tab and select Rows, and Insert 5 rows above.

Notice that since the five rows were added above row 10, the “initial” row 10 moves to row 15.

If you want to insert five rows below row 10, then select a range of five rows with row 10 as the final row.

Then follow through the same process as before, but this time around, select Insert 5 rows below. Notice how this time around row 10 stays in the same position and the new rows are added below it.

2. The Right-Click Menu
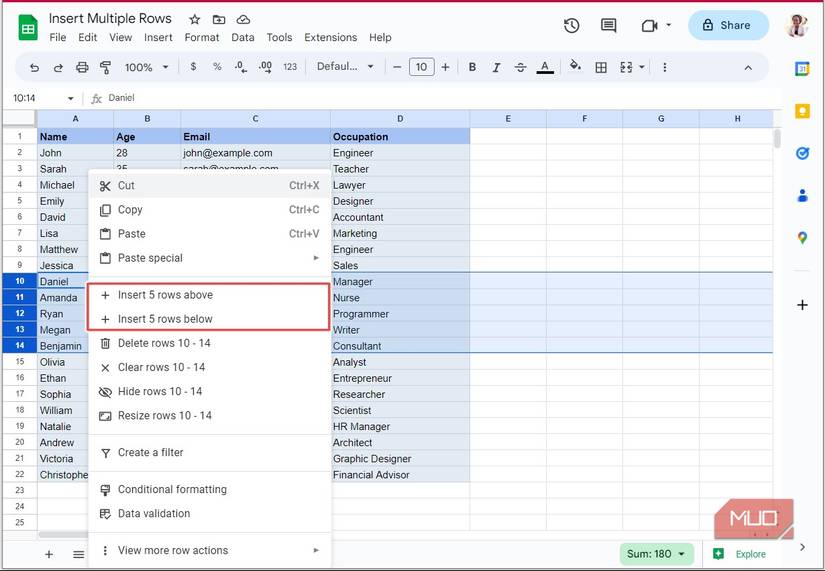
Instead of reaching all the way to the Insert tab, you can quickly insert multiple rows using the right-click menu. As we did in the previous section, select a range of rows to match the number of rows you want to add (let’s use 5 rows for this example as well).
But this time around, right-click on your selection and select either Insert 5 rows above or Insert 5 rows below from the drop-down menu.
3. The F4 Shortcut
So far, the methods we’ve looked at only allow you to insert multiple rows that are adjacent to each other. But what if you want to insert non-adjacent rows? This is where the F4 key comes in handy! It’s one of the many keyboard shortcuts in Google Sheets that can significantly boost your speed.
The F4 key repeats the last action you performed. So whether your last action was inserting one row above or three rows below, hitting F4 on your keyboard will perform that exact action.
Let’s take a look at an example where you want to insert one row below row 2, another below row 6, and a final one below row 12. First, you have to manually insert one row below any of the rows (let’s say row 2) using either the Insert tab or the right-click menu (as we’ve discussed previously).

Now you can go to row 6 and hit F4 on your keyboard to add a row below it, then go to row 12 and do the same.
If the F4 key doesn’t work on your keyboard, try fn + F4 or Ctrl + Y.

While the keyboard shortcut method doesn’t add these non-adjacent rows at a go, it’s a much faster process compared to repeatedly using the Insert tab or right-click menu.
4. The Macro Option
A much better alternative to the F4 shortcut method is using the Macros feature to automate repetitive tasks (for our example, inserting multiple rows).
So instead of relying on the last action you executed, you can create different macros for adding different numbers of rows, and access each of them with just a click of a button or a custom shortcut key. To add a new macro, click the Extensions tab from the menu, select Macros, and then Record macro.

A dialog box pops up to show that you’re recording a new macro, so any action you take will be captured. Before you take any action, ensure that you’ve selected the right option out of the following in the dialog box:
- Use absolute references: With this option selected, if you add three rows below, let’s say row 6, executing the macro later will always add three rows below row 6.
- Use relative references: Instead of always adding 3 rows below row 6, this option will only add 3 rows below your selected row at the time of execution.
With either of these options selected, you can now add three rows below row 6 and click Save.

Give your macro a suitable name. You can also assign it to a custom shortcut (optional), and click Save.

Now you can execute your new macro by hitting the custom shortcut on your keyboard or by navigating to the Extensions tab, clicking Macros, and selecting your macro from the drop-down menu.
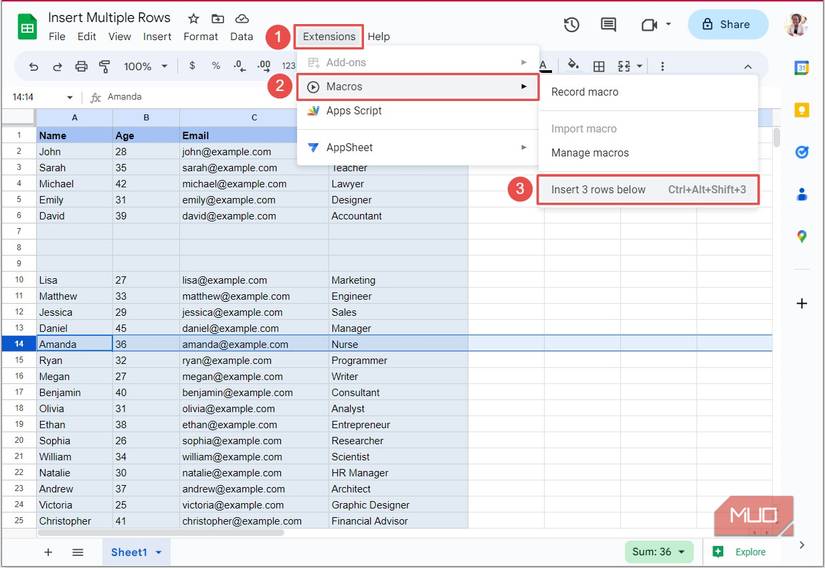
If you’re executing the macro for the first time, you’ll need to grant authorization for it to make changes to your spreadsheet.

After the authorization, you’ll have to re-run the script using your custom shortcut or the Extensions tab (as explained previously).

5. The Add Button
By default, there are a maximum of 1000 rows in Google Sheets. And if you’re working with large sets of data, this may not be enough.
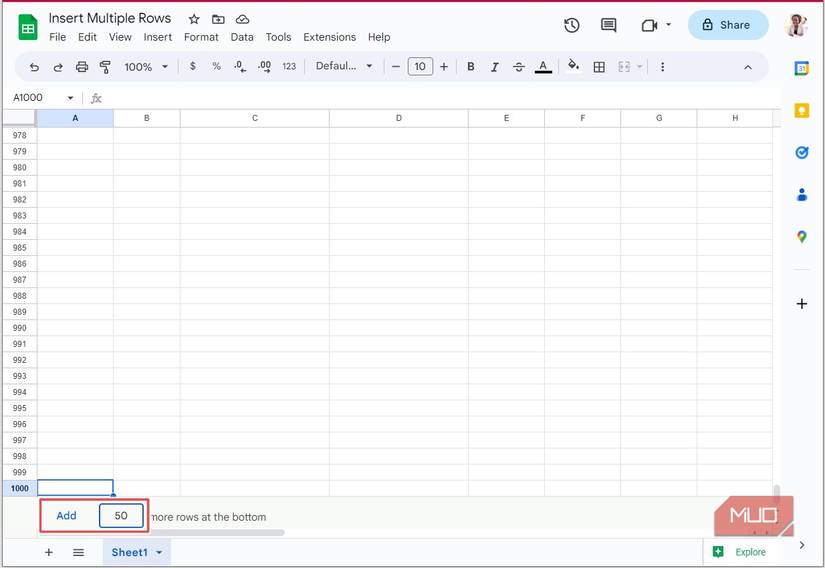
Thankfully, Google Sheets makes it easy to add multiple rows below the 1000th row with the Add button. First, select the last row of your data set (as shown in the image below).

Now press Ctrl + down arrow on your keyboard to move to the bottom of the spreadsheet, then hit the down arrow again to reveal the Add button. Specify the no. of extra rows you want to add to the bottom of your sheet and click Add.
Insert Multiple Rows in Google Sheets With the Right Techniques
When it comes to inserting multiple rows into Google Sheets, the techniques shared above will save you lots of time and headaches. So go ahead and start incorporating them into your workflow. And if you dabble in Microsoft Excel, the process of inserting multiple rows is just as easy.