| Blog | Documentation | Comparision | Discord/X | Website |
🔥 Distributed storage for GPU workloads. Built on Rust on io_uring, OpenLake is a state of the art storage engine delivering million+ iops within 1ms.
- [2026/09] 🔥 OpenLake tops the MLPerf Storage v3.0 2026 object checkpointing, leading NVIDIA and Nebius (blog).
- [2026/08] ExANS: a lossless GPU codec for BF16 KV cache: ×ばつ cost savings, now available in OpenLake v0.8 (blog).
- [2026/07] Breaking the KV Wall: managing 100 TB of KV cache and ×ばつ inference throughput with deferred materialization (blog).
Older updates
- [2026/07] Introducing OpenLake: open source storage that saturates the GPUs: ×ばつ throughput and 600 μs reads (blog).
OpenLake is a storage engine for AI infrastructure. With OpenLake you get high throughput for small I/O and cache like performance while being fully persistent and durable. Keep GPUs fed during training and inference reducing idle time and getting more from your accelerators.
OpenLake is fast with:
- KV Cache Offload. Reduced LLM Inference costs by having Petabyte scale KV cache store co-located on GPU hosts.
- VectorDB: Fast index building and vector serving.
- Checkpointing: Ultra fast checkpoint storage and retrieval for RL and ML workloads.
- Model Training: Small file I/O and fast random reads, reduced GPU costs/training time.
- Context Storage: Store massive conversations, memories and context for fast agentic retrieval.
Learn more: Blogs → | Benchmarks → | KV Offload | Object Store
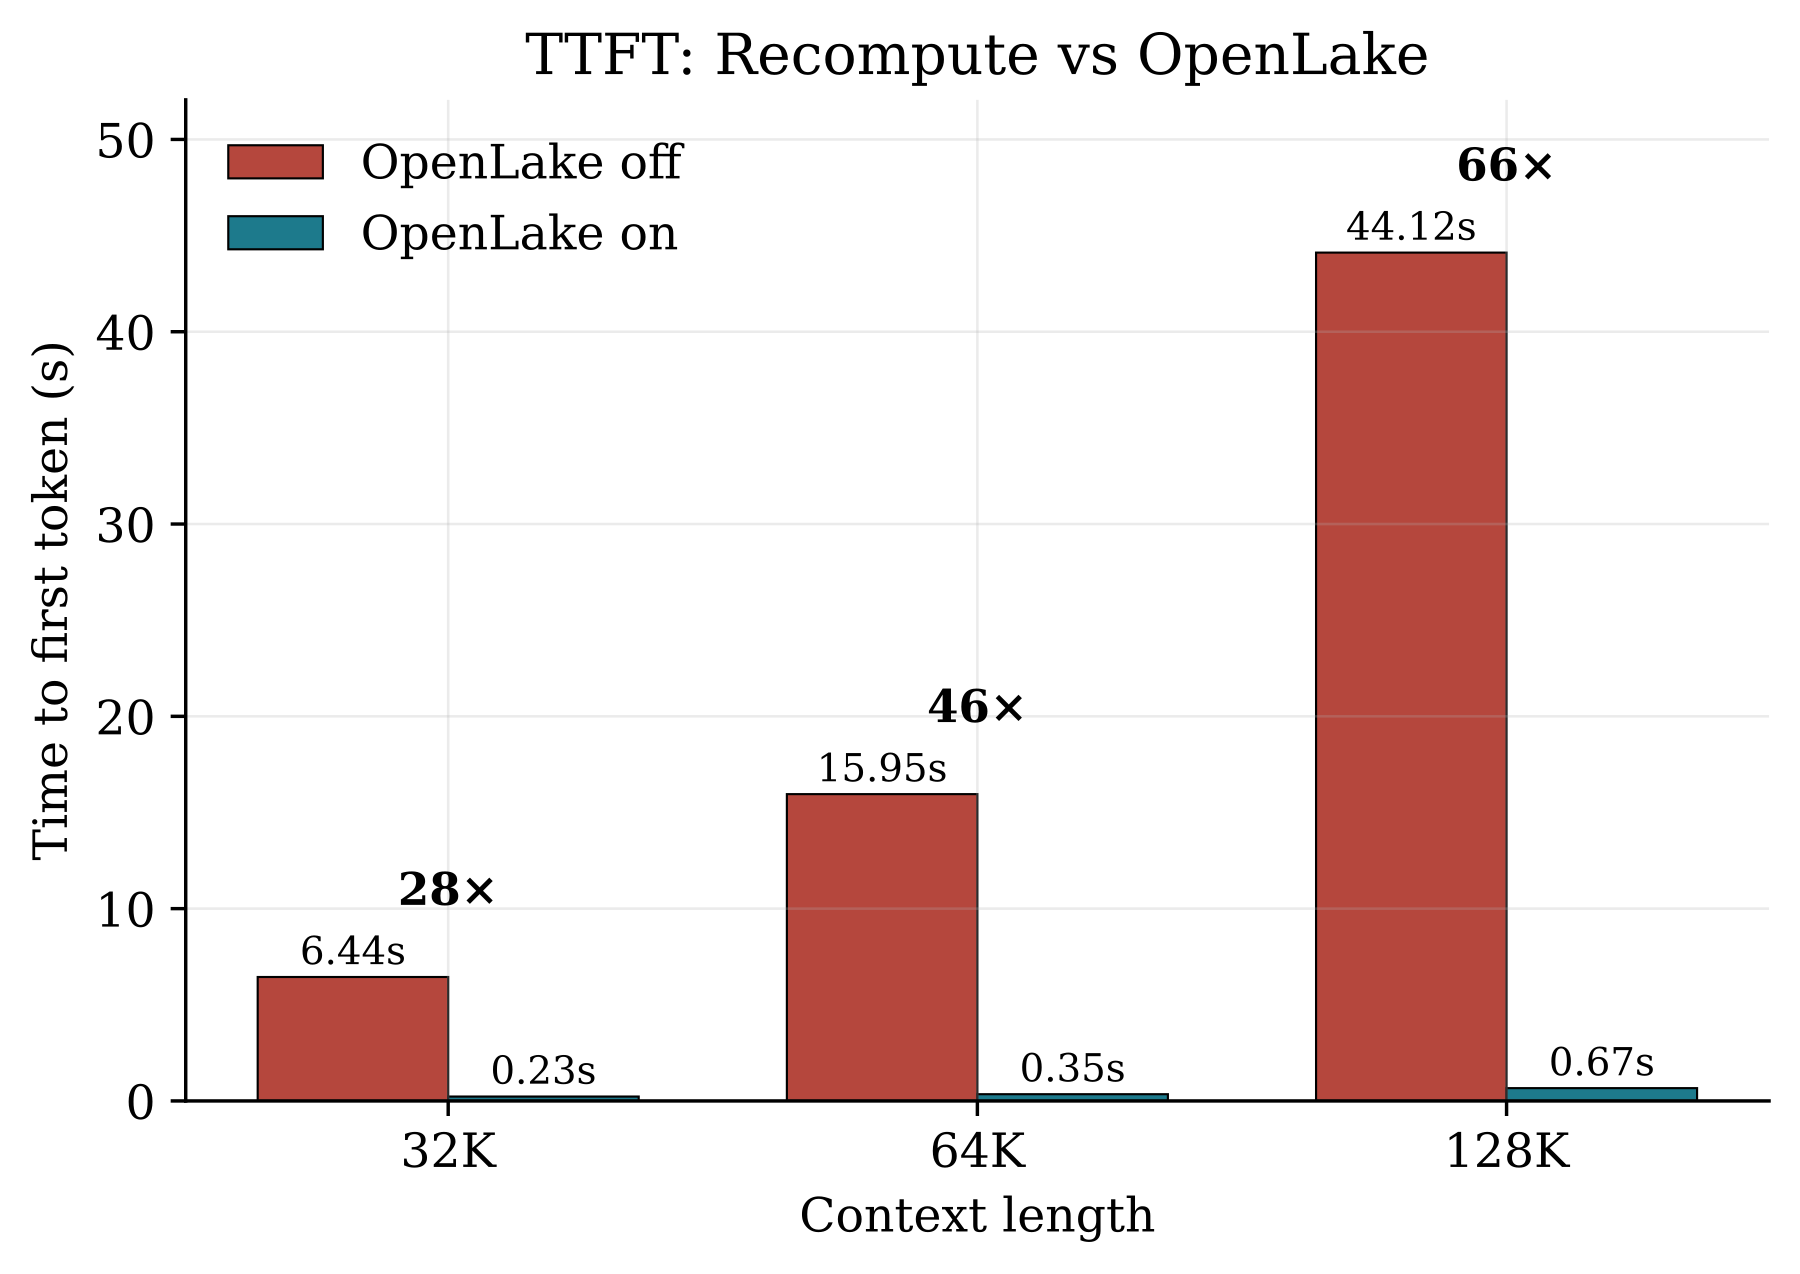
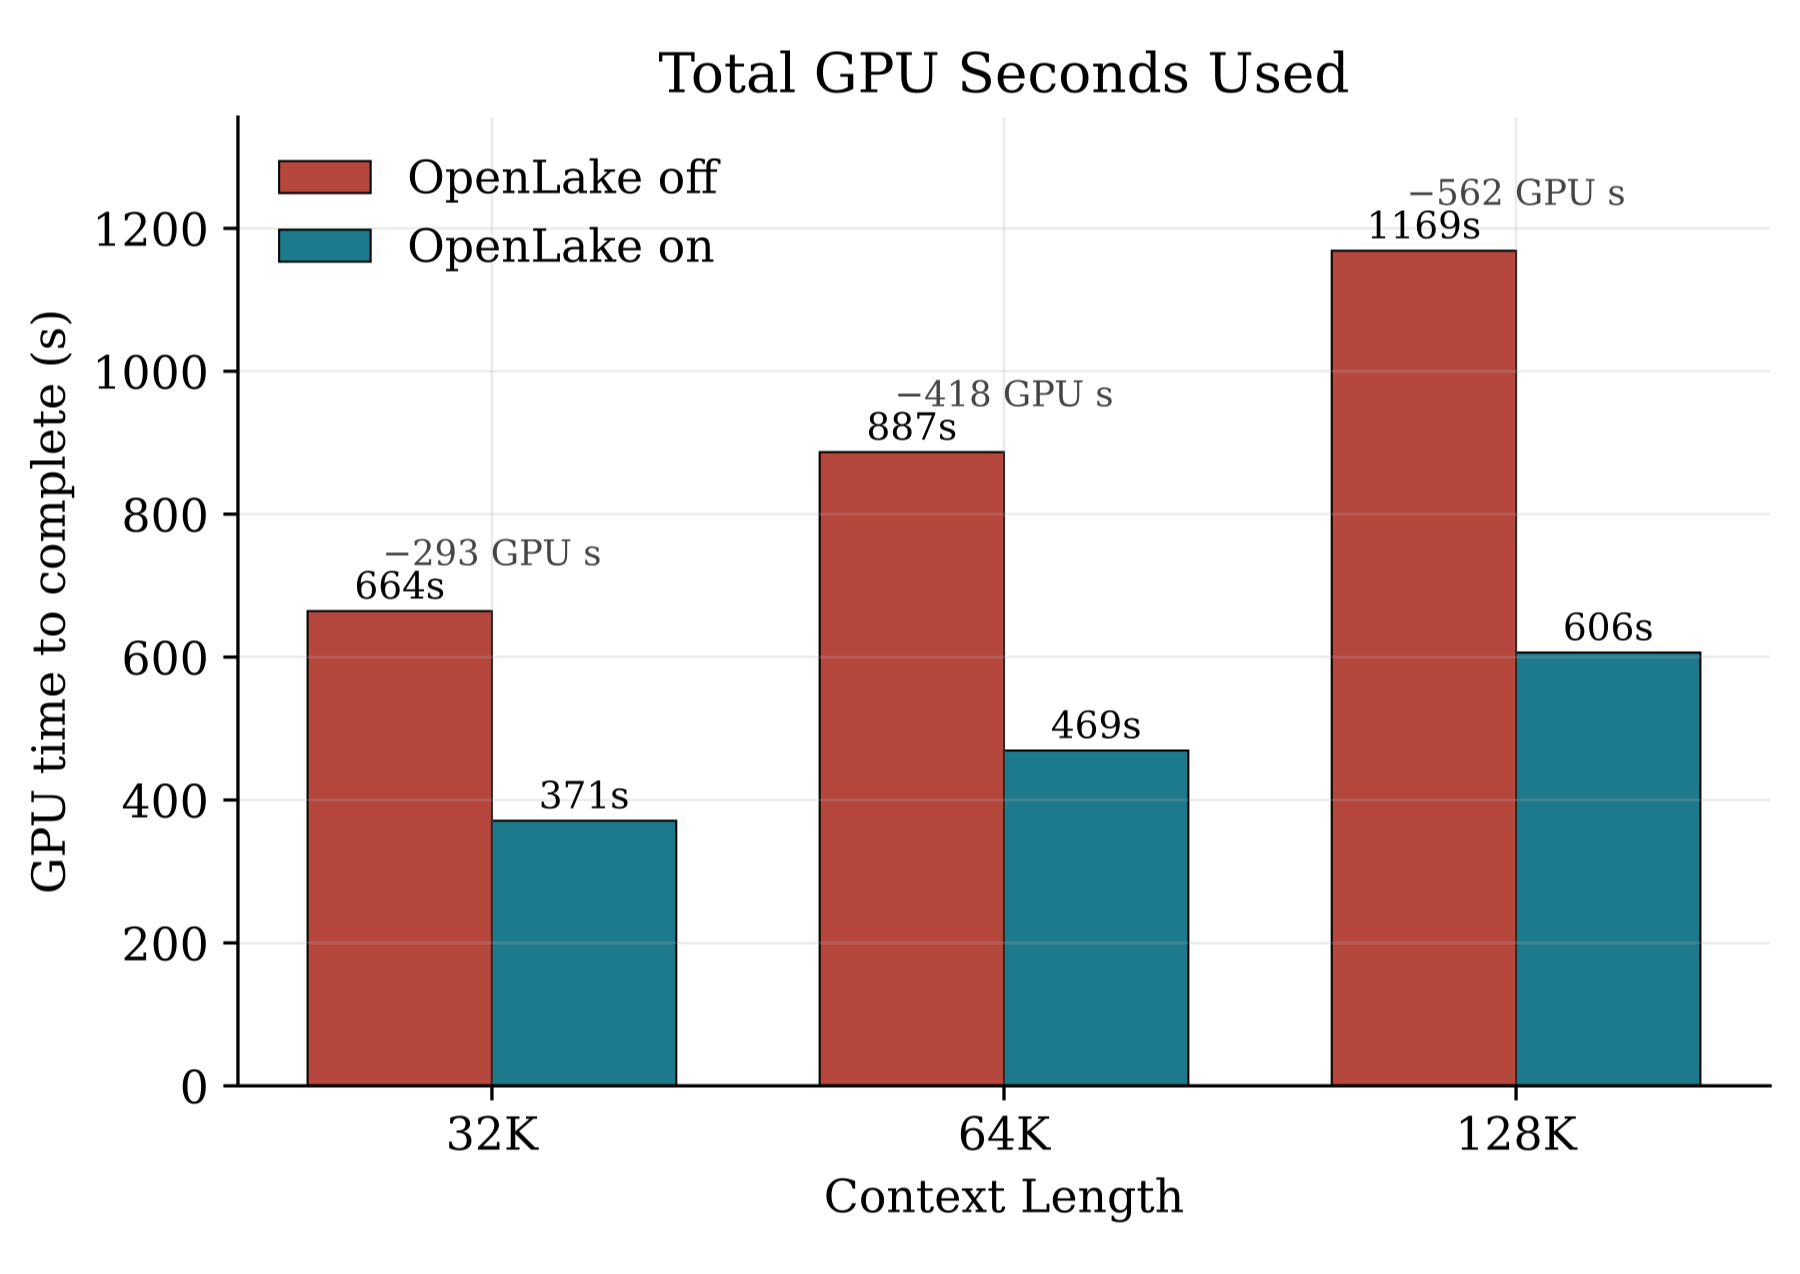
×ばつ speedup on time to first token first token when cached. (128K context window)
GPU nodes contribute to create an OpenLake cluster. The inference engine writes KV once and reads it back in milliseconds (using the host RAM and disk), saving prefill for long and repeated prompts.
Drop OpenLake into your existing setup. No code changes:
pip install openlake-vllm
openlaked
export PYTHONHASHSEED=0
vllm serve <model_name> --kv-transfer-config '{"kv_connector":"OpenLakeConnector","kv_connector_module_path":"openlake_client.openlake_connector","kv_role":"kv_both","kv_connector_extra_config":{"openlake_nodes":["127.0.0.1:9400"],"openlake_device":"local"}}'
Note: By default OpenLake offloads to the same host. To enable OpenLake across your GPU fleet, please start openlaked with a --config.
For Kubernetes clusters, use the Helm KV deployment guide to place one OpenLake instance on each selected node and generate the ordered vLLM peer configuration.
OpenLake enabled vs disabled:
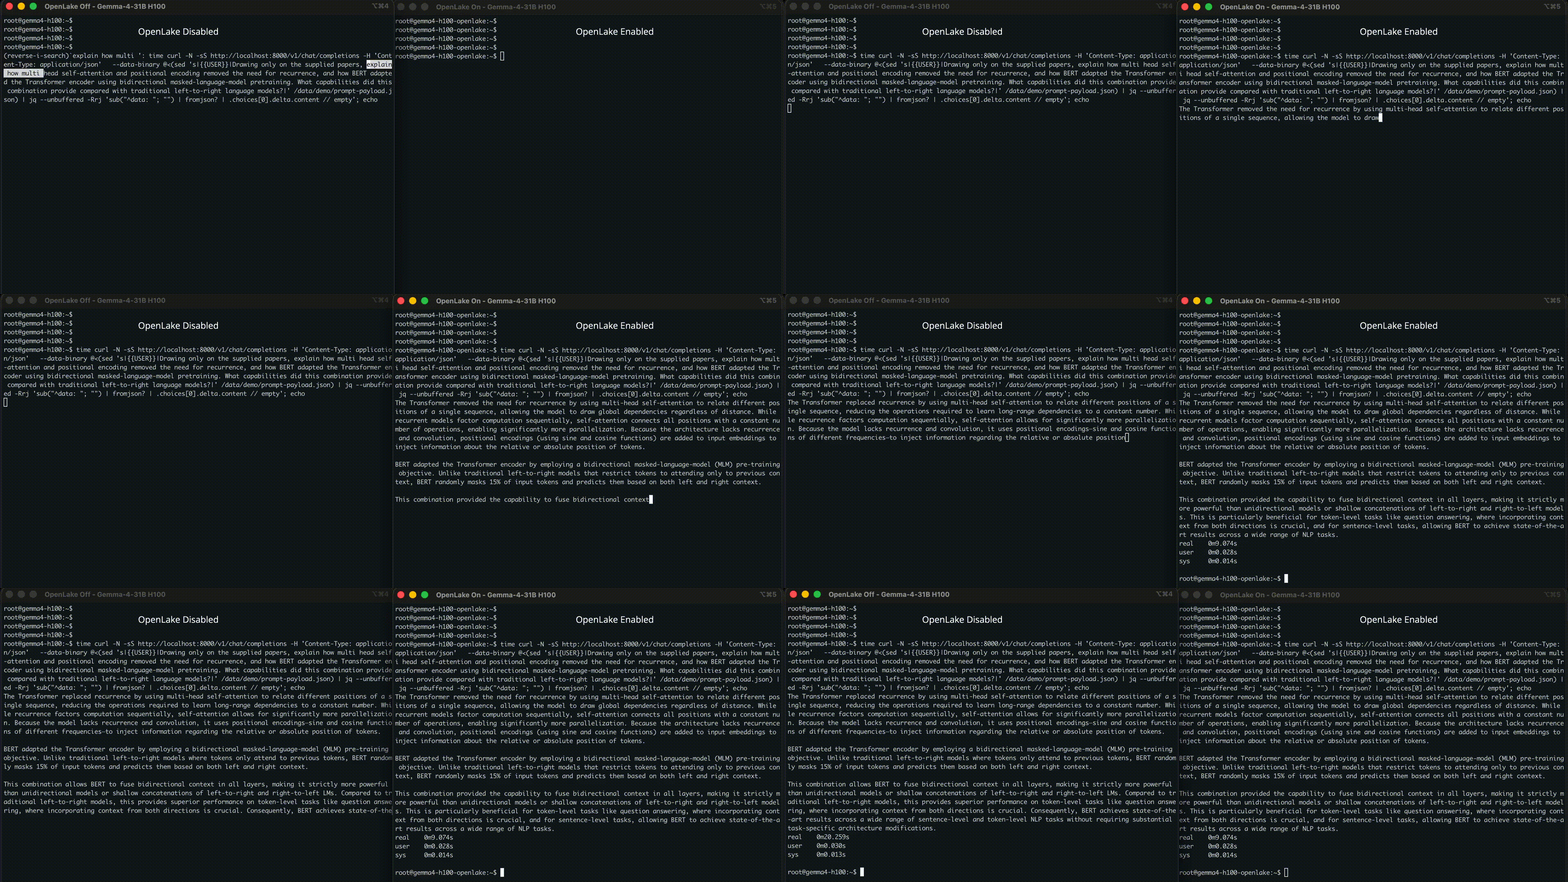
OpenLake and vLLM serving Gemma4-31B on H100 (256K context window)
Multi host GPU Cluster (IB)
Run OpenLake on existing GPU cluster. Run OpenLake with
(kv_rdma.toml)
and node's self_id: (0, 1, 2...):
openlaked --config kv_rdma_0.toml # gpu 1: ids = 0
openlaked --config kv_rdma_1.toml # gpu 2: ids = 1
Point your vLLM workers at the unified cluster, in id order:
cat > /tmp/openlake-kv.json <<'EOF'
{
 "kv_connector": "OpenLakeConnector",
 "kv_connector_module_path": "openlake_client.openlake_connector",
 "kv_role": "kv_both",
 "kv_connector_extra_config": {
 "openlake_nodes": ["10.0.0.1:9400", "10.0.0.2:9400"],
 "openlake_device": "mlx5_ib0"
 }
}
EOF
export PYTHONHASHSEED=0
vllm serve <model_name> --kv-transfer-config "$(cat /tmp/openlake-kv.json)"
A prefix computed on one GPU host is served to any other from the shared pool.
Build from source and have an S3 compatible store running in four steps. Install the dependencies and build the OpenLake binary locally.
sudo apt-get install -y build-essential pkg-config clang cmake libhwloc-dev libudev-dev curl git awscli
curl --proto '=https' --tlsv1.2 -sSf https://sh.rustup.rs | sh -s -- -y && . "$HOME/.cargo/env"
git clone https://github.com/openlake-project/openlake.git && cd openlake
cargo build --release --bin openlaked
mkdir -p data/d0 data/d1 data/d2 data/d3
./target/release/openlaked --config crates/openlake_server/configs/storage-tcp-local.toml
export AWS_ACCESS_KEY_ID=openlakeadmin
export AWS_SECRET_ACCESS_KEY=openlakeadmin
export AWS_DEFAULT_REGION=us-east-1
aws --endpoint-url http://127.0.0.1:9000 s3 mb s3://demo
aws --endpoint-url http://127.0.0.1:9000 s3 cp ./checkpoint.safetensors s3://demo/
aws --endpoint-url http://127.0.0.1:9000 s3 ls s3://demo/
To build from the source, please follow the platform specific build guides:
Ubuntu / Debian
Produce binaries for your deployment or test code changes.
# Install system dependencies
sudo apt-get update
sudo apt-get install -y --no-install-recommends ca-certificates build-essential pkg-config clang cmake libhwloc-dev libudev-dev curl git
# Install Rust
curl --proto '=https' --tlsv1.2 -sSf https://sh.rustup.rs | sh -s -- -y && . "$HOME/.cargo/env"
# Clone and build OpenLake
git clone https://github.com/openlake-project/openlake.git
cd openlake && cargo build --release --locked -p openlake_server --bin openlaked
# Create the local storage directories
mkdir -p data/d0 data/d1 data/d2 data/d3
# Start OpenLake in TCP mode. Please switch the config path for RDMA.
RUST_LOG=info ./target/release/openlaked --config crates/openlake_server/configs/storage-tcp-local.toml
macOS (development)
Install Homebrew first if brew is unavailable.
# Install system dependencies
xcode-select --install
brew install cmake pkg-config
# Install Rust
curl --proto '=https' --tlsv1.2 -sSf https://sh.rustup.rs | sh -s -- -y && . "$HOME/.cargo/env"
# Clone and build OpenLake
git clone https://github.com/openlake-project/openlake.git
cd openlake && cargo build --release --locked -p openlake_server --bin openlaked
# Create local storage directories
mkdir -p data/d0 data/d1 data/d2 data/d3
# Start OpenLake in TCP mode. (macOS does not provide the Linux RDMA interfaces)
RUST_LOG=info ./target/release/openlaked --config crates/openlake_server/configs/storage-tcp-local.toml
Windows (WSL2)
Build OpenLake with WSL2. See the full Windows development environment guide.
# Run in an administrator PowerShell terminal:
wsl --install -d Ubuntu
wsl
# Then run inside the Ubuntu shell:
# Install system dependencies
sudo apt-get update
sudo apt-get install -y --no-install-recommends ca-certificates build-essential pkg-config clang cmake libhwloc-dev libudev-dev curl git
# Install Rust
curl --proto '=https' --tlsv1.2 -sSf https://sh.rustup.rs | sh -s -- -y && . "$HOME/.cargo/env"
# Clone and build OpenLake
git clone https://github.com/openlake-project/openlake.git
cd openlake && cargo build --release --locked -p openlake_server --bin openlaked
# Create local storage directories
mkdir -p data/d0 data/d1 data/d2 data/d3
# Start OpenLake in TCP mode
RUST_LOG=info ./target/release/openlaked --config crates/openlake_server/configs/storage-tcp-local.toml
If you would like support for a different build system, please open an issue on GitHub.
OpenLake keeps the path from storage to GPU memory short, predictable, and low latency.
- Zero copy: With GPUDirect Storage and RDMA, data can move directly between NVMe or an RDMA NIC and GPU memory without staging through host memory or the page cache.
- Core local asynchronous I/O: OpenLake runs one pinned
compioruntime per physical core, backed by Linuxio_uring. Requests stay on the same core throughout the hot path, avoiding work stealing and cross core contention. - Burst aware RDMA: PacedRDMA uses credit based flow control to prevent senders from overwhelming receivers, sustaining throughput during request bursts while protecting tail latency.
- Efficient durability: SIMD Reed Solomon erasure coding distributes data and parity across drives, providing durable storage with less capacity overhead than full replication.
Explore the architecture and user docs, inspect the included configurations, or read the OpenLake engineering blog for deeper technical discussions.
We welcome and value any contributions and collaborations. Please check out Contributing to OpenLake for how to get involved.