[TOC]
进程是所有线程的集合,每一个线程是进程的一条执行路径。
多线程主要体现在提高程序的效率,比如迅雷多线程下载,多线程分批发送短信等。
class ThreadDemo extends Thread {
 @Override
 public void run() {
 System.out.println("这里是子线程");
 System.out.println("线程名称:" + this.getName());
 System.out.println("线程ID:" + this.getId());
 }
}
public class JavaThreadDemo01 {
 public static void main(String[] args) {
 System.out.println("这里是主线程");
 ThreadDemo threadDemo = new ThreadDemo();
 threadDemo.start();
 }
}
class RunnableDemo implements Runnable {
 @Override
 public void run() {
 System.out.println("这里是子线程");
 System.out.println("线程名称:" + Thread.currentThread().getName());
 System.out.println("线程ID:" + Thread.currentThread().getId());
 }
}
public class JavaThreadDemo02 {
 public static void main(String[] args) {
 System.out.println("这里是主线程");
 RunnableDemo runnableDemo = new RunnableDemo();
 Thread thread = new Thread(runnableDemo);
 thread.start();
 }
}
public class JavaThreadDemo03 {
 public static void main(String[] args) {
 System.out.println("主线程");
 // 使用实现接口的方式
 Thread thread1 = new Thread(new Runnable() {
 @Override
 public void run() {
 System.out.println("这里是子线程");
 System.out.println("线程名称:" + Thread.currentThread().getName());
 System.out.println("线程ID:" + Thread.currentThread().getId());
 }
 });
 thread1.start();
 // 使用lambda表达式
 Thread thread2 = new Thread(() -> {
 System.out.println("这里是子线程");
 System.out.println("线程名称:" + Thread.currentThread().getName());
 System.out.println("线程ID:" + Thread.currentThread().getId());
 });
 thread2.start();
 }
}
使用实现Runnable接口的方式好,因为java是单继承,所以继承Thread接口后不能继承其他父类,而实现Runnable接口后还可以实现其他接口,继承其他父类。
调用run()方法是使用实例调用,是单线程调用,不会开启多线程。
1新建状态(NEW):新建一个线程,线程还没有开始运行,此时线程就是新建状态
2就绪状态:当线程对象调用了start()方法即启动了线程,start()方法创建线程运行的系统资源,并调度线程运行run()方法。当start()方法返回后,线程就处于就绪状态。处于就绪状态的线程并不一定立即运行run()方法,线程还必须同其他线程竞争cpu时间,只有获得cpu时间才能运行线程。因为在单cpu的计算机系统中,不可能同时运行多个线程,一个时刻仅能有一个线程处于运行状态,因此可能存在多个处于就绪状态的线程,对于多个就绪状态的线程是由Java运行时系统的线程调度程序来调度的。
3运行状态(RUNNABLE):当线程获取cpu时间后,线程进入运行状态,真正开始执行run()方法。
4阻塞状态(BLOCKED/WAITING/TIMED_WAITING):a、线程通过调用sleep()方法进入睡眠;b、线程调用一个在I\O上被阻塞的操作;c、线程试图得到一个锁,而该锁正被其他线程持有;d、线程在等待某个触发条件。
BLOCKED:等待监视器锁,实际上就是被synchronized方法或块阻塞
WAITING:等待用notify()或者notifyAll()唤醒
TIMED_WAITING:等待用notify()或者notifyAll()唤醒,如果没有等到,时间到了也会退出这一状态
5死亡状态(TERMINATED):a、run()方法正常退出自然死亡;b、一个未捕获的异常终止了run()方法使线程猝死。
1调用isAlive()方法,如果是可运行或被阻塞,方法返回true。
2线程是新建状态或线程死亡,返回false。
通过一个案例了解线程安全
案例:需求现在有100张火车票,有两个窗口同时抢火车票,请使用多线程模拟抢票效果。
先来看一个线程不安全的例子
class SellTicketRunnable implements Runnable {
 public int count = 100;
 @Override
 public void run() {
 while (count > 0) {
 try {
 Thread.sleep(500);
 } catch (InterruptedException e) {
 e.printStackTrace();
 }
 int index = 100 - count + 1;
 System.out.println(Thread.currentThread().getName() + "卖出第" + index + "张票");
 count--;
 }
 }
}
public class JavaSyncDemo {
 public static void main(String[] args) {
 SellTicketRunnable runnable = new SellTicketRunnable();
 Thread sellThread1 = new Thread(runnable);
 Thread sellThread2 = new Thread(runnable);
 sellThread1.start();
 sellThread2.start();
 }
}
可以看到两个线程同时卖票的时候,会出现漏卖,多卖同一张票,还会出现超卖的问题,这就是线程不安全的问题。
当多个线程同时共享,同一个全局变量或静态变量,做写的操作时,可能会发生数据冲突问题,也就是线程安全问题。但是做读操作是不会发生数据冲突问题。
class SellTicketRunnable implements Runnable {
 public int count = 100;
 private Object lock = new Object();
 @Override
 public void run() {
 while (count > 0) {
 try {
 Thread.sleep(500);
 } catch (InterruptedException e) {
 e.printStackTrace();
 }
 synchronized (lock) {
 if (count > 0) {
 int index = 100 - count + 1;
 System.out.println(Thread.currentThread().getName() + "卖出第" + index + "张票");
 count--;
 }
 }
 }
 }
}
public class JavaSyncDemo {
 public static void main(String[] args) {
 SellTicketRunnable runnable = new SellTicketRunnable();
 Thread sellThread1 = new Thread(runnable);
 Thread sellThread2 = new Thread(runnable);
 sellThread1.start();
 sellThread2.start();
 }
}
从上面的案例可以看出,使用synchronized同步代码块包裹住写操作,每个线程在调用同步代码块中逻辑的时候,都需要先获取同步锁,所以避免了多线程写操作数据的冲突问题。
class SellTicketRunnable01 implements Runnable {
 public int count = 100;
 @Override
 public void run() {
 while (count > 0) {
 try {
 Thread.sleep(500);
 } catch (InterruptedException e) {
 e.printStackTrace();
 }
 this.sale();
 }
 }
 synchronized void sale() {
 if (count > 0) {
 int index = 100 - count + 1;
 System.out.println(Thread.currentThread().getName() + "卖出第" + index + "张票");
 count--;
 }
 }
}
public class JavaSyncDemo01 {
 public static void main(String[] args) {
 SellTicketRunnable01 runnable = new SellTicketRunnable01();
 Thread sellThread1 = new Thread(runnable);
 Thread sellThread2 = new Thread(runnable);
 sellThread1.start();
 sellThread2.start();
 }
}
synchronized包裹的函数,其实就是给该函数块添加了一把this锁。
注意:synchronized 修饰静态方法使用锁是当前类的字节码文件(即
类名.class),同理,如果在静态方法中添加个同步代码块,可以获取类名.class为代码块加锁
class SellTicketRunnable02 implements Runnable {
 public static int count = 100;
 @Override
 public void run() {
 while (count > 0) {
 try {
 Thread.sleep(500);
 } catch (InterruptedException e) {
 e.printStackTrace();
 }
 SellTicketRunnable02.sale();
 }
 }
 static void sale() {
 synchronized (SellTicketRunnable02.class) {
 if (count > 0) {
 int index = 100 - count + 1;
 System.out.println(Thread.currentThread().getName() + "卖出第" + index + "张票");
 count--;
 }
 }
 }
}
public class JavaSyncDemo02 {
 public static void main(String[] args) {
 SellTicketRunnable02 runnable = new SellTicketRunnable02();
 Thread sellThread1 = new Thread(runnable);
 Thread sellThread2 = new Thread(runnable);
 sellThread1.start();
 sellThread2.start();
 }
}
class SellTicketRunnable03 implements Runnable {
 public int count = 100;
 private Lock lock = new ReentrantLock();
 @Override
 public void run() {
 while (count > 0) {
 try {
 Thread.sleep(500);
 } catch (InterruptedException e) {
 e.printStackTrace();
 }
 lock.lock();
 if (count > 0) {
 int index = 100 - count + 1;
 System.out.println(Thread.currentThread().getName() + "卖出第" + index + "张票");
 count--;
 }
 lock.unlock();
 }
 }
}
public class JavaSyncDemo03 {
 public static void main(String[] args) {
 SellTicketRunnable03 runnable = new SellTicketRunnable03();
 Thread sellThread1 = new Thread(runnable);
 Thread sellThread2 = new Thread(runnable);
 sellThread1.start();
 sellThread2.start();
 }
}
lock和synchronized的区别
1lock在使用时需要手动的获取锁和释放锁;
2lock可以尝试非阻塞的获取锁,如果这一时刻锁没有被其他线程获取到,则成功获取并持有锁;
3lock锁可以响应中断,当获取到锁的线程被中断时,中断异常会被抛出,同时锁被释放;
4lock在指定截至时间之前获取锁,如果解释时间到了依旧无法获取锁,就返回。
// lock锁的安全使用方法
class lockDemo {
 Lock lock = new ReentrantLock();
 void demoFun() {
 lock.lock();
 try {
 // 可能出现线程安全的操作
 } finally {
 lock.unlock();
 }
 }
}
java.util.concurrent.atomic.AtomicBoolean;java.util.concurrent.atomic.AtomicInteger;java.util.concurrent.atomic.AtomicLong;java.util.concurrent.atomic.AtomicReference;
class SellTicketRunnable04 implements Runnable {
 public AtomicInteger count = new AtomicInteger(100);
 @Override
 public void run() {
 while (true) {
 try {
 Thread.sleep(50);
 } catch (InterruptedException e) {
 e.printStackTrace();
 }
 if (count.get() > 0) {
 int index = 100 - count.getAndDecrement() + 1;
 System.out.println(Thread.currentThread().getName() + "卖出第" + index + "张票");
 }
 }
 }
}
public class JavaSyncDemo04 {
 public static void main(String[] args) {
 SellTicketRunnable04 runnable = new SellTicketRunnable04();
 Thread sellThread1 = new Thread(runnable);
 Thread sellThread2 = new Thread(runnable);
 sellThread1.start();
 sellThread2.start();
 }
}
先看一个死锁的示例
public class DeadLockDemo01 {
 private static Object lock1 = new Object();
 private static Object lock2 = new Object();
 public static void main(String[] args) {
 new Thread() { //线程1
 public void run() {
 while (true) {
 synchronized (lock1) {
 System.out.println(this.getName() + ":获取lock1锁");
 synchronized (lock2) {
 System.out.println(this.getName() + ":获取lock2锁");
 }
 }
 }
 }
 }.start();
 new Thread() { //线程2
 public void run() {
 while (true) {
 synchronized (lock2) {
 System.out.println(this.getName() + ":获取lock2锁");
 synchronized (lock1) {
 System.out.println(this.getName() + "::获取lock1锁");
 }
 }
 }
 }
 }.start();
 }
}
运行上面的代码,可以观察到线程卡死,就是出现了死锁
线程1先拿到lock1锁,再拿到lock2锁,执行完成后才能释放所有锁;
线程2先拿到lock2锁,再拿到lock1锁,执行完成后才能释放所有锁。
如果在线程1获取到lock1锁的时候,线程2获取到lock2还没释放,线程1无法获取lock2锁,也就无法释放lock2锁,这时系统就会出现死锁。
线程死锁的避免办法:不要在同步中嵌套同步
多线程之间通讯,其实就是多个线程在操作同一个资源,但是操作的动作不同。
需求:第一个线程写入(input)用户,另一个线程取读取(out)用户。实现写一个,读一个操作。
class User {
 public String name;
 public String sex;
 // 读写标志(true:表示已经写入|false:表示未写入)
 public boolean flag = false;
 @Override
 public String toString() {
 return "name:" + this.name + "=======" + "sex:" + this.sex;
 }
}
class InputThread extends Thread {
 private User user;
 InputThread(User user) {
 this.user = user;
 }
 @Override
 public void run() {
 int count = 0;
 while (true) {
 synchronized (user) {
 if (this.user.flag) {
 try {
 // 使当前线程等待
 this.user.wait();
 } catch (InterruptedException e) {
 e.printStackTrace();
 }
 }
 if (count == 0) {
 this.setVal("小红", "女");
 } else {
 this.setVal("小明", "男");
 }
 count = (count + 1) % 2;
 this.user.flag = true;
 // 通知另一个线程解除等待状态,继续执行
 this.user.notify();
 }
 }
 }
 private void setVal(String name, String sex) {
 this.user.name = name;
 this.user.sex = sex;
 }
}
class OutThread extends Thread {
 private User user;
 OutThread(User user) {
 this.user = user;
 }
 @Override
 public void run() {
 while (true) {
 synchronized (user) {
 if (!this.user.flag) {
 try {
 this.user.wait();
 } catch (InterruptedException e) {
 e.printStackTrace();
 }
 }
 System.out.println(this.user.toString());
 this.user.flag = false;
 this.user.notify();
 }
 }
 }
}
public class ThreadCommDemo {
 public static void main(String[] args) {
 User user = new User();
 InputThread inputThread = new InputThread(user);
 OutThread outThread = new OutThread(user);
 inputThread.start();
 outThread.start();
 }
}
wait()、notify()、notifyAll()是三个定义在Object类中的方法,可以用来控制线程的状态。
1如果对象调用了wait()方法,就会使持有该对象的线程把该对象的控制权交出去,然后处于等待状态;
2如果对象调用了notify()方法,就会通知某个正在等待这个对象控制权的线程,可以继续运行;
3如果对象调用了notifyAll()方法,就会通知所有正在等待这个对象控制权的线程,可以继续运行。
wait()与sleep()的区别
sleep()方法属于Thread类中,wait()方法属于Object类中。sleep()方法导致程序暂停执行指定的时间,让出cpu给其他线程,但是监控状态依然保持,当指定的时间到了之后又会自动恢复运行状态。
在调用sleep()方法的过程中,线程不会释放对象锁。
调用wait()方法的时候,线程会放弃对象锁,进入等待此对象的等待锁定池,只有针对此对象调用notify()方法后本线程才进入对象锁定池准备,获取对象锁后进入运行状态。
注意:
wait()方法需要包裹在同步块中
class User01 {
 public String name;
 public String sex;
 // 读写标志(true:表示已经写入|false:表示未写入)
 public boolean flag = false;
 public Lock lock = new ReentrantLock();
 Condition condition = lock.newCondition();
 @Override
 public String toString() {
 return "name:" + this.name + "=======" + "sex:" + this.sex;
 }
}
class InputThread01 extends Thread {
 private User01 user;
 InputThread01(User01 user) {
 this.user = user;
 }
 @Override
 public void run() {
 int count = 0;
 while (true) {
 this.user.lock.lock();
 if (this.user.flag) {
 try {
 // 使当前线程等待
 this.user.condition.await();
 } catch (InterruptedException e) {
 e.printStackTrace();
 }
 }
 if (count == 0) {
 this.setVal("小红", "女");
 } else {
 this.setVal("小明", "男");
 }
 count = (count + 1) % 2;
 this.user.flag = true;
 // 通知另一个线程解除等待状态,继续执行
 this.user.condition.signal();
 this.user.lock.unlock();
 }
 }
 private void setVal(String name, String sex) {
 this.user.name = name;
 this.user.sex = sex;
 }
}
class OutThread01 extends Thread {
 private User01 user;
 OutThread01(User01 user) {
 this.user = user;
 }
 @Override
 public void run() {
 while (true) {
 this.user.lock.lock();
 if (!this.user.flag) {
 try {
 this.user.condition.await();
 } catch (InterruptedException e) {
 e.printStackTrace();
 }
 }
 System.out.println(this.user.toString());
 this.user.flag = false;
 this.user.condition.signal();
 this.user.lock.unlock();
 }
 }
}
public class ThreadCommDemo01 {
 public static void main(String[] args) {
 User01 user = new User01();
 InputThread01 inputThread = new InputThread01(user);
 OutThread01 outThread = new OutThread01(user);
 inputThread.start();
 outThread.start();
 }
}
condition.await()方法类似wait()方法,condition.signal()方法类似notify()方法。
1使用退出标志,使线程正常退出,也就是当
run()方法结束后线程终止。
class Thread01 extends Thread {
 volatile boolean flag = true;
 @Override
 public void run() {
 while (flag) {
 try {
 // 可能发生异常的操作
 System.out.println(getName() + "线程一直在运行。。。");
 } catch (Exception e) {
 System.out.println(e.getMessage());
 this.stopThread();
 }
 }
 }
 public void stopThread() {
 System.out.println("线程停止运行。。。");
 this.flag = false;
 }
}
public class StopThreadDemo01 {
 public static void main(String[] args) {
 Thread01 thread01 = new Thread01();
 thread01.start();
 try {
 Thread.sleep(5000);
 } catch (InterruptedException e) {
 e.printStackTrace();
 }
 thread01.stopThread();
 }
}
2使用
stop()方法强行终止线程,这个方法已经被弃用了,所以这里不写。
3使用interrupt()方法中断线程(只有线程在wait和sleep才会捕获InterruptedException异常,执行终止线程的逻辑,在运行中不会捕获)
class Thread02 extends Thread {
 private boolean flag = true;
 @Override
 public void run() {
 while (flag) {
 synchronized (this) {
// try {
// wait();
// } catch (InterruptedException e) {
// e.printStackTrace();
// this.stopThread();
// }
 try {
 sleep(10000);
 } catch (InterruptedException e) {
 e.printStackTrace();
 this.stopThread();
 }
 }
 }
 }
 public void stopThread() {
 System.out.println("线程已经退出。。。");
 this.flag = false;
 }
}
public class StopThreadDemo02 {
 public static void main(String[] args) {
 Thread02 thread02 = new Thread02();
 thread02.start();
 System.out.println("线程开始");
 try {
 Thread.sleep(5000);
 } catch (InterruptedException e) {
 e.printStackTrace();
 }
 thread02.interrupt();
 }
}
调用
interrupt()方法会抛出InterruptedException异常,捕获后再做停止线程的逻辑即可。
如果线程处于类似
while(true)运行的状态,interrupt()方法无法中断线程。
Java中有两种线程,一种是用户线程,一种是守护线程。
当进程不存在或主线程停止,守护线程也会自动停止。
class DaemonThread extends Thread {
 @Override
 public void run() {
 while (true) {
 System.out.println("我是守护线程。。。只要守护的线程不挂,我永远都不挂");
 }
 }
}
public class DaemonThreadDemo {
 public static void main(String[] args) {
 Thread thread = new Thread(new Runnable() {
 @Override
 public void run() {
 DaemonThread daemonThread = new DaemonThread();
 daemonThread.setDaemon(true);
 daemonThread.start();
 try {
 Thread.sleep(5000);
 } catch (InterruptedException e) {
 e.printStackTrace();
 }
 System.out.println("主线程运行完成退出。。。");
 }
 });
 thread.start();
 }
}
join()作用就是让其他线程处于等待状态
先看一个需求:创建一个线程,子线程执行完毕后,主线程才能执行
public class JoinThreadDemo {
 public static void main(String[] args) {
 Thread thread = new Thread(new Runnable() {
 @Override
 public void run() {
 System.out.println("这里是子线程");
 int count = 100;
 while (count > 0) {
 System.out.println(Thread.currentThread().getName() + "=====" + count);
 count--;
 }
 }
 });
 thread.start();
 try {
 thread.join();
 } catch (InterruptedException e) {
 e.printStackTrace();
 }
 System.out.println("这里是主线程");
 }
}
.jpg)
在Java线程中,通过一个
int priority来控制优先级,范围为1-10,其中10最高,默认值为5。
注:设置了优先级,不代表每次都一定会被执行。只是CPU调度会优先分配
class PriorityThread extends Thread {
 public PriorityThread(String name) {
 this.setName(name);
 }
 @Override
 public void run() {
 System.out.println(getName() + "==========" + getId());
 }
}
public class PriorityThreadDemo {
 public static void main(String[] args) {
 PriorityThread priorityThread1 = new PriorityThread("priority_10");
 PriorityThread priorityThread2 = new PriorityThread("priority_default");
 priorityThread1.setPriority(10);
 priorityThread2.start();
 priorityThread1.start();
 }
}
.jpg)
多线程有三大特性:原子性、可见性、有序性
Java内存模型(Java Memory Model ,JMM),决定一个线程对共享变量的写入时,能对另一个线程可见。从抽象的角度来看,JMM定义了线程和主内存之间的抽象关系:线程之间的共享变量存储在主内存(main memory)中,每个线程都有一个私有的本地内存(local memory),本地内存中存储了该线程以读/写共享变量的副本。本地内存是JMM的一个抽象概念,并不真实存在。
用一张图表示Java内存模型
.jpg)
原子性即一个操作或多个操作,要么全部执行并且执行过程不被任何因素打断,要么就都不执行。
一个经典的例子就是数据库存储的事务。原子性其实就是保证数据一致、线程安全的一部分。
Synchronized、lock可以解决线程原子性问题
当多个线程访问同一个变量时,一个线程修改了这个变量的值,其他线程能够立即看得到修改的值。
若两个线程在不同的cpu,那么线程1改变了i的值还没刷新到主存,线程2又使用了i,那么这个i值肯定还是之前的,线程1对变量的修改其他线程没看到,这就是可见性问题。
Volatile可以解决线程可见性问题
程序执行的顺序按照代码的先后顺序执行。
一般来说处理器为了提高程序运行效率,可能会对输入代码进行优化,它不保证程序中各个语句的执行先后顺序同代码中的顺序一致,但是它会保证程序最终执行结果和代码顺序执行的结果是一致的。
而在多线程就不一定了,所以我们在多线程编程时就得考虑这个问题了。
class ThreadDemo extends Thread {
 boolean flag;
 ThreadDemo(boolean flag) {
 this.flag = flag;
 }
 @Override
 public void run() {
 System.out.println(getName() + "线程开始运行。。。");
 while (flag) {
 }
 System.out.println(getName() + "线程已经结束。。。");
 }
 public void stopThread() {
 this.flag = false;
 }
}
public class VolatileThreadDemo {
 public static void main(String[] args) {
 ThreadDemo threadDemo = new ThreadDemo(true);
 threadDemo.start();
 try {
 Thread.sleep(1000);
 } catch (InterruptedException e) {
 e.printStackTrace();
 }
 threadDemo.stopThread();
 }
}
先来看以上的代码,在主线程中调用
threadDemo.stopThread()方法停止线程,看上去逻辑没有问题,但是我们会发现线程没有停止。
.jpg)
注意:有的同学可能在测试上面代码的时候程序可以正常退出。那是因为你的JVM没有优化造成的!
造成线程没有停止的原因是
while(flag)中的flag是在线程运行的"工作内存"中获取的,而不是从"主内存"中获取的,这就造成了我们在主线程中改变flag的值对于子线程中不生效。只要在flag前加volatile关键字,强制线程每次读取该值的时候都去"主内存"中取值,就能解决我们的问题。
package com.littlestones.volatiledemo;
/**
 * @program: JavaThreadLearn
 * @description: volatile示例
 * @author: Leil
 * @create: 2019年12月24日 15:22
 */
class ThreadDemo extends Thread {
 volatile boolean flag;
 ThreadDemo(boolean flag) {
 this.flag = flag;
 }
 @Override
 public void run() {
 System.out.println(getName() + "线程开始运行。。。");
 while (flag) {
 }
 System.out.println(getName() + "线程已经结束。。。");
 }
 public void stopThread() {
 this.flag = false;
 }
}
public class VolatileThreadDemo {
 public static void main(String[] args) {
 ThreadDemo threadDemo = new ThreadDemo(true);
 threadDemo.start();
 try {
 Thread.sleep(1000);
 } catch (InterruptedException e) {
 e.printStackTrace();
 }
 threadDemo.stopThread();
 }
}
.jpg)
注意:volatile关键字只能解决线程的可见性问题,不能解决线程的原子性问题
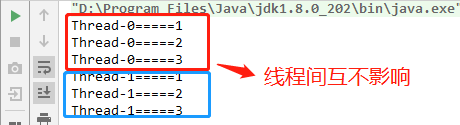
ThreadLocal是保存线程本地化对象的容器,当运行于多线程环境的某个对象用ThreadLocal维护变量时,ThreadLocal为每个使用变量的线程分配一个独立的变量副本。所以每个线程都可以独立的改变自己的副本,而不会影响其他线程所对应的副本。
从线程的角度看,这个变量就像线程专有的本地变量,这也是类名中"Local"所要表达的意思。
class Entity {
 // 使用重写initialValue方法初始化值
// public ThreadLocal<Integer> seqNum = new ThreadLocal<Integer>() {
// @Override
// protected Integer initialValue() {
// return 0;
// }
// };
 // 使用lambda表达式初始化值
 public ThreadLocal<Integer> seqNum = ThreadLocal.withInitial(() -> 0);
 public int getNextSeqNum() {
 seqNum.set(seqNum.get() + 1);
 return seqNum.get();
 }
}
class ThreadDemo extends Thread {
 private Entity entity;
 public ThreadDemo(Entity entity) {
 this.entity = entity;
 }
 @Override
 public void run() {
 for (int i = 0; i < 3; i++) {
 System.out.println(getName() + "=====" + entity.getNextSeqNum());
 }
 }
}
public class ThreadLocalDemo {
 public static void main(String[] args) {
 Entity entity = new Entity();
 ThreadDemo threadDemo01 = new ThreadDemo(entity);
 ThreadDemo threadDemo02 = new ThreadDemo(entity);
 threadDemo01.start();
 try {
 Thread.sleep(1000);
 } catch (InterruptedException e) {
 e.printStackTrace();
 }
 threadDemo02.start();
 }
}
public class SimpleThreadLocal<T> {
 private Map<Thread, T> map = Collections.synchronizedMap(new HashMap<>());
 public void set(T val) {
 map.put(Thread.currentThread(), val);
 }
 public T get() {
 Thread thread = Thread.currentThread();
 if (map.containsKey(thread)) {
 return map.get(thread);
 } else {
 T t = init();
 map.put(thread, t);
 return t;
 }
 }
 public void remove() {
 map.remove(Thread.currentThread());
 }
 public T init() {
 return null;
 }
}
下面我们调用自己实现的ThreadLocal测试效果
class Entity01 {
 public SimpleThreadLocal<Integer> seqNum = new SimpleThreadLocal<Integer>() {
 @Override
 public Integer init() {
 return 0;
 }
 };
 public int getNextSeqNum() {
 seqNum.set(seqNum.get() + 1);
 return seqNum.get();
 }
}
class ThreadDemo01 extends Thread {
 private Entity01 entity;
 public ThreadDemo01(Entity01 entity) {
 this.entity = entity;
 }
 @Override
 public void run() {
 for (int i = 0; i < 3; i++) {
 System.out.println(getName() + "=====" + entity.getNextSeqNum());
 }
 }
}
public class SimpleThreadLocalDemo {
 public static void main(String[] args) {
 Entity01 entity = new Entity01();
 ThreadDemo01 threadDemo01 = new ThreadDemo01(entity);
 ThreadDemo01 threadDemo02 = new ThreadDemo01(entity);
 threadDemo01.start();
 try {
 Thread.sleep(1000);
 } catch (InterruptedException e) {
 e.printStackTrace();
 }
 threadDemo02.start();
 }
}
可以看到实现了同样的效果
对于多线程资源共享的问题,同步机制采用了"以时间换空间"的方式:访问串行化,对象共享化
ThreadLocal采用了"以空间换时间"的方式:访问并行化,对象共享化
前者仅提供了一份变量,让不同的线程排队访问;而后者为每个线程都提供了一份变量,因此可以同时访问而互不影响。
线程池是指在初始化一个多线程应用程序过程中创建一个线程集合,然后在需要执行新的任务时重用这些线程而不是新建一个线程。线程池中线程的数量通常取决于可用内存数量和应用程序的需求。线程池中的每个线程都有被分配一个任务,一旦任务已经完成了,线程回到池子中并等待下一次分配任务。
1线程池改进了一个应用程序的响应时间。由于线程池中的线程已经准备好且等待被分配任务,应用程序可以直接拿来使用而不用新建一个线程。
2线程池为每个短生存周期任务创建一个完整的线程的,并可以在任务完成后回收资源。
3线程池根据当前在系统中运行的进程来优化线程时间片。
4线程池允许我们开启多个任务而不用为每个线程设置属性。
创建一个可缓存线程池,如果线程池长度超过处理需要,可灵活回收空闲线程,若无可回收,则新建线程。
public class CachedThreadPoolDemo {
 public static void main(String[] args) {
 ExecutorService threadPool = Executors.newCachedThreadPool();
 for (int i = 1; i <= 10; i++) {
 final int index = i;
 threadPool.execute(new Runnable() {
 @Override
 public void run() {
 System.out.println(Thread.currentThread().getName() + "=====" + index);
 }
 });
 }
 }
}
创建一个定长线程池,可控制线程最大并发数,超出的线程会在队列中等待。
public class FixedThreadPoolDemo {
 public static void main(String[] args) {
 ExecutorService threadPool = Executors.newFixedThreadPool(3);
 for (int i = 1; i <= 10; i++) {
 final int index = i;
 threadPool.execute(() -> {
 System.out.println(Thread.currentThread().getName() + "=====" + index);
 });
 }
 }
}
.jpg)
创建一个定长线程池,支持定时及周期性任务执行。
public class ScheduledThreadPoolDemo {
 public static void main(String[] args) {
 ScheduledExecutorService threadPool = Executors.newScheduledThreadPool(3);
 for (int i = 1; i <= 10; i++) {
 threadPool.schedule(new Runnable() {
 @Override
 public void run() {
 System.out.println(Thread.currentThread().getName() + ":延迟3秒打印log");
 }
 }, 3, TimeUnit.SECONDS);
 }
 }
}
创建一个单线程化的线程池,它只会用唯一的工作线程来执行任务,保证所有任务按照指定顺序执行。
public class SingleThreadExecutorDemo {
 public static void main(String[] args) {
 ExecutorService executorService = Executors.newSingleThreadExecutor();
 for (int i = 1; i <= 10; i++) {
 final int index = i;
 executorService.execute(new Runnable() {
 @Override
 public void run() {
 System.out.println(Thread.currentThread().getName() + "===" + index);
 try {
 Thread.sleep(500);
 } catch (InterruptedException e) {
 e.printStackTrace();
 }
 }
 });
 }
 }
}
.jpg)