#这个应用中有多个项目 ##1,仿ios给activity背景设置模糊度 ##2,搜索关键字变红,指定字段变色 ##3,Android图片滤镜,可以自定义任意效果
#一, BlurBehindActivity 仿ios给activity背景设置模糊度,可以设置任意透明度(只需要一行代码简单集成) 安卓模糊背景,半透明背景,任意透明度背景
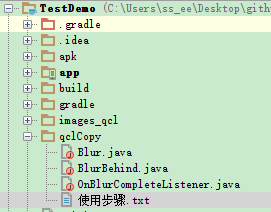
#使用步骤,只需下面简单2步。 ##1,把项目中的qclCopy文件夹里的类直接复制到你的项目就行
image ##2,完成好第一步就直接使用了 ###比如你从MainActivity跳转到activity2 public class MainActivity extends Activity { @Override protected void onCreate(Bundle savedInstanceState) { super.onCreate(savedInstanceState); setContentView(R.layout.activity_main); findViewById(R.id.dummy_button).setOnClickListener(new View.OnClickListener() { @Override public void onClick(View v) {
				BlurBehind.getInstance().execute(MainActivity.this, new OnBlurCompleteListener() {
					@Override
					public void onBlurComplete() {
						Intent intent = new Intent(MainActivity.this, MainActivity2.class);
						intent.setFlags(Intent.FLAG_ACTIVITY_NO_ANIMATION);
						startActivity(intent);
					}
				});
			}
		});
	}
}
###MainActivity2 只需要添加下面简单一行代码就可以设置模糊效果(也可以设置任意透明度) public class MainActivity2 extends Activity { @Override protected void onCreate(Bundle savedInstanceState) { super.onCreate(savedInstanceState); setContentView(R.layout.activity_blurred);
		BlurBehind.getInstance()//在你需要添加模糊或者透明的背景中只需要设置这几行简单的代码就可以了
				.withAlpha(50)
				.withFilterColor(Color.parseColor("#0075c0"))
				.setBackground(this);
	}
}
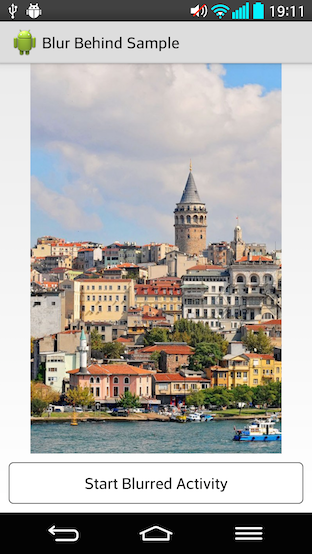
#下面是效果图
#二, 搜索关键字变红,指定字段变色 有时候我们搜索中的关键字需要变红或者变为别的颜色,我自己重写了textview。使用起来特别方便
##使用步骤 1,把下面自定义的MyTextView 复制到项目中
import android.content.Context; import android.text.Spannable; import android.text.SpannableStringBuilder; import android.text.style.ForegroundColorSpan; import android.util.AttributeSet; import android.widget.TextView;
import java.util.ArrayList; import java.util.List;
//制定字体变色,自定义textview public class MyTextView extends TextView {
public MyTextView(Context context, AttributeSet attrs) {
 super(context, attrs);
}
public void setSpecifiedTextsColor(String text, String specifiedTexts, int color) {
 List<Integer> sTextsStartList = new ArrayList<>();
 int sTextLength = specifiedTexts.length();
 String temp = text;
 int lengthFront = 0;//记录被找出后前面的字段的长度
 int start = -1;
 do {
 start = temp.indexOf(specifiedTexts);
 if (start != -1) {
 start = start + lengthFront;
 sTextsStartList.add(start);
 lengthFront = start + sTextLength;
 temp = text.substring(lengthFront);
 }
 } while (start != -1);
 SpannableStringBuilder styledText = new SpannableStringBuilder(text);
 for (Integer i : sTextsStartList) {
 styledText.setSpan(
 new ForegroundColorSpan(color),
 i,
 i + sTextLength,
 Spannable.SPAN_EXCLUSIVE_EXCLUSIVE);
 }
 setText(styledText);
}
}
2,使用只需要一行代码就可以完事 public class TextActivity04 extends Activity { private MyTextView textView;
public String result = "关键字变色,特别简单,只需要一行代码,就可以实现关键字变红";

@Override
protected void onCreate(Bundle savedInstanceState)
{
 super.onCreate(savedInstanceState);
 setContentView(R.layout.activity_test_04_layout);

 textView = (MyTextView)findViewById(R.id.tv);
 textView.setSpecifiedTextsColor(result, "关键字", Color.parseColor("#FF0000"));
	/*
		textView.setSpecifiedTextsColor(result, "关键字", Color.parseColor("#FF0000"))中result可以换成你的搜索结果
		关键字直接换成你的EditText中输入的关键字就可以啦

	*/
}
}
3,附加布局文件,特别简单 <com.huxiu.yd.viewmine.MyTextView android:id="@+id/tv" android:layout_width="match_parent" android:layout_height="wrap_content" android:layout_alignParentTop="true" android:layout_toRightOf="@id/image" android:maxLines="2" android:textColor="@color/gray5" android:textSize="14dp" tools:text="测试搜索结果标题" />
#下面是效果图
#三,Android图片滤镜,可以自定义任意效果
对图像进行颜色方面的处理,通过使用颜色矩阵(ColorMatrix)来实现。从而可以达到很多特效如黑白老照片、泛黄旧照片等等。
##颜色矩阵(ColorMatrix)实现滤镜效果 ###一,知识简介 一张位图可以转换为一个5*4的矩阵,涉及到颜色和透明度。如图1所示。在Android中, 颜色矩阵M是以一维数组m=[a,b,c,d,e,f,g,h,i,j,k,l,m,n,o,p,q,r,s,t]的方式进行存储的。 在一张图片中,图像的RGBA(红色、绿色、蓝色、透明度)值决定了该图片所呈现出来的颜色效果。 要想改变一张图片的颜色效果,只需要改变图像的颜色分量矩阵即可。通过颜色矩阵可以很方便的修改图像的颜色分量矩阵。 由此可见,通过颜色矩阵修改了原图像的RGBA值,从而达到了改变图片颜色效果的目的。 并且,通过如图3所示的运算可知,颜色矩阵M的 第一行参数abcde决定了图像的红色成分, 第二行参数fghij决定了图像的绿色成分, 第三行参数klmno决定了图像的蓝色成分, 第四行参数pqrst决定了图像的透明度, 第五列参数ejot是颜色的偏移量。
	通常,改变颜色分量时可以通过修改第5列的颜色偏移量来实现,
	如图4所示的颜色矩阵M1,通过计算后可以得知该颜色矩阵的作用是使图像的红色分量和绿色分量均增加100,
	这样的效果就是图片泛黄(因为红色与绿色混合后得到黄色)。
###二,以黑白效果为例(有两种实现方法) 1,用数组矩阵 float[] array = {1, 0, 0, 0, 100, 0, 1, 0, 0, 100, 0, 0, 1, 0, 0, 0, 0, 0, 1, 0}; ColorMatrix colorMatrix = new ColorMatrix(array); 2,把饱和度设置为0 就可以得到黑白的图片 ColorMatrix colorMatrix = new ColorMatrix(); colorMatrix.setSaturation(0);
====================实例代码======================================== package com.huxiu.yd.api.lib.filterAPI;
import android.graphics.Bitmap; import android.graphics.Canvas; import android.graphics.ColorMatrix; import android.graphics.ColorMatrixColorFilter; import android.graphics.Paint;
public class GrayFilter { // 黑白效果函数 public static Bitmap changeToGray(Bitmap bitmap) {
 int width, height;
 width = bitmap.getWidth();
 height = bitmap.getHeight();
 Bitmap grayBitmap = Bitmap.createBitmap(width, height, Bitmap.Config.RGB_565);
 Canvas canvas = new Canvas(grayBitmap);
 Paint paint = new Paint();
 paint.setAntiAlias(true); // 设置抗锯齿
 //一,数组矩阵的方法

 /*float[] array = {1, 0, 0, 0, 100,
 0, 1, 0, 0, 100,
					 0, 0, 1, 0, 0,
					 0, 0, 0, 1, 0};
	ColorMatrix colorMatrix = new ColorMatrix(array);
	*/
 //二,把饱和度设置为0 就可以得到灰色(黑白)的图片
 ColorMatrix colorMatrix = new ColorMatrix();
 colorMatrix.setSaturation(0);
 ColorMatrixColorFilter filter = new ColorMatrixColorFilter(colorMatrix);
 paint.setColorFilter(filter);
 canvas.drawBitmap(bitmap, 0, 0, paint);
 return grayBitmap;
}
}
3,上面实例代码的使用(传入bitmap即可添加滤镜后的效果)
	Bitmap newBitmap = GrayFilter.changeToGray(bitmap);

	//把添加滤镜后的效果显示在imageview上
		imageview.setBackground(new BitmapDrawable(getResources(), newBitmap));
###三,常用的颜色矩阵 1,宝丽来彩色[Polaroid Color]
		float[] array = {1.438, -0.062, -0.062, 0, 0,
 -0.122, 1.378, -0.122, 0, 0,
					 -0.016, -0.016, 1.483, 0, 0,
					 -0.03, 0.05, -0.02, 1, 0};
		ColorMatrix colorMatrix = new ColorMatrix(array);

	2,怀旧效果
		float[] array = {0.393f,0.769f,0.189f,0,0,
					0.349f,0.686f,0.168f,0,0,
					0.272f,0.534f,0.131f,0,0,
					0,0,0,1,0};
		ColorMatrix colorMatrix = new ColorMatrix(array);

	3,泛红
		2,0,0,0,0,
		0,1,0,0,0,
		0,0,1,0,0,
		0,0,0,1,0
	4,泛绿(荧光绿)
		1,0,0,0,0,
		0,1.4,0,0,0,
		0,0,1,0,0,
		0,0,0,1,0
	5,泛蓝(宝石蓝)
		1,0,0,0,0,
		0,1,0,0,0,
		0,0,1.6,0,0,
		0,0,0,1,0
	6,泛黄(把红色 跟 绿色分量都加50)
		1,0,0,0,50,
		0,1,0,0,50,
		0,0,1,0,0,
		0,0,0,1,0
###下面是效果图 image
#我的个人博客