XLX Version Dashboard Version Debian License Maintained
Automated installation script for XLX multi-mode reflectors Supporting D-Star • C4FM • DMR protocols
Features • Quick Start • Installation • Configuration • User Manager
This project simplifies the installation of XLX reflectors with minimal user intervention. Developed by Daniel K. (PP5PK), this installer automates the setup of the XLX reflector created by LX3JL and includes a customized dark theme dashboard. The goal is to make deploying an XLX reflector easy, reliable, and maintainable!
Upon completion, you'll have a fully functional public D-Star/YSF/DMR XLX reflector with monitoring dashboard! 🎉
- ✅ No AMBE hardware needed for C4FM and DMR interoperability (since early 2020)
- ✅ Complete systemd service integration replacing legacy init.d scripts
- ✅ Dark theme dashboard with improvements and modern UI
- ✅ Lightweight - it ever runs on Raspberry Pi Zero!
- ✅ Optional Echo Test (Parrot) service to audio tests
- ✅ Compatible with Debian 10+ (13 recommended), Ubuntu, RaspiOS, Armbian, etc...
- ✅ Full uninstall support with optional SSL certificate removal
- ✅ Built-in User Manager for whitelist, dashboard access and RadioID database
- ✅ Residual installation detection — automatically cleans up incomplete or failed installs before proceeding
- ✅ Safe cancellation — type
Xat any prompt to abort without leaving the system in an inconsistent state
Note: D-Star integration with other modes still requires AMBE chips. For D-Star-only or YSF/DMR reflectors, no additional hardware is needed.
| Feature | Description |
|---|---|
| 🔄 Multi-Protocol | Native support for D-Star, C4FM (YSF), and DMR |
| 🎨 Custom Dashboard | Dark theme with enhanced monitoring capabilities |
| 🔊 Echo Test | Optional Parrot service for audio testing |
| 🔒 SSL Ready | Automated SSL certificate setup with Certbot |
| 📊 Real-time Monitoring | Live connection tracking and statistics |
| 🌍 YSF Auto-link | Configurable automatic linking for YSF |
| 🎯 Auto-update | Automatic real-time users database setup |
| 👥 User Manager | Terminal tool to manage users, whitelist and passwords |
| 🧹 Smart Cleanup | Detects and removes residual files from failed installs |
The included dashboard is a dark-theme fork with major improvements:
- Real-time multi-TX module detection with pulsing highlight animation and live TX timers
- Live duration counter for connected stations, updating every second without page reload
- Responsive layout for desktop and mobile
- 30‐day activity history and module activity chart (via Chart.js, independent 60-second refresh)
- SQLite operator database (call, name, city) displayed in Recent Activity and Connected Stations tabs
- Filter-aware auto-refresh — pauses when a callsign or module filter is active
- Browser tab badge showing connected station count and active TX callsign
- Hidden tabs support and others via
config.inc.php
The installer provides native systemd services, replacing original XLXD init.d behavior:
xlxd.servicexlx_log.serviceupdate_XLX_db.service(update timers)xlxecho.service(if Echo Test is enabled)
This brings better reliability, logging, restart behavior, and dependency control.
Before installation, ensure you have:
- Debian-based system or VPS with latest updates
- Stable internet connection with fixed public IP
- Firewall management capabilities
- FQDN for dashboard (e.g.,
xlxbra.net) - Unique 3-digit XLX ID (check availability here)
Visit any active reflector dashboard to see which XLX suffixes are in use. Any unlisted suffix is available!
Before running the installer, ensure all required ports are open and forwarded (see Firewall Configuration).
Execute the commands from the Quick Start section above.
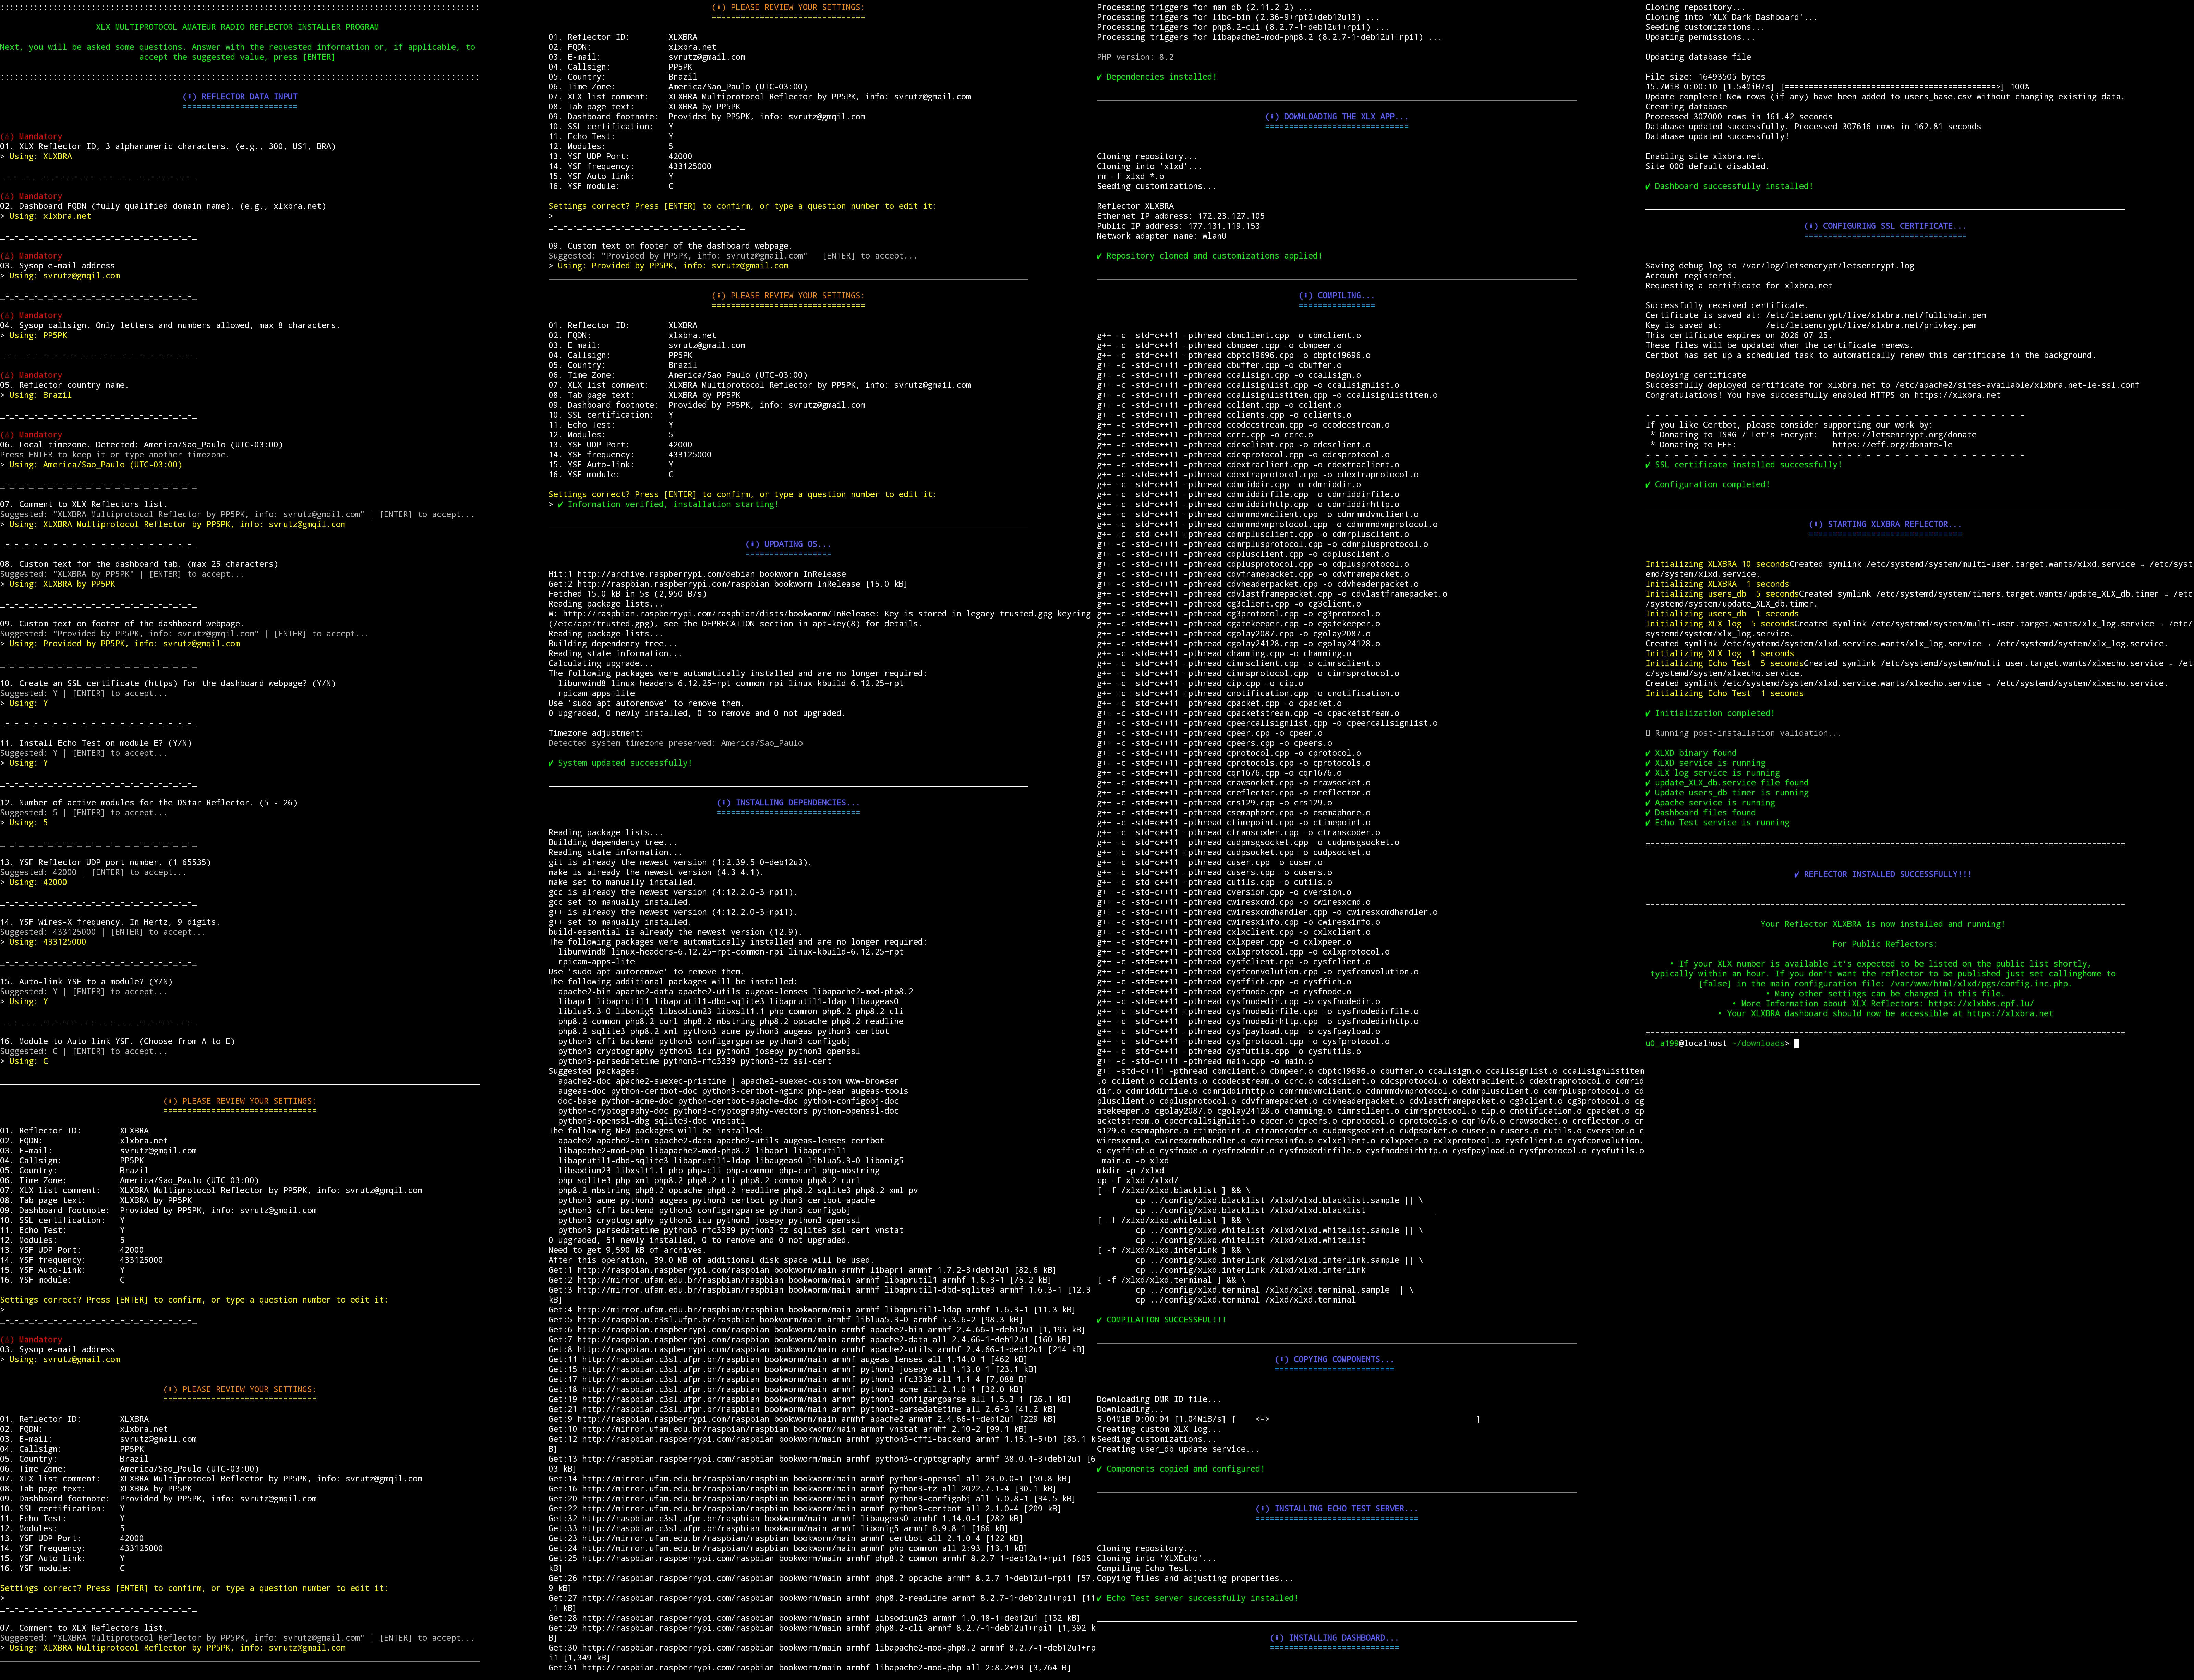
The installer will request the following information:
| # | Prompt | Example | Default |
|---|---|---|---|
| 01 | 3-digit XLX reflector | 300, US1, BRA |
- |
| 02 | Dashboard FQDN | xlxbra.net |
- |
| 03 | Sysop email address | xlxref@gmail.com |
- |
| 04 | Sysop callsign | PP5PK |
- |
| 05 | Reflector country | Germany |
- |
| 06 | Time Zone | Europe/Berlin |
Detected |
| 07 | Comment for XLX list | XLX300 Reflector... |
- |
| 08 | Custom tab name | XLXBRA Dashboard... |
- |
| 09 | Custom footnote | Maintained by... |
- |
| 10 | Install SSL? | Y/N |
Y |
| 11 | Install Echo Test? | Y/N |
Y |
| 12 | Number of modules | 1-26 |
5 |
| 13 | YSF UDP port | 1-65535 |
42000 |
| 14 | YSF Wires-X frequency (Hz) | 433125000 |
433125000 |
| 15 | Enable YSF auto-link? | Y/N |
Y |
| 16 | YSF auto-link module | A-Z |
C |
Tip: At any prompt, type
Xand press [ENTER] to safely cancel the installation. No changes will be made to the system.
The installation proceeds automatically. Once complete, your reflector will be operational and ready to accept connections!
If the installer detects files from a previous incomplete or failed installation, it will automatically identify and remove them before proceeding. This ensures a clean environment without requiring manual intervention, even if a prior install did not complete successfully.
If an existing complete installation is found, the installer will offer to launch the uninstaller directly, so you can perform a clean reinstallation without leaving the script.
# Update system
sudo apt update && sudo apt full-upgrade -y
# Install prerequisites
sudo apt install git -y
# Clone repository
cd /usr/src/
sudo git clone https://github.com/PP5PK/XLX_Installer.git
# Run installer
cd XLX_Installer/ && sudo chmod +x *.sh
sudo ./installer.sh
| Port | Type | Description |
|---|---|---|
| 22 | TCP | SSH |
| 80 | TCP | HTTP |
| 443 | TCP | HTTPS |
| 8080 | TCP | RepNeT |
| 20001-20005 | TCP | DPlus protocol |
| 40001 | TCP | ICom G3 |
| 8880 | UDP | DMR+ DMO mode |
| 10001 | UDP | JSON interface XLX Core |
| 10002 | UDP | XLX interlink |
| 10100 | UDP | AMBE controller |
| 10101-10199 | UDP | AMBE transcoding |
| 12345-12346 | UDP | ICom Terminal presence/request |
| 20001-20005 | UDP | DPlus protocol |
| 21110 | UDP | Yaesu IMRS protocol |
| 30001 | UDP | DExtra protocol |
| 30051 | UDP | DCS protocol |
| 40000 | UDP | Terminal DV |
| 42000 | UDP | YSF protocol |
| 62030 | UDP | MMDVM protocol |
| Type | Location |
|---|---|
| Installation | /xlxd/ |
| Source Files & Folders | /usr/src/xlxd/ /usr/src/XLXEcho/ /usr/src/XLX_Dark_Dashboard/ /usr/src/XLX_Installer/ /usr/local/bin/update_db.sh /usr/local/bin/xlx_log.sh |
| Log Files | /var/log/xlxd* /var/log/xlx.log /var/log/xlxecho.log /var/log/update_XLX_db.log |
| Services | /etc/systemd/system/xlxd.service /etc/systemd/system/xlxecho.service /etc/systemd/system/xlx_log.service /etc/systemd/system/update_XLX_db.service /etc/systemd/system/update_XLX_db.timer |
| Dashboard | /var/www/html/xlxd/ |
| Configuration | /var/www/html/xlxd/pgs/config.inc.php /etc/logrotate.d/xlx_logrotate.conf /xlxd/callinghome.php /xlxd/xlxd.blacklist /xlxd/xlxd.whitelist /xlxd/xlxd.interlink /xlxd/xlxd.terminal |
| User Manager | /xlxd/users_db/reflector_user_manager.sh |
| RadioID Database | /xlxd/users_db/users_base.csv /xlxd/users_db/user.csv |
| Dashboard Authentication | /var/www/restricted/.htpasswd |
After installation, the file /xlxd/callinghome.php is created automatically. This file is critical to the identity and ownership of your reflector and should be treated with care.
callinghome.php contains a unique cryptographic hash that:
- Proves ownership of your specific reflector ID (e.g., XLX300) to the global XLX network
- Prevents conflicts — no other operator can register the same reflector ID while your hash is the valid one
- Controls dashboard visibility — the green thumbs-up indicator on the public reflector list, confirming that your reflector is active and legitimate, depends on this file being valid and matching the one registered on the network
If you need to reinstall your reflector, back up /xlxd/callinghome.php before running the uninstaller:
sudo cp /xlxd/callinghome.php ~/callinghome.php.bakAfter reinstalling, replace the newly generated file with your backup:
sudo cp ~/callinghome.php.bak /xlxd/callinghome.phpThis ensures your reflector is immediately recognized as the legitimate owner of its ID on the global network.
If the backup is lost and a new callinghome.php is generated after reinstallation:
- New reflectors — will appear online immediately, as there is no prior hash registered for that ID
- Existing reflectors — the new hash must be validated by the network, which takes approximately 3 days. During this period, the reflector will still be functional and accept connections, but may not display the green active indicator on the public list until validation is complete
# Start the reflector
sudo systemctl start xlxd.service
# Stop the reflector
sudo systemctl stop xlxd.service
# Restart the reflector
sudo systemctl restart xlxd.service
# Check status
sudo systemctl status xlxd.service
# Watch live logs
sudo tail -f /var/log/xlx.logAfter a successful installation, your reflector should appear on any XLX dashboard (e.g., xlxbra.net) within a few minutes. If it does not, the most common cause is an IP address mismatch in the service configuration.
The file /etc/systemd/system/xlxd.service contains a line like:
ExecStart=/xlxd/xlxd XLX300 192.168.1.10 127.0.0.1
The second argument (the first IP address) is critical — it must be the IP that has direct outbound internet access. There are two scenarios:
| Setup | IP to use | Example |
|---|---|---|
| Server behind a LAN router (ports forwarded to the server) | Local/internal IP | 192.168.1.10 |
| VPS or server with public IP assigned directly to the NIC | Public IP | 203.0.113.45 |
The installer attempts to detect the correct IP automatically. However, in some environments — particularly those with complex networking, multiple interfaces, or NAT — it may not detect this correctly.
1. Check which IP is currently configured:
grep ExecStart /etc/systemd/system/xlxd.service
2. Identify the correct IP for your setup:
# Your local/internal IP
hostname -I | awk '{print 1ドル}'
# Your public IP (as seen from the internet)
curl -s https://v4.ident.me
3. Edit the service file with the correct IP:
sudo nano /etc/systemd/system/xlxd.service
4. Apply the change and restart:
sudo systemctl daemon-reload
sudo systemctl stop xlxd.service
sudo systemctl start xlxd.service
5. Verify the service is running:
sudo systemctl status xlxd.service
After restarting, allow a few minutes for the reflector to register and appear on the public list.
The installer includes reflector_user_manager.sh, a unified terminal tool for all user administration tasks. Instead of running separate scripts, everything is available from a single two-level interactive menu.
sudo /xlxd/users_db/reflector_user_manager.sh
Main menu
├── 1) Database (RadioID)
│ ├── 1) Add / Edit record
│ ├── 2) Delete record
│ ├── 3) List records by Callsign
│ ├── 4) Search records (filter)
│ ├── 5) Create / Update SQL database
│ └── X) Back
└── 2) Access Control
 ├── 1) Add user (whitelist + dashboard)
 ├── 2) Reset password (dashboard)
 ├── 3) Remove user (whitelist + dashboard)
 ├── 4) Look up user (whitelist + dashboard)
 ├── 5) List pending (password not yet changed)
 ├── 6) List whitelist (all callsigns)
 └── X) Back
| Feature | Description |
|---|---|
| 📋 RadioID Database | Add, edit, delete and search records in users_base.csv |
| 🔍 Filtered Search | Case-insensitive partial search by callsign, DMRID, name, city or country — with pagination (25 records/page) |
| 🔑 Password Management | Generate and reset secure 12-character dashboard passwords |
| 📡 Whitelist Control | Add and remove callsigns from xlxd.whitelist with confirmation |
| 🗂️ Whitelist Listing | Display all active whitelist entries in auto-sized columns |
| ⏳ Pending List | Track users who have not yet changed their initial password |
| 🔄 SQL Sync | Trigger create_user_db.php to rebuild the SQLite database from the CSV |
For full documentation see REFLECTOR_USER_MANAGER.md.
To list your reflector on YSF hosts:
- Visit dvref.com
- Follow the registration instructions
If you skipped automatic SSL during installation:
- Visit the Certbot website
- Follow the simple instructions
- Ensure TCP ports 80 and 443 are open and forwarded
The uninstaller is located at templates/uninstaller.sh within the installer directory. It can be launched manually or directly from the installer if an existing installation is detected during a new install attempt.
cd /usr/src/XLX_Installer/templates
sudo ./uninstaller.sh
This removes:
- systemd services and timers
- dashboard and web files
- reflector core binaries
- configuration files
- Apache virtual host integration
- cron jobs and timers
- log files and directories
- SSL certificate (optional — the uninstaller will ask)
Note: The uninstaller will offer to remove the SSL certificate issued for your dashboard domain. If you plan to reuse the same domain, you may choose to keep it.
Tip: Type
Xat any prompt during uninstallation to abort safely without making changes.
⚠️ Remember to back up/xlxd/callinghome.phpbefore uninstalling if you plan to reinstall. See the callinghome.php section for details.
| Project | Author | Description |
|---|---|---|
| XLX Reflector | LX3JL | Original XLX reflector software |
| XLX Forum Home | LX1IQ | Official XLX Forum / Support |
| XLX Dark Dashboard | PP5PK | Dark themed XLX dashboard |
| Original Installer Idea | N5AMD | Initial Debian installer concept |
| YSF Registration | KC1AWV | YSF Reflector registration service |
| Echo Test Service | Narspt | XLX Echo Test implementation |
| SSL Certification | Certbot | Free SSL/TLS certificates |
| This Installer | PP5PK | Automated installation script |
If you encounter issues or have questions:
- 📧 Contact the maintainer: PP5PK
- 🐛 Open an issue on GitHub
- 💬 Join the amateur radio community discussions
This project is open source and available for use by the amateur radio community.
Released under the The Unlicense License. See LICENSE for details.
Made with ❤️ by the Amateur Radio Community
⭐ If you find this project useful, please consider starring it on GitHub! Contributions and pull requests are welcome.