- TypeScript 100%
ShareX-R2-Cloudflare-Workers
This repo pairs with the blog post found at https://jross.me/cloudflare-r2-sharex-custom-uploader. It assumes some precursory knowledge about Workers, Cloudflare, and ShareX. If you have any questions, please feel free to create a discussion/issue, or submit a PR with any docs improvements! I want to extend this repo in the future and when R2 is more widely available, and document the process from start to finish.
Video Guide
For a video walkthrough on how to set everything up, including the Worker, R2, and ShareX, you can follow this great guide from KianNH.
https://watch.videodelivery.net/3fb9e86deffbd4351b9187db92136ef5
Worker and R2 Setup
-
Ensure you have wrangler installed and configured. See here for more details
-
Clone repo (or fork?), and run
npm cito install dependencies -
Choose a bucket name to use in the next steps. For the purpose of this example, I'll be using
sharex-files -
Edit
wrangler.tomlwith youraccount_id,route, andr2_buckets.bucket_name -
Run
wrangler r2 bucket create <bucket name> -
Generate a random string of characters - this will be used for an
AUTH_KEYheader that we'll send along with ShareX- This ensures that only you can upload to your script
-
In your GitHub repository, create an
AUTH_KEYsecret, and set its value to theAUTH_KEYyou just generated- This will be used by the GitHub Action to deploy the worker
-
In your GitHub repository, create a
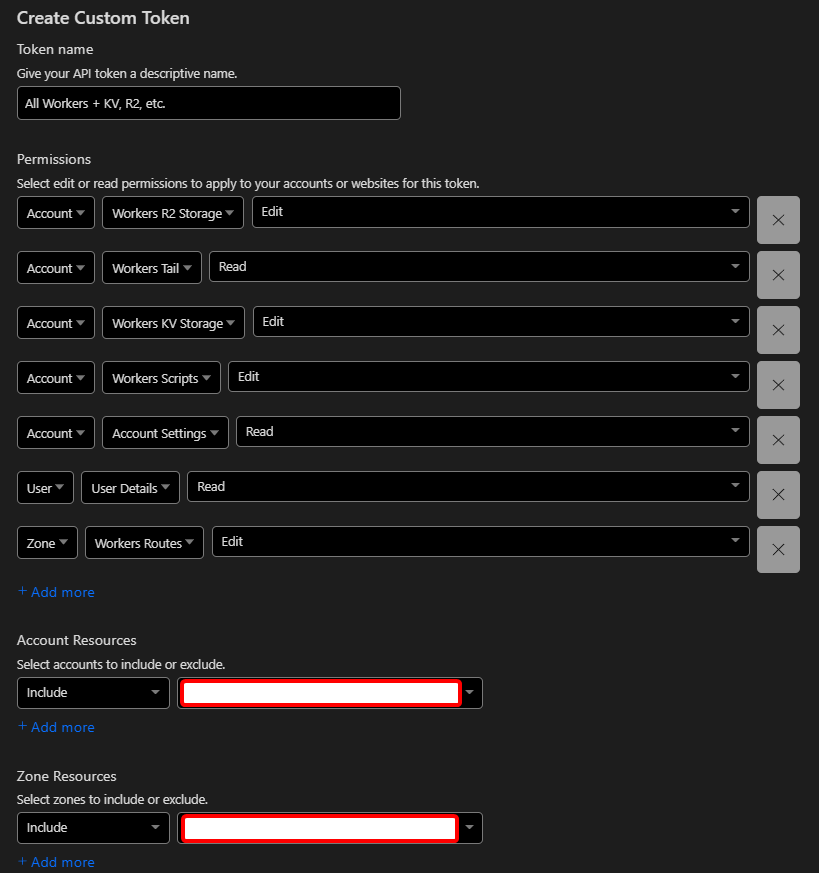
CF_API_TOKENsecret, and set its value to a Cloudflare API token with the following permissions:-
Account - Workers R2 Storage - Edit
-
Account - Workers Tail - Read
-
Account - Workers KV Storage - Edit
-
Account - Workers Scripts - Edit
-
Account - Account Settings - Read
-
User - User Details - Read
-
Zone - Workers Routes - Edit
-
Then be sure to give it access to the application account/zone resources you want to use Cloudflare API token for Wrangler R2 access
-
-
If using GitHub Actions (like this repo), simply push your changes and the worker will be automatically deployed - see your Actions log for any errors.
-
(optional) If you want to deploy manually, or use some other CI other than GitHub Actions, you will need to manually setup the
AUTH_KEYsecret (via the Workers UI, orwrangler secret put), and then runnpm run deploy.
ShareX Setup
For full documentation on ShareX custom uploaders, please review their documentation at https://getsharex.com/docs/custom-uploader.
- Open Main Window -> Destinations -> Custom Uploader Settings
- New -> Name it
R2or whatever else you want - Set the
Destination TypetoImage uploadere - Set the
MethodtoPOST - Set the
Request URLto the URL of your worker, with/uploadappended, such ashttps://r2-sharex.jross.me/upload - Set the
BodytoBinary - Leave URL paramaters blank
- (optional) Add a new URL paramater called
filename, and set it to{filename}. If this is set, the original filename will be used when storing to R2, otherwise a random ID will be generated - Add a new header under
Headerscalledx-auth-key, and set it to the secure string you generated earlier - Set
URLto{json:image} - Set
Deletion URLto{json:deleteUrl} - Use the testers on the left hand side to test your configuration
- When ready, change your default destination for images (etc.) to
R2
ShareX configuration for a custom Cloudflare R2 Uploader

Acknowledgements
https://github.com/kotx/render is used to retrieve files from R2, since this is a fantastic example handling ranges, etags, HEAD requests, and more. Huge shoutout to kotx for this work!