I have followed numerous guides and tutorials for getting the NRF24L01+ modules working with an Arduino Uno. I have swapped to a genuine Arduino and tried 4 different NRF modules. All without luck.
I am trying to get the most basic example from Simple nRF24L01+ 2.4GHz transceiver demo to work.
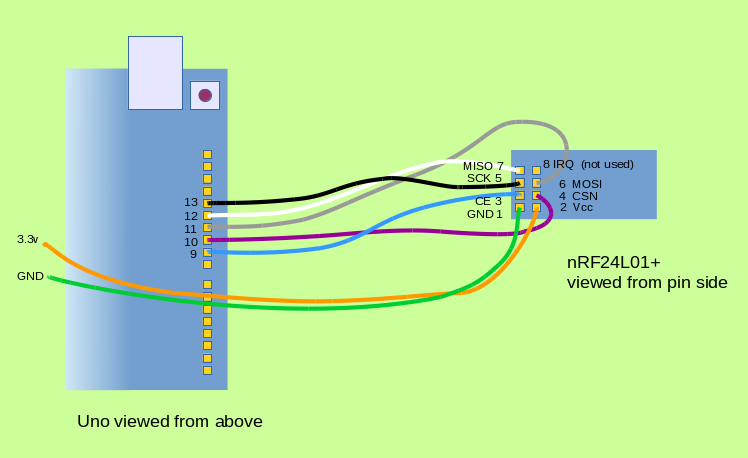
Hardware Connections: Hardware Connections
Simple TX Test Code:
// SimpleTx - the master or the transmitter
#include <SPI.h>
#include <nRF24L01.h>
#include <RF24.h>
#define CE_PIN 9
#define CSN_PIN 10
const byte slaveAddress[5] = {'R','x','A','A','A'};
RF24 radio(CE_PIN, CSN_PIN); // Create a Radio
char dataToSend[10] = "Message 0";
char txNum = '0';
unsigned long currentMillis;
unsigned long prevMillis;
unsigned long txIntervalMillis = 1000; // send once per second
void setup() {
Serial.begin(9600);
Serial.println("SimpleTx Starting");
radio.begin();
radio.setDataRate( RF24_250KBPS );
radio.setRetries(3,5); // delay, count
radio.openWritingPipe(slaveAddress);
}
//====================
void loop() {
currentMillis = millis();
if (currentMillis - prevMillis >= txIntervalMillis) {
send();
prevMillis = millis();
}
}
//====================
void send() {
bool rslt;
radio.stopListening();
rslt = radio.write( &dataToSend, sizeof(dataToSend) );
// Always use sizeof() as it gives the size as the number of bytes.
// For example if dataToSend was an int sizeof() would correctly return 2
Serial.print("Data Sent ");
Serial.print(dataToSend);
if (rslt) {
Serial.println(" Acknowledge received");
updateMessage();
}
else {
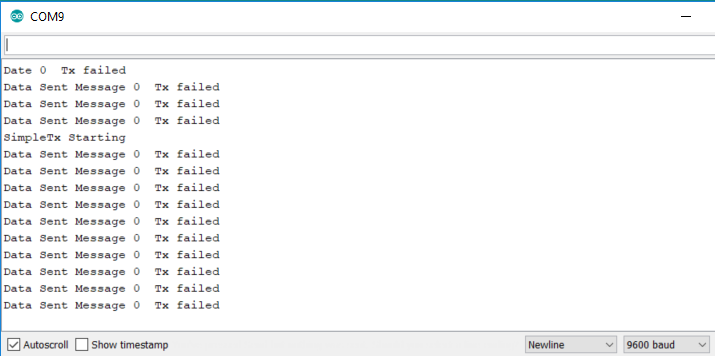
Serial.println(" Tx failed");
}
}
//================
void updateMessage() {
// so you can see that new data is being sent
txNum += 1;
if (txNum > '9') {
txNum = '0';
}
dataToSend[8] = txNum;
}
Serial monitor:
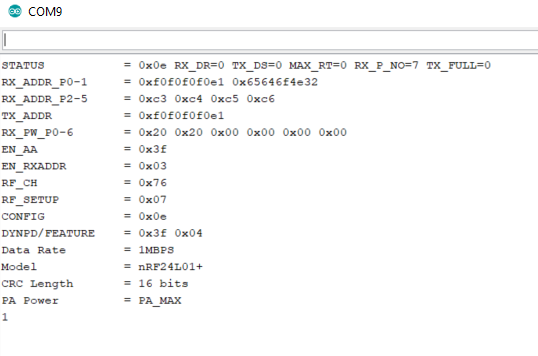
Using radio.printDetails( ); returns:
Please let me know what I'm missing.
Glorfindel
5781 gold badge7 silver badges18 bronze badges
1 Answer 1
The Arduinos 3V3 does not privide enough current. To eliminate this as a source of your problem you can use a ceramic capacitor of 100μF across VCC and GND pins of the nRF24L01+ module or buy a 5V to 3V3 step down converter specially made for nRF24L01.
answered May 13, 2019 at 7:16
lang-cpp
TX failederror message.uint8_t slaveAddress[5] = {0xF0F0F0F0A1LL, 0XF0F0F0F0B1LL, 0XF0F0F0F0C1LL, 0XF0F0F0F0D1LL, 0XF0F0F0F0E1LL};? How do you expect such large values to fit intouint8_t??? The compiler will interpret this asuint8_t slaveAddress[5] = {0xA1, 0xB1, 0xC1, 0xD1, 0xE1};. Is this what you wanted? I'd guess not. Also, take a look here github.com/nRF24/RF24/blob/master/RF24.h#L246 how the address is supposed to be formed.