If you use Microsoft Word to create large documents, you can also use it for note-taking—no need to download another app. No matter the scenario that requires you to take notes (e.g., lectures, meetings, and interviews), Word has you covered.
1 Take Advantage of Voice Typing for Quick Notes
The voice typing feature in Microsoft Word allows you to capture your thoughts and ideas quickly. Your words will be transcribed into the document as you speak, which is useful when typing is impractical or time-consuming.
To record a voice note in Microsoft Word, select the Home tab and click Dictate in the Voice section of the ribbon.
Once the dictation widget appears, start speaking, and you will see your words appear in the document. Click the microphone icon to pause and resume the recording as needed.
2 Use Drawing Tools for Sketchnoting
Sketchnoting is a visual way of taking notes that mixes text and drawings to make information easier to understand and remember. It can be more effective than simply typing out your notes.
You can use the drawing tools in the Draw tab of Word to sketchnote. You will find the ones you need for effective sketchnoting, such as the pen, pencil, marker, and eraser, in the Drawing Tools group of the ribbon.
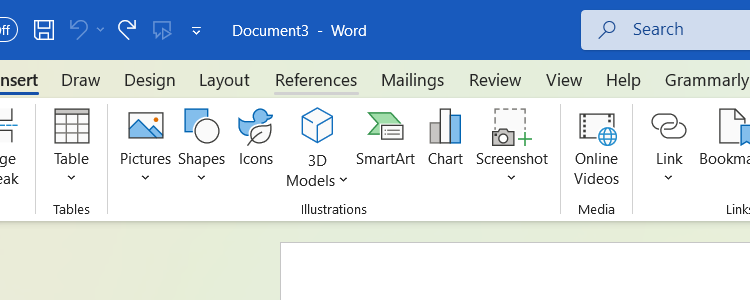
3 Insert Visual Aids to Illustrate Ideas
You can add visual aids, such as images, charts, and graphs, in Microsoft Word. These enhance your notes by aiding comprehension and retention of information. You will find them in the Illustrations group of the ribbon when you select the Insert tab.
4 Add Comments for Additional Information
You can include comments in your notes to add context, explanations, or reminders alongside your main notes without cluttering the primary content. For example, you can include a note and then insert a comment reminding yourself to expand on it later, along with a link to get additional information.
To add a comment in Microsoft Word, highlight the text you want to comment on, select the Review tab in the top menu, and then click New Comment in the Comments group of the ribbon.
Type your note and click the blue envelope button to insert the comment in the document.
5 Create a Template for Note-Taking
If you structure your notes the same way every time, you can create a template for them in Word. This will make you more efficient at note-taking by streamlining the process.
To create a template in Word, start with a blank document and lay out the basic structure of your note.
Next, click File > Save As, and in the rightmost panel, give the template a name, and save it with a Word Template (*.dotx) extension.
To use the custom template, click File > New and select the Personal tab. You will find all the templates you created there.
6 Save to OneDrive for Cross-Device Access to Your Notes
When you use OneDrive for cross-device access, your notes in Word will always be available to review and edit from anywhere. For instance, if you don't have your computer nearby, you can continue taking notes in Microsoft Word on your mobile device and finish them once you're back on your PC.
To save your document to OneDrive, click the AutoSave toggle in the top-right corner.
If you haven't signed in to Word with your Microsoft account, you'll see a pop-up asking you to do that. Click Sign in and follow the instructions. If you don't have a Microsoft account, you'll be able to create one during this step.
Next, pick your OneDrive account, name your document, and then click OK in the pop-up. Now you can access that document in Microsoft Word on any device, provided you're using the same Microsoft account. Any changes you make will be synced across devices as well.
Microsoft Word isn't just for creating work documents. You can also use it as a tool to take and organize your notes. You can always turn them into a professional document in Word later if it's for something like an article, report, or assignment.