This tutorial explains simple blob detection using OpenCV.
A Blob is a group of connected pixels in an image that share some common property ( E.g, grayscale value ). In the image above, the dark connected regions are blobs, and blob detection aims to identify and mark these regions.
OpenCV provides a convenient way to detect and filter blobs based on different characteristics. Let’s start with the simplest example
Python
# Standard imports
import cv2
import numpy as np;
# Read image
im = cv2.imread("blob.jpg", cv2.IMREAD_GRAYSCALE)
# Set up the detector with default parameters.
detector = cv2.SimpleBlobDetector()
# Detect blobs.
keypoints = detector.detect(im)
# Draw detected blobs as red circles.
# cv2.DRAW_MATCHES_FLAGS_DRAW_RICH_KEYPOINTS ensures the size of the circle corresponds to the size of blob
im_with_keypoints = cv2.drawKeypoints(im, keypoints, np.array([]), (0,0,255), cv2.DRAW_MATCHES_FLAGS_DRAW_RICH_KEYPOINTS)
# Show keypoints
cv2.imshow("Keypoints", im_with_keypoints)
cv2.waitKey(0)
C++
using namespace cv;
// Read image
Mat im = imread( "blob.jpg", IMREAD_GRAYSCALE );
// Set up the detector with default parameters.
SimpleBlobDetector detector;
// Detect blobs.
std::vector<KeyPoint> keypoints;
detector.detect( im, keypoints);
// Draw detected blobs as red circles.
// DrawMatchesFlags::DRAW_RICH_KEYPOINTS flag ensures the size of the circle corresponds to the size of blob
Mat im_with_keypoints;
drawKeypoints( im, keypoints, im_with_keypoints, Scalar(0,0,255), DrawMatchesFlags::DRAW_RICH_KEYPOINTS );
// Show blobs
imshow("keypoints", im_with_keypoints );
waitKey(0);
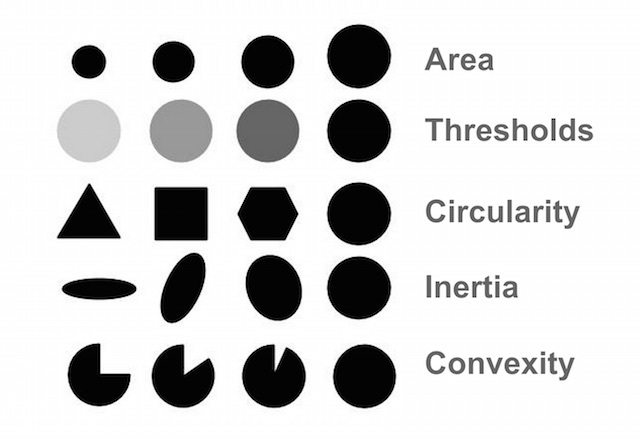
SimpleBlobDetector, as the name implies, is based on a rather simple algorithm described below. The algorithm is controlled by parameters ( shown in bold below ) and has the following steps. Scroll down to learn how the parameters are set.
The parameters for SimpleBlobDetector can be set to filter the type of blobs we want.
First, you need to set filterByColor = 1. Set blobColor = 0 to select darker blobs, and blobColor = 255 for lighter blobs. By Size : You can filter the blobs based on size by setting the parameters filterByArea = 1, and appropriate values for minArea and maxArea. E.g. setting minArea = 100 will filter out all the blobs that have less then 100 pixels.By Shape : Now shape has three different parameters.
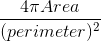
This just measures how close to a circle the blob is. E.g. a regular hexagon has higher circularity than, say a square. To filter by circularity, set filterByCircularity = 1. Then set appropriate values for minCircularity and maxCircularity. Circularity is defined as
[画像:\frac{4*\pi*Area}{perimeter * perimeter}] This means that a circle has a circularity of 1, the circularity of a square is 0.785, and so on.
A picture is worth a thousand words. Convexity is defined as the (Area of the Blob / Area of it’s convex hull). Now, Convex Hull of a shape is the tightest convex shape that completely encloses the shape. To filter by convexity, set filterByConvexity = 1, followed by setting 0 ≤ minConvexity ≤ 1and maxConvexity ( ≤ 1)
Don’t let this scare you. Mathematicians often use confusing words to describe something very simple. All you have to know is that this measures how elongated a shape is. E.g. for a circle, this value is 1, for an ellipse it is between 0 and 1, and for a line it is 0. To filter by inertia ratio, set filterByInertia = 1, and set 0 ≤ minInertiaRatio ≤ 1and maxInertiaRatio (≤ 1 )appropriately.
Setting parameters for SimpleBlobDetector is easy. Here is an example
Python
# Setup SimpleBlobDetector parameters.
params = cv2.SimpleBlobDetector_Params()
# Change thresholds
params.minThreshold = 10;
params.maxThreshold = 200;
# Filter by Area.
params.filterByArea = True
params.minArea = 1500
# Filter by Circularity
params.filterByCircularity = True
params.minCircularity = 0.1
# Filter by Convexity
params.filterByConvexity = True
params.minConvexity = 0.87
# Filter by Inertia
params.filterByInertia = True
params.minInertiaRatio = 0.01
# Create a detector with the parameters
ver = (cv2.__version__).split('.')
if int(ver[0]) < 3 :
	detector = cv2.SimpleBlobDetector(params)
else :
	detector = cv2.SimpleBlobDetector_create(params)
C++
Setting of params for SimpleBlobDetector in OpenCV 2 is slightly different from OpenCV 3. In the code below, we use the macro CV_MAJOR_VERSION to detect the version of OpenCV. In OpenCV 3, the SimpleBlobDetector::create method is used to create a smart pointer. The usage is shown in the code below.
// Setup SimpleBlobDetector parameters.
SimpleBlobDetector::Params params;
// Change thresholds
params.minThreshold = 10;
params.maxThreshold = 200;
// Filter by Area.
params.filterByArea = true;
params.minArea = 1500;
// Filter by Circularity
params.filterByCircularity = true;
params.minCircularity = 0.1;
// Filter by Convexity
params.filterByConvexity = true;
params.minConvexity = 0.87;
// Filter by Inertia
params.filterByInertia = true;
params.minInertiaRatio = 0.01;
#if CV_MAJOR_VERSION < 3 // If you are using OpenCV 2
 // Set up detector with params
 SimpleBlobDetector detector(params);
 // You can use the detector this way
 // detector.detect( im, keypoints);
#else
 // Set up detector with params
 Ptr<SimpleBlobDetector> detector = SimpleBlobDetector::create(params);
 // SimpleBlobDetector::create creates a smart pointer.
 // So you need to use arrow ( ->) instead of dot ( . )
 // detector->detect( im, keypoints);
#endif
We hate SPAM and promise to keep your email address safe.