Microsoft Forms logo inside an Excel spreadsheet on a MacBook
Screenshots by Varun—no attribution | Image created on: https://app.shotsnapp.com/ (no attribution)
Nothing is as sleek as writing your online survey responses directly into an Excel spreadsheet in real-time. You can enjoy this feature if you use Microsoft Forms. There's a repetitive and dynamic (automated) ways around it.
The automated methods are handier, but in this article, you'll see how to go about either.
How to Export Microsoft Forms Responses to Excel
Exporting Microsoft Forms responses into Excel helps you get the latest replies to your survey. It involves downloading survey responses to your computer as an Excel file. The process is easy if you've created your Microsoft survey form already:
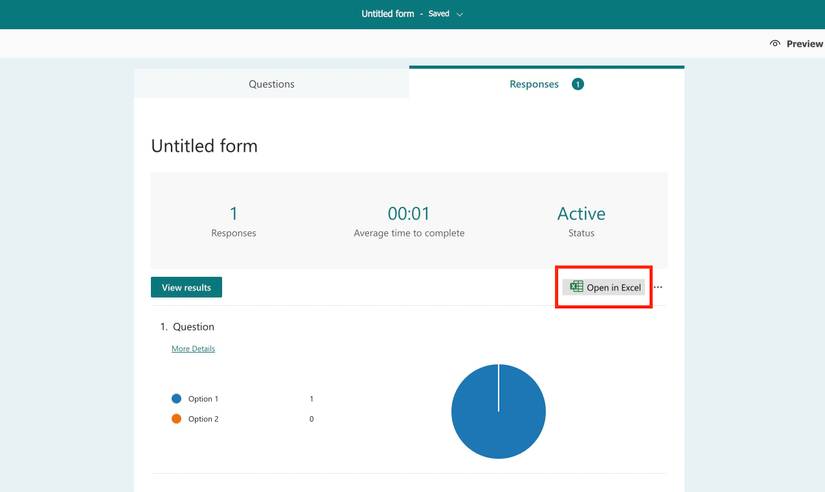
In Microsoft Forms, go to Responses at the top-right.
Click Open in Excel on the right side of the screen to download the current responses to your computer.
You have to repeat this process each time you want to get a response update.
But this method isn't the best, since you'll have to reinvent the wheel frequently to update your spreadsheet; this means downloading a new Excel file each time someone submits a response. That can be exhausting, especially if many people are responding in real-time.
To make your life easier, you can automate the process with OneDrive for Business or Power Automate, as described in the following sections.
How to Sync Microsoft Forms With Excel via OneDrive for Business
You can update your Excel spreadsheet dynamically if you're on a Microsoft 365 Business account. To do this, you'll create a survey form that can write responses dynamically to Excel directly from OneDrive.
When you use OneDrive for Business to create Microsoft Forms for Excel, it makes an Excel spreadsheet version of that form with columns bearing the corresponding form field attributes.
To create an Excel form that updates Microsoft Forms responses automatically in real-time:
Once in SharePoint, click the app launcher icon (the squared dots) at the top-left. Then select OneDrive in the left sidebar. This takes you to your OneDrive for Business dashboard.
After creating and sharing your survey, open the Excel spreadsheet online, and you'll now see new data as they get updated in real-time.
If you share the Excel spreadsheet with your team members, they'll also get a real-time update of the responses as people respond to your survey.
How to Sync Microsoft Forms Responses to Excel via Power Automate
Power Automate is a powerful routine tasks automation tool. Interestingly, it also provides an excellent way to sync Microsoft Forms with Excel. It's the best method if you've shared your survey form already.
It involves creating an automated cloud flow in Power Automate. However, you must also be on a Microsoft Business account to use this flow feature in Power Automate. Use the steps below to connect Microsoft Forms with Microsoft Excel automatically using Power Automate:
Insert a Table Into Your Excel Workbook Online
Your online Excel workbook must be in a table format, as Forms only write to tables in an Excel spreadsheet.
If you've downloaded an Excel spreadsheet from Microsoft Forms responses, you can upload that to OneDrive, ignore this subsection, and jump to syncing Microsoft Forms with Excel.
So before you begin, create a new Excel spreadsheet in OneDrive. Ensure that you access OneDrive via your Microsoft Business account:
Click the Show all dropdown in the left sidebar of your Microsoft 365 admin center. Then go to SharePoint. Click the app's icon at the top-left and select OneDrive.
From the Excel spreadsheet opened in the browser, click Saved at the top-left. Then enter a preferred name in the File Name field. Click any void space to close that modal box.
Now create your columns, and ensure that they correspond with the fields in your Microsoft survey form. For instance, if you've shared a form that asks for email and gender, your Excel workbook will have an email and gender column.
Highlight the columns. Then go to the Insert tab on the ribbon and click Table.
Tick the My table has headers checkmark and click OK.
Click Sign in if prompted. Make sure you use a Microsoft 365 Business account to sign in if you're on a personal Microsoft account. You can do this by clicking Use another account on the sign-in box.
Under the Location field, choose OneDrive for Business.
Select OneDrive from the Document Library Field.
Click the file browser on the File field and choose the tabulated Excel workbook you created earlier. Or you can select the one uploaded to OneDrive from your computer if you're using a previously exported spreadsheet.
Select the table name from the Excel sheet. New fields corresponding to the Excel columns in that spreadsheet should now appear. These must also correlate with the survey form fields.
That's it! You've now created an automated cloud flow for Microsoft Forms in Power Automate.
Power Automate will now write new responses dynamically to your Excel workbook as responders submit replies in real-time. You can even sync the collected data across multiple Excel files for consolidated analysis.
If you've been exporting your Microsoft Forms responses to Excel on your PC before now, you can copy and paste the existing data into the newly automated Excel workbook. This action will not stop your Power Automate flows.
Update Survey Responses in Real-Time Excel
Automating real-time Microsoft Forms response updates in Microsoft Excel makes life easier. While the direct OneDrive for Business option provides easy sync if you've not shared your form, Power Automate is handier if you've shared your Microsoft Forms survey and people are already responding.
Although you can leverage Microsoft Forms on a personal account, dynamic response writing to Excel still requires you to own a Microsoft Business account. You might also want to see how Google Forms compares to Microsoft's since these are close competitors.