Worlde is a popular game that took the world by storm in early 2022. Recreating the Wordle game or at least building a simpler version of it is something that developers who are new to JavaScript should consider.
How Wordle Works
In Wordle, there is a secret five-letter word. The player has six tries and must guess different five-letter words to see how close they are to the secret word.
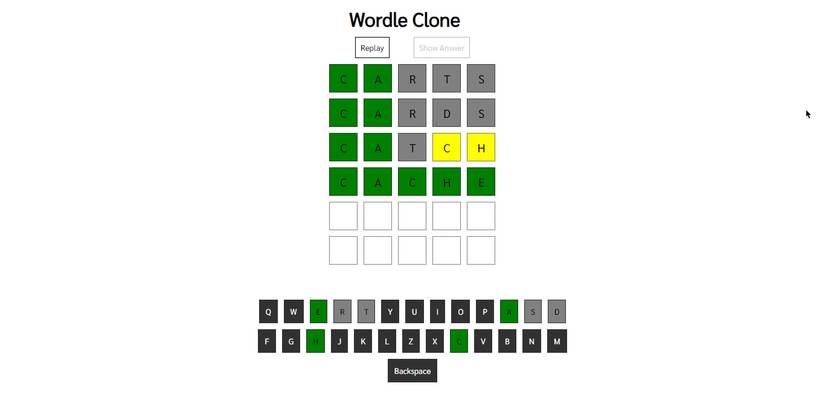
After the player submits a guess, Wordle uses colors to tell the player how close they are to the secret word. If a letter has the color yellow, it means that the letter is in the secret word, but in the wrong position.
The green color tells the user that the letter is in the secret word and in the right position, while the grey color tells the player that the letter is not in the word.

Setting Up the Development Server
The code used in this project is available in a GitHub repository and is free for you to use under the MIT license. If you want to have a look at a live version of this project, you can check out this demo.
The project uses the Vite build tool via the Command Line Interface (CLI) for scaffolding. Make sure you have Yarn installed on your computer because it is generally faster than the Node Package Manager (NPM). Open your terminal and run the following command:
yarn create vite
This will create a new Vite project. The framework should be Vanilla and the variant should be set to JavaScript. Now run:
yarn
This will install all the dependencies necessary to make the project work. After this installation, run the following command to start the development server:
yarn devSetting Up the Game and Designing the Keyboard
Open the project in your code editor, clear the contents of the main.js file, and make sure your project folder looks like this:
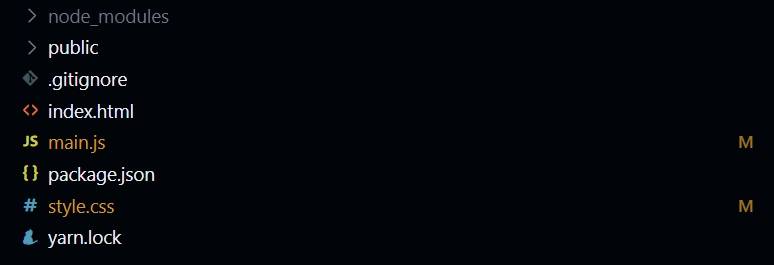
Now, replace the contents of the index.html file with the following boilerplate code:
<!DOCTYPE html>
<html lang="en">
<head>
 <meta charset="UTF-8" />
 <link rel="icon" type="image/svg+xml" href="/vite.svg" />
 <meta name="viewport" content="width=device-width, initial-scale=1.0" />
 <title>JS Wordle</title>
</head>
<body>
 <div id="app">
 <div>
 <h1>Wordle Clone</h1>
 <div id="controls">
 <button id="restart-btn">Replay</button>
 <button id="show-btn">Show Answer</button>
 </div>
 <div id="message">Please wait. The Game is loading...</div>
 </div>
 <div id="interface">
 <div id="board"></div>
 <div class="keyboard"></div>
 </div>
 </div>
 <script type="module" src="/main.js"></script>
</body>
</html>
For the CSS, head over to this project's GitHub Repository and copy the contents of the style.css file into your own style.css file.
Now, in the terminal, install the Toastify NPM package by running the following command:
yarn add toastify -S
Toastify is a popular JavaScript package that allows you to show alerts to the user. Next, in the main.js file, import the style.css file and the toastify utility.
import "./style.css"
import Toastify from 'toastify-js'
Define the following variables to make interaction with the DOM elements easier:
let board = document.querySelector("#board");
let message = document.querySelector("#message");
let keys = "QWERTYUIOPASDFGHJKLZXCVBNM".split("");
let restartBtn = document.querySelector("#restart-btn");
let showBtn = document.querySelector("#show-btn");
showBtn.setAttribute("disabled", "true");
keys.push("Backspace");
let keyboard = document.querySelector(".keyboard");
Setting Up the Game Board
Since Wordle is a game where the user has to guess a five-letter word in six tries, define a variable called boardContent that holds an array of six arrays. Then define the variables currentRow and currentBox to make it easier to traverse boardContent.
let boardContent = [
 [0, 0, 0, 0, 0],
 [0, 0, 0, 0, 0],
 [0, 0, 0, 0, 0],
 [0, 0, 0, 0, 0],
 [0, 0, 0, 0, 0],
 [0, 0, 0, 0, 0],
];
let currentRow = 0;
let currentBox = 0;
let secretWord;
To render the board with five boxes in each of the six rows using HTML elements, use nested loops to iterate and create the elements. Finally, append them to the board.
for (let i = 0; i <= 5; i++) {
 let row = document.createElement('div')
 for (let y = 0; y <= 4; y++) {
 let box = document.createElement('span');
 row.appendChild(box);
 row.className = `row-${i + 1}`
 }
 board.appendChild(row);
}
Adding the Keyboard and Listening to Keyboard Input
To create the keyboard, iterate through the keys using forEach, creating a button element for each entry. Set the button's text to Backspace if the entry is *, otherwise set it to the entry value.
Assign the key class to the button, and set the data-key attribute to the uppercase entry value. Next, add a click event listener to the button that calls the function insertKey with the uppercase entry value.
keys.forEach(entry => {
 let key = document.createElement("button");
 if (entry === "*") {
 key.innerText = "Backspace";
 } else {
 key.innerText = entry;
 }
 key.className = "key";
 key.setAttribute("data-key", entry.toUpperCase());
 key.addEventListener("click", () => {
 insertKey(entry.toUpperCase())
 setTimeout(() => {
 document.querySelector(`button[data-key=${entry.toUpperCase()}]`).blur();
 }, 250)
 })
 keyboard.append(key);
})
Getting a New Word From an API
When the user first loads the game, the game should fetch a new five-letter word from the Random word API. This word is then stored in the secretWord variable.
function getNewWord() {
 async function fetchWord() {
 try {
 const response = await fetch("https://random-word-api.herokuapp.com/word?length=5");
 if (response.ok) {
 const data = await response.json();
 return data;
 } else {
 throw new Error("Something went wrong!")
 }
 } catch (error) {
 message.innerText = `Something went wrong. \n${error}\nCheck your internet connection.`;
 }
 }
 fetchWord().then(data => {
 secretWord = data[0].toUpperCase();
 main();
 })
}
In the code block above, the main function runs if the random word is successfully fetched. Define a main function right below the getNewWord function:
function main(){
}
To style each box on the board, you'll need a list of all the boxes in each row. Declare a variable, row that grabs all the rows in the DOM. Also, set the message display style to none:
 rows.forEach(row => [...row.children].forEach(child => boxes.push(child)))
 boxes.forEach((box) => {
 box.classList.add("empty");
 })
 message.style.display = "none";
Next, add a keyup event listener to the window object and check if the released key is valid. If valid, focus on the corresponding button, simulate a click, and blur it after a 250ms delay:
 window.addEventListener('keyup', (e) => {
 if (isValidCharacter(e.key)) {
 document.querySelector(`button[data-key=${e.key.toUpperCase()}]`).focus();
 document.querySelector(`button[data-key=${e.key.toUpperCase()}]`).click();
 setTimeout(() => {
 document.querySelector(`button[data-key=${e.key.toUpperCase()}]`).blur();
 }, 250)
 }
 })
Under the keyup event listener, set up event listeners for two buttons: showBtn and restartBtn. When the player clicks showBtn, display a toast notification with the value of the secretWord variable.
Clicking restartBtn reloads the page. Also, make sure you include an isValidCharacter function to check if a key is a valid character.
 showBtn.addEventListener('click', () => {
 Toastify({
 text: `Alright fine! the answer is ${secretWord}`,
 duration: 2500,
 className: "alert",
 }).showToast();
 })
 restartBtn.addEventListener('click', () => {
 location.reload();
 })
 function isValidCharacter(val) {
 return (val.match(/^[a-zA-Z]+$/) && (val.length === 1 || val === "Backspace"))
 }
Outside the main function, create a renderBox function and provide three parameters: row (the row number), box (the box index within the row), and data (the text content to update).
function renderBox(row, box, data) {
 [...document.querySelector(`.row-${row}`).children][box].innerText = data;
}
Handling Keyboard Input With a Function
To handle the key inputs and to update the board, create an insertKey function with a key parameter. The function should behave according to the parameter passed.
function insertKey(key) {
 if (key === "Backspace".toUpperCase() && currentRow < boardContent.length) {
 boardContent[currentRow][currentBox] = 0;
 if (currentBox !== 0) {
 currentBox--;
 renderBox(currentRow + 1, currentBox, "");
 }
 } else {
 if (currentRow < boardContent.length) {
 boardContent[currentRow][currentBox] = key;
 renderBox(currentRow + 1, currentBox, key);
 currentBox++;
 }
 if (currentRow < boardContent.length && boardContent[currentRow][currentBox] !== 0) {
 evaluate(currentRow, key);
 currentBox = 0;
 currentRow++;
 }
 }
}
Evaluating the Player’s Guess
Create an evaluate function that accepts a row parameter. This function is responsible for evaluating the player's guess.
function evaluate(row){
}
Every game has a Show Answer button that appears only after the user has made four guesses. So, in the function, implement the functionality that does just that:
if (currentRow === 4) {
 showBtn.removeAttribute('disabled')
}
Then define the guess variable and an answer variable that checks if the letters are in the correct position.
let guess = boardContent[row].join('').toUpperCase();
let answer = secretWord.split("");
The tile coloring algorithm will come in handy here. Recall that a tile or letter should be green if it is in the word and in the correct spot.
If the tile is in the word but in the wrong spot, the tile is yellow and finally, the grey color is for tiles that are not in the word.
let colors = guess
 .split("")
 .map((letter, idx) => letter == answer[idx] ? (answer[idx] = false) : letter)
 .map((letter, idx) =>
 letter
 ? (idx = answer.indexOf(letter)) < 0
 ? "grey"
 : (answer[idx] = "yellow")
 : "green"
);
The given code block above performs an element-by-element comparison between the guess array and the answer array. Based on the results of this comparison, the code updates the colors array.
Next, define a setColors function that can take in the colors array as a parameter and color the tiles appropriately:
function setColor(colors) {
 colors.forEach((color, index) => {
 document.querySelector(`button[data-key=${guess[index].toUpperCase()}]`).style.backgroundColor = color;
 document.querySelector(`button[data-key=${guess[index].toUpperCase()}]`).style.color= "black";
 [...document.querySelector(`.row-${row + 1}`).children][index].style.backgroundColor = color;
 })
}
The game is now complete. All you have to do now is call the getNewWord function, and you are good to go.
getNewWord();
Congratulations, you just recreated Wordle.
Take Your JavaScript Skills to the Next Level by Recreating Games
Learning a new language as a beginner is not easy. Recreating games like Tic-tac-toe, Hangman, and Wordle in a language like JavaScript, can help beginners master the concepts of the language by putting them in practice.