A design pattern is a template that solves a commonly reoccurring problem in software design.
The state pattern is a behavioral pattern that lets an object alter its behavior when its internal state changes.
Here you will learn how to use the state pattern in TypeScript.
What Is the State Pattern?
The state design pattern is closely related to a finite-state machine, which describes a program that exists in a finite number of states at any given moment and behaves differently within each state.
There are limited, predetermined rules—transitions—that govern the other states that each state may switch to.
For context, in an online store, if a customer’s shopping order has been “delivered,” it can’t be “canceled” because it has already been “delivered”. “Delivered” and “Canceled” are finite states of the order, and the order will behave differently based on its state.
The state pattern creates a class for each possible state, with state-specific behavior contained in each class.
An Example State-Based Application
For example, assume you are creating an application that tracks the states of an article for a publishing company. An article can either be pending approval, drafted by a writer, edited by an editor, or published. These are the finite states of an article to be published; within each unique state, the article behaves differently.
You can visualize the different states and transitions of the article application with the state diagram below:
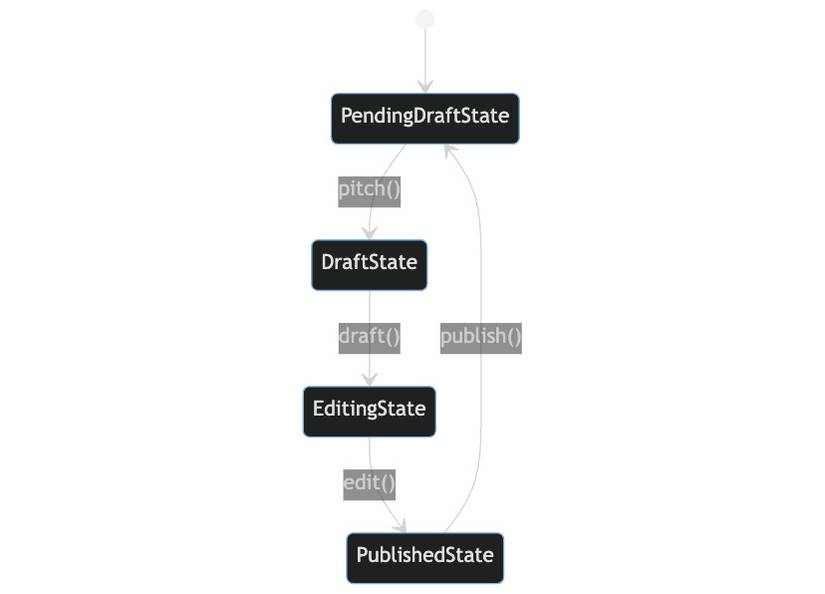
Implementing this scenario in code, you'd first have to declare an interface for the Article:
interface ArticleInterface {
 pitch(): void;
 draft(): void;
 edit(): void;
 publish(): void;
}
This interface will have all the possible states of the application.
Next, create an application that implements all the interface methods:
// Application
class Article implements ArticleInterface {
 constructor() {
 this.showCurrentState();
 }

 private showCurrentState(): void {
 //...
 }

 public pitch(): void {
 //...
 }

 public draft(): void {
 //...
 }

 public edit(): void {
 //...
 }

 public publish(): void {
 //...
 }
}
The private showCurrentState method is a utility method. This tutorial uses it to show what happens in each state. It is not a required part of the state pattern.
Handling State Transitions
Next, you'll need to handle the state transitions. Handling the state transition in your application class would require many conditional statements. This would result in repetitive code that’s harder to read and maintain. To solve this problem, you can delegate the transition logic for each state to its own class.
Before you write each state class, you should create an abstract base class to ensure any method called in an invalid state throws an error.
For example:
abstract class ArticleState implements ArticleInterface {
 pitch(): ArticleState {
 throw new Error("Invalid Operation: Cannot perform task in current state");
 }

 draft(): ArticleState {
 throw new Error("Invalid Operation: Cannot perform task in current state");
 }

 edit(): ArticleState {
 throw new Error("Invalid Operation: Cannot perform task in current state");
 }

 publish(): ArticleState {
 throw new Error("Invalid Operation: Cannot perform task in current state");
 }
}
In the base class above, every method throws an error. Now, you have to override each method by creating specific classes that extends the base class for each state. Each specific class will contain state-specific logic.
Each application has an idle state, which initializes the application. The idle state for this application will set the application to the draft state.
For example:
class PendingDraftState extends ArticleState {
 pitch(): ArticleState {
 return new DraftState();
 }
}
The pitch method in the class above initializes the application by setting the current state to DraftState.
Next, override the rest of the methods like so:
class DraftState extends ArticleState {
 draft(): ArticleState {
 return new EditingState();
 }
}
This code overrides the draft method and returns an instance of the EditingState.
class EditingState extends ArticleState {
 edit(): ArticleState {
 return new PublishedState();
 }
}
The code block above overrides the edit method and returns an instance of PublishedState.
class PublishedState extends ArticleState {
 publish(): ArticleState {
 return new PendingDraftState();
 }
}
The code block above overrides the publish method and puts the application back in its idle state, PendingDraftState.
Then, you need to allow the application to change its state internally by referencing the current state through a private variable. You can do this by initializing the idle state inside your application class and storing the value to a private variable:
private state: ArticleState = new PendingDraftState();
Next, update the showCurrentState method to print the current state value:
private showCurrentState(): void {
 console.log(this.state);
}
The showCurrentState method logs the current state of the application to the console.
Finally, reassign the private variable to the current state instance in each of your application's methods.
For example, update your applications pitch method to the code block below:
public pitch(): void {
 this.state = this.state.pitch();
 this.showCurrentState();
}
In the code block above, the pitch method changes the state from the current state to the pitch state.
Similarly, all the other methods will change the state from the current application state to their respective states.
Update your application methods to the code blocks below:
The draft method:
public draft(): void {
 this.state = this.state.draft();
 this.showCurrentState();
}
The edit method:
public edit(): void {
 this.state = this.state.edit();
 this.showCurrentState();
}
And the publish method:
public publish(): void {
 this.state = this.state.publish();
 this.showCurrentState();
}
Using the Finished Application
Your finished application class should be similar to the code block below:
// Application
class Article implements ArticleInterface {
 private state: ArticleState = new PendingDraftState();

 constructor() {
 this.showCurrentState();
 }

 private showCurrentState(): void {
 console.log(this.state);
 }

 public pitch(): void {
 this.state = this.state.pitch();
 this.showCurrentState();
 }

 public draft(): void {
 this.state = this.state.draft();
 this.showCurrentState();
 }

 public edit(): void {
 this.state = this.state.edit();
 this.showCurrentState();
 }

 public publish(): void {
 this.state = this.state.publish();
 this.showCurrentState();
 }
}
You can test the state transitions by calling the methods in the correct sequence. For example:
const docs = new Article(); // PendingDraftState: {}

docs.pitch(); // DraftState: {}
docs.draft(); // EditingState: {}
docs.edit(); // PublishedState: {}
docs.publish(); // PendingDraftState: {}
The code block above works because the application’s states transitioned appropriately.
If you try to change the state in a way that is not allowed, for example, from the pitch state to the edit state, the application will throw an error:
const docs = new Article(); // PendingDraftState: {}
docs.pitch() // DraftState: {}
docs.edit() // Invalid Operation: Cannot perform task in current state
You should only use this pattern when:
- You are creating an object that behaves differently depending on its current state.
- The object has many states.
- The state-specific behavior changes frequently.
Advantages and Trade-Offs of the State Pattern
This pattern eliminates bulky conditional statements and maintains the single responsibility and open/closed principles. But it can be overkill if the application has few states or its states aren’t particularly dynamic.