The acronym REST stands for REpresentational State Transfer, while API stands for Application Programming Interface. Together, they refer to a REST API. A REST API is a service that transfers requests and responses between two software systems, on a REST architecture.
The REST architecture builds web services that are accessible through URLs using one of four request verbs: POST, GET, PUT, and DELETE. So, you could say a REST API is software that allows you to create, read, update, and delete resources via URLs.
You can learn how to create a REST API using Spring Boot.
Initializing the Spring Boot Application
The first thing you should do is familiarize yourself with the basics of Spring and set up a Spring Boot application. You’ll need to alter the dependencies, though. In addition to the web dependency, you’ll need to get the Spring Data Java Persistent API (JPA) dependency, and the driver for the database you intend to use (this application will use MySQL).
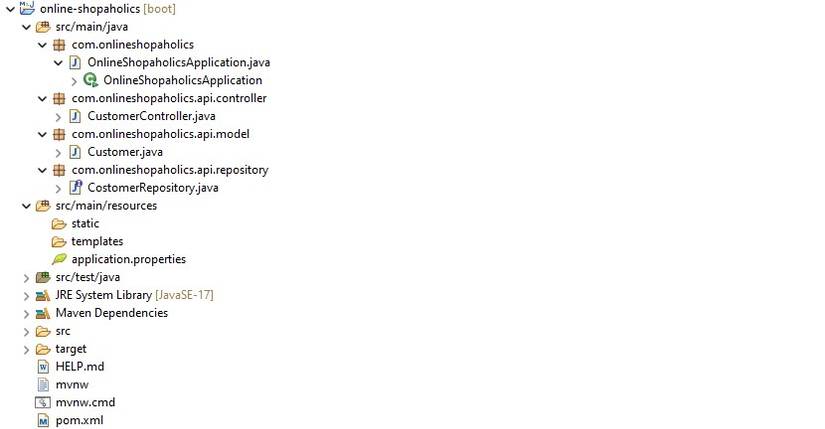
For this REST API, you will need a controller, a model, and a repository. So, the REST API will have the following file structure:
Creating the Model
The first class you’ll need to create is the customer model, which stores the data logic.
package com.onlineshopaholics.api.model;
import jakarta.persistence.Column;
import jakarta.persistence.Entity;
import jakarta.persistence.GeneratedValue;
import jakarta.persistence.GenerationType;
import jakarta.persistence.Id;
import jakarta.persistence.Table;
@Table(name="customer")
@Entity
public class Customer {
 @Id
 @GeneratedValue(strategy = GenerationType.AUTO)
 private Integer id;
 @Column(name="customername")
 private String name;
 private String email;
 public Integer getId() {
 return id;
 }
 public void setId(Integer id) {
 this.id = id;
 }
 public String getName() {
 return name;
 }
 public void setName(String name) {
 this.name = name;
 }
 public String getEmail() {
 return email;
 }
 public void setEmail(String email) {
 this.email = email;
 }
}
From the customer class above, you’ll see that each customer will have an id, name, and email. You’ll also notice several annotations that serve different purposes.
- @Entity: Declares the customer class as a JPA entity. This means that JPA will use the fields in the class to create columns in a relational database.
- @Table: Designates the name of the table that will map to the customer model class.
- @Id: Designates a property that will uniquely identify the entity in the database.
- @GeneratedValue and @GenerationType: These work together to specify an auto-generate strategy for the field that it associates with. So, the id field will automatically generate a unique value each time you create a new customer.
- @Column: Designates a property that maps to a column in the database. So, the name property will map to a customername column in the database.
Creating the Repository
This repository will allow you to interact with the customer data in the database.
package com.onlineshopaholics.api.repository;
import org.springframework.data.repository.CrudRepository;
import com.onlineshopaholics.api.model.Customer;
public interface CustomerRepository extends CrudRepository<Customer, Integer>{}
The customer repository extends Spring’s CrudRepositoy<T,ID> interface, passing it the Customer model class along with the type of the unique identifier for the entity, Integer.
The CrudRepository interface provides access to over 10 operations, including the generic CRUD methods you’ll need for the REST API. So, because the CrudRepository already defines the methods you’ll need, there’s no need to explicitly declare them in the CustomerRepository interface.
Creating the Controller
The controller allows you to update the data in your database using the model and the repository.
package com.onlineshopaholics.api.controller;
import java.util.Optional;
import org.springframework.beans.factory.annotation.Autowired;
import org.springframework.web.bind.annotation.DeleteMapping;
import org.springframework.web.bind.annotation.GetMapping;
import org.springframework.web.bind.annotation.PathVariable;
import org.springframework.web.bind.annotation.PostMapping;
import org.springframework.web.bind.annotation.PutMapping;
import org.springframework.web.bind.annotation.RequestBody;
import org.springframework.web.bind.annotation.RequestMapping;
import org.springframework.web.bind.annotation.RequestParam;
import org.springframework.web.bind.annotation.ResponseBody;
import org.springframework.web.bind.annotation.RestController;
import com.onlineshopaholics.api.model.Customer;
import com.onlineshopaholics.api.repository.CustomerRepository;
@RestController
@RequestMapping("/customers")
public class CustomerController {
 @Autowired
 private CustomerRepository customerRepository;
 // create new customer
 @PostMapping("/add")
 public Customer addNewCustomer(@RequestBody Customer newCustomer){
 Customer user = new Customer();
 user.setName(newCustomer.getName());
 user.setEmail(newCustomer.getEmail());
 customerRepository.save(user);
 return user;
 }
 // view all customers
 @GetMapping("view/all")
 public @ResponseBody Iterable<Customer> getAllCustomers(){
 return customerRepository.findAll();
 }
 // view specific customer
 @GetMapping("view/{id}")
 public Optional<Customer> getCustomer(@PathVariable Integer id) {
 return customerRepository.findById(id);
 }
 // update an existing customer
 @PutMapping("/edit/{id}")
 public String update( @RequestBody Customer updateCustomer, @PathVariable Integer id) {
 return customerRepository.findById(id)
 .map(customer -> {
 customer.setName(updateCustomer.getName());
 customer.setEmail(updateCustomer.getEmail());
 customerRepository.save(customer);
 return "Customer details have been successfully updated!";
 }).orElseGet(() -> {
 return "This customer doesn't exist";
 });
 }
 // delete customer
 @DeleteMapping("delete/{id}")
 public String delete(@PathVariable("id")Integer id) {
 customerRepository.deleteById(id);
 return "Customer has been successfully deleted!";
 }
}
The controller above equips the REST API with CRUD operations, by using five of the CrudRepository<T,ID> interface methods (each assigned to a specific method). The controller also uses several important Spring annotations that allow it to perform its functions.
- @RestController: This annotation serves two purposes. It marks a class for discovery by component scanning. It also tells Spring to write the return value for all the methods, in this class, in the response body.
- @RequestMapping: Defines the baseline request pattern that the controller will handle. So, this controller will handle all requests to “/customers”.
- @ResponseBody: Allows a method to return an entire entity.
- @RequestBody: Allows you to convert the request body to an object.
- @RequestParam: Allows you to isolate one property from an object.
- @PathVariable: Allows you to map a request value to a placeholder. It maps the ID given to the delete method with an existing value in the database.
- @PostMapping: Allows you to create resources.
- @GetMapping: Allows you to read resource data.
- @PutMapping: Allows you to update resources.
- @DeleteMapping: Allows you to delete resources.
Connecting the Database to Your Application
To connect a database to any Spring application, you’ll need to use the application.properties file under the resources folder. This file is initially empty, so you can populate it with the appropriate properties for the database that you intend to use. This application will use a MySQL database so, the application.properties file will contain the following data:
spring.jpa.hibernate.ddl-auto=update
spring.jpa.open-in-view=false
spring.datasource.url=jdbc:mysql://${MYSQL_HOST:localhost}:3306/onlineshopaholics
spring.datasource.username=root
spring.datasource.password=securepw
spring.datasource.driver-class-name=com.mysql.cj.jdbc.Driver
The data above shows that this application will be connecting to a MySQL database called onlineshopaholics, with a “root” username and “securepw” as the password. Your next step is to create the database and customer table in MySQL.
Creating Requests
There are many tools that you can use to test your REST API. Postman is a popular REST API testing tool, and you can use it to test the simple API you have built. After creating the MySQL table and running the Spring application, you can launch Postman and experiment with the four request verbs.
POST Request
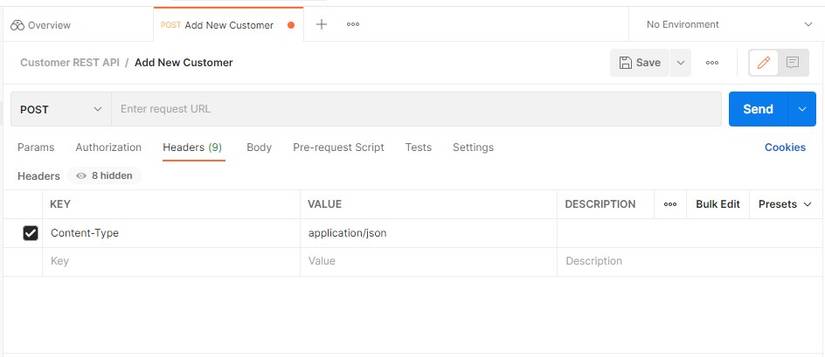
This request will allow you to create new customers using the REST API. To complete this request, you’ll need to go to the headers section of your post request and create a new header (Content-Type). You should set this header’s value to application/json, as you’ll be creating new customers using JSON.
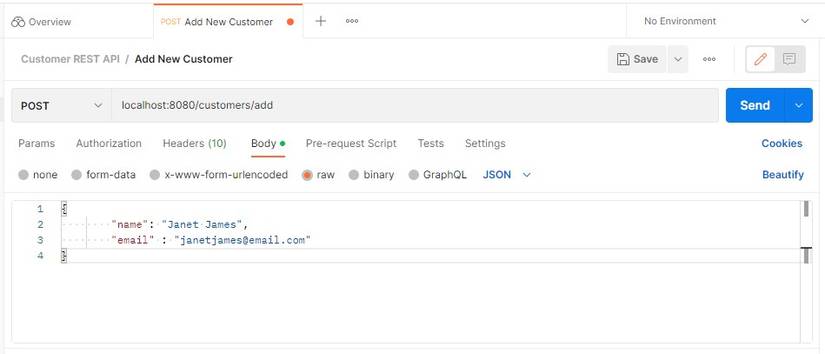
In the body of the request, you’ll need to change the type to raw and insert your JSON. Then you’ll need to insert the post URL:
Sending the request will return the following response:
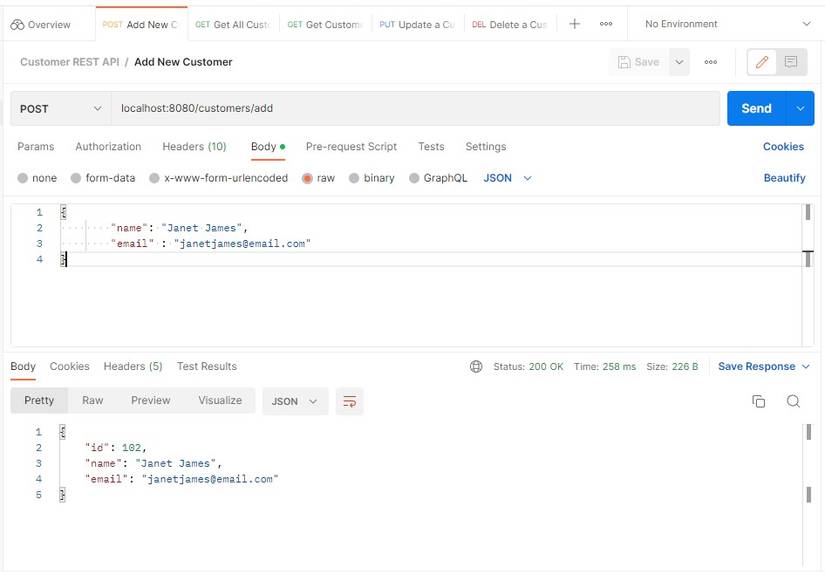
You can see that the request was successful, and the new customer also has an id.
GET Request
Now that you have a customer, you can view it with the get request that returns all customers:

Or each customer by id:

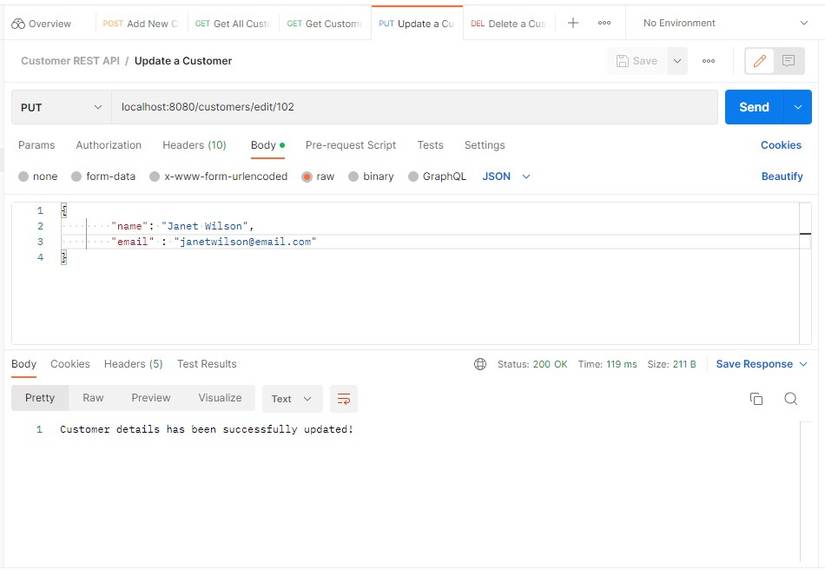
PUT Request
You can update Janet with a new surname and email.
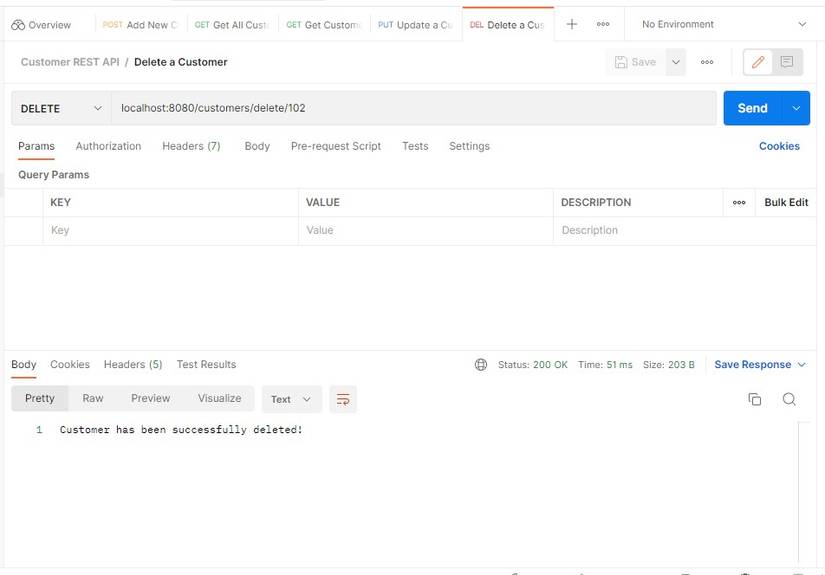
DELETE Request
You can also delete Janet from the database.
Test Your Spring REST API Using JUnit
With Spring Boot, you can test any application (including REST APIs) using Spring’s test file. Software testing is important to Spring Boot. Each initialized Spring application uses JUnit for testing and allows you to send requests to your REST APIs.