An expense tracker is an essential tool that helps individuals and businesses manage their financial transactions. With an expense tracker, you can create budgets, categorize expenses, and analyze spending patterns.
Find out how to build an expense tracker app, with a cross-platform GUI, in Python.
The Tkinter, CSV, and Matplotlib Modules
To build this expense tracker, you’ll need the Tkinter, CSV, and Matplotlib modules.
Tkinter lets you create desktop applications. It offers a variety of widgets like buttons, labels, and text boxes that make it easy to develop apps.
The CSV module is a built-in Python library that provides functionality for reading and writing CSV (Comma-Separated Values) files.
With Matplotlib, you can build interactive visualizations such as graphs, plots, and charts. Using it with modules like OpenCV can help you master image enhancement techniques too.
To install these modules, run:
pip install tk matplotlib
Define the Structure of the Expense Tracker App
You can find this project's source code in its GitHub repository.
Begin by importing the necessary modules. Define a class, ExpenseTrackerApp. Set the title and the dimensions. Define a list to store the expenses and another for the categories. Initialize a StringVar named category_var and set its initial value to the first category in the categories list. Finish up by calling the create_widgets method.
import tkinter as tk
from tkinter import ttk, messagebox, simpledialog
import csv
import matplotlib.pyplot as plt
class ExpenseTrackerApp(tk.Tk):
 def __init__(self):
 super().__init__()
 self.title("Expense Tracker")
 self.geometry("1300x600")
 self.expenses = []
 self.categories = [
 "Food",
 "Transportation",
 "Utilities",
 "Entertainment",
 "Other",
 ]
 self.category_var = tk.StringVar(self)
 self.category_var.set(self.categories[0])
 self.create_widgets()
The create_widgets method is responsible for adding UI components to your app. Create a frame for the expense record's labels and entries. Create six labels: one each for the heading, expense amount, item description, category, date, and total expense. Set each one’s parent element, the text it should display, and its font style.
Create three entry widgets and a Combobox to get the corresponding input. For the entry widgets, set the parent element, the font style, and the width. Define the parent element, the list of values, the font style, and the width for the Combobox. Bind category_var to it, so the selected value is automatically updated.
 def create_widgets(self):
 self.label = tk.Label(
 self, text="Expense Tracker", font=("Helvetica", 20, "bold")
 )
 self.label.pack(pady=10)
 self.frame_input = tk.Frame(self)
 self.frame_input.pack(pady=10)
 self.expense_label = tk.Label(
 self.frame_input, text="Expense Amount:", font=("Helvetica", 12)
 )
 self.expense_label.grid(row=0, column=0, padx=5)
 self.expense_entry = tk.Entry(
 self.frame_input, font=("Helvetica", 12), width=15
 )
 self.expense_entry.grid(row=0, column=1, padx=5)
 self.item_label = tk.Label(
 self.frame_input, text="Item Description:", font=("Helvetica", 12)
 )
 self.item_label.grid(row=0, column=2, padx=5)
 self.item_entry = tk.Entry(self.frame_input, font=("Helvetica", 12), width=20)
 self.item_entry.grid(row=0, column=3, padx=5)
 self.category_label = tk.Label(
 self.frame_input, text="Category:", font=("Helvetica", 12)
 )
 self.category_label.grid(row=0, column=4, padx=5)
 self.category_dropdown = ttk.Combobox(
 self.frame_input,
 textvariable=self.category_var,
 values=self.categories,
 font=("Helvetica", 12),
 width=15,
 )
 self.category_dropdown.grid(row=0, column=5, padx=5)
 self.date_label = tk.Label(
 self.frame_input, text="Date (YYYY-MM-DD):", font=("Helvetica", 12)
 )
 self.date_label.grid(row=0, column=6, padx=5)
 self.date_entry = tk.Entry(self.frame_input, font=("Helvetica", 12), width=15)
 self.date_entry.grid(row=0, column=7, padx=5)
Define five buttons: Add Expense, Edit Expense, Delete Expense, Save Expenses, and Show Expenses Chart. Set the parent element of each, the text it should display, and the command it will run when you click it. Create a frame for the listbox. Set the parent element, the font style, and the width.
Create a vertical scroll bar and place it on the right side of the frame. Use it to scroll through the contents of the listbox. Organize all the elements with necessary padding and call update_total_label().
 self.add_button = tk.Button(self, text="Add Expense", command=self.add_expense)
 self.add_button.pack(pady=5)
 self.frame_list = tk.Frame(self)
 self.frame_list.pack(pady=10)
 self.scrollbar = tk.Scrollbar(self.frame_list)
 self.scrollbar.pack(side=tk.RIGHT, fill=tk.Y)
 self.expense_listbox = tk.Listbox(
 self.frame_list,
 font=("Helvetica", 12),
 width=70,
 yscrollcommand=self.scrollbar.set,
 )
 self.expense_listbox.pack(pady=5)
 self.scrollbar.config(command=self.expense_listbox.yview)
 self.edit_button = tk.Button(
 self, text="Edit Expense", command=self.edit_expense
 )
 self.edit_button.pack(pady=5)
 self.delete_button = tk.Button(
 self, text="Delete Expense", command=self.delete_expense
 )
 self.delete_button.pack(pady=5)
 self.save_button = tk.Button(
 self, text="Save Expenses", command=self.save_expenses
 )
 self.save_button.pack(pady=5)
 self.total_label = tk.Label(
 self, text="Total Expenses:", font=("Helvetica", 12)
 )
 self.total_label.pack(pady=5)
 self.show_chart_button = tk.Button(
 self, text="Show Expenses Chart", command=self.show_expenses_chart
 )
 self.show_chart_button.pack(pady=5)
 self.update_total_label()
Define the Functionality of the Expense Tracker
Define a method, add_expense. Retrieve the value of the expense, item, category, and date. If the value of the expense and date are valid, add the expense to the expenses list. Insert this record into the listbox and format it appropriately. Once inserted, delete the user input in the entry boxes for new input.
Otherwise, display a warning that the values of expense and date cannot be empty. Call update_total_label.
 def add_expense(self):
 expense = self.expense_entry.get()
 item = self.item_entry.get()
 category = self.category_var.get()
 date = self.date_entry.get()
 if expense and date:
 self.expenses.append((expense, item, category, date))
 self.expense_listbox.insert(
 tk.END, f"{expense} - {item} - {category} ({date})"
 )
 self.expense_entry.delete(0, tk.END)
 self.item_entry.delete(0, tk.END)
 self.date_entry.delete(0, tk.END)
 else:
 messagebox.showwarning("Warning", "Expense and Date cannot be empty.")
 self.update_total_label()
Define a method, edit_expense. Retrieve the index of the selected record and get the expense. Open a dialog box asking to enter the expense. If the user provided a new expense, alter the expenses list accordingly. Call the refresh_list and update_total_label.
 def edit_expense(self):
 selected_index = self.expense_listbox.curselection()
 if selected_index:
 selected_index = selected_index[0]
 selected_expense = self.expenses[selected_index]
 new_expense = simpledialog.askstring(
 "Edit Expense", "Enter new expense:", initialvalue=selected_expense[0]
 )
 if new_expense:
 self.expenses[selected_index] = (
 new_expense,
 selected_expense[1],
 selected_expense[2],
 selected_expense[3],
 )
 self.refresh_list()
 self.update_total_label()
Define a method, delete_expense. Retrieve the index of the selected record and get the expense. Pass the index of the entry you want to delete. Delete that entry from the listbox and call the update_total_label.
 def delete_expense(self):
 selected_index = self.expense_listbox.curselection()
 if selected_index:
 selected_index = selected_index[0]
 del self.expenses[selected_index]
 self.expense_listbox.delete(selected_index)
 self.update_total_label()
Define a method, refresh_list. Delete the existing record and add a new record with the updated values instead.
 def refresh_list(self):
 self.expense_listbox.delete(0, tk.END)
 for expense, item, category, date in self.expenses:
 self.expense_listbox.insert(
 tk.END, f"{expense} - {item} - {category} ({date})"
 )
Define a method, update_total_label. Calculate the sum of all expenses in the list and update it on the label. Define another method, save_expenses. Create and open a CSV file named expenses.csv in write mode. Add column headers to the CSV file as the first row. Iterate over each expense record, and write it as a row.
 def update_total_label(self):
 total_expenses = sum(float(expense[0]) for expense in self.expenses)
 self.total_label.config(text=f"Total Expenses: USD {total_expenses:.2f}")
 def save_expenses(self):
 with open("expenses.csv", "w", newline="") as csvfile:
 writer = csv.writer(csvfile)
 column_headers = ["Expense Amount", "Item Description", "Category", "Date"]
 writer.writerow(column_headers)
 for expense in self.expenses:
 writer.writerow(expense))
Define a method, show_expenses_chart. Define a dictionary, category_totals. Iterate through the expenses list and convert the expense amount to float. Store the total expense amount for each category. If the category already exists in the dictionary, increment the total by the current expense amount. Otherwise, create a new entry with the current expense amount.
 def show_expenses_chart(self):
 category_totals = {}
 for expense, _, category, _ in self.expenses:
 try:
 amount = float(expense)
 except ValueError:
 continue
 category_totals[category] = category_totals.get(category, 0) + amount
Extract the categories and the expenses into two different lists. Create a new figure for the plot with the specified size. Generate a pie chart, using the expenses list as the data and the category list as the label. The autopct parameter specifies the format for displaying the percentage values on the chart slices. Pass equal to plt.axis to ensure that you draw the pie chart as a circle. Set the title of the pie chart and display it.
 categories = list(category_totals.keys())
 expenses = list(category_totals.values())
 plt.figure(figsize=(8, 6))
 plt.pie(
 expenses, labels=categories, autopct="%1.1f%%", startangle=140, shadow=True
 )
 plt.axis("equal")
 plt.title(f"Expense Categories Distribution (USD)")
 plt.show()
Create an instance of the ExpenseTrackerApp class. The mainloop() function tells Python to run the Tkinter event loop and listen for events until you close the window.
if __name__ == "__main__":
 app = ExpenseTrackerApp()
 app.mainloop()
Test Different Features of the Python Expense Tracker
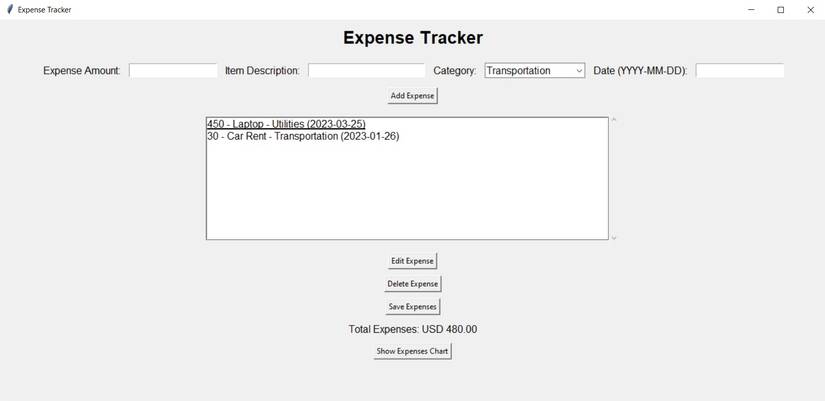
When you run the program, it will launch an application window. This has input fields to record the expense, the item description, the category, and the date. Enter some data and click the Add Expense button; you’ll see the record gets added to the list box. The program also updates the total expenses.

Select a record and click the Edit Expenses button. A dialog box appears, letting you update the individual record.

Clicking the Delete Expenses button to remove the selected record.
On hitting the Show Expenses Chart button, the program displays a pie chart. The pie chart displays the expense for each category along with its name and percentage.

Improving the Expense Tracker
You can add search functionality to let users find specific expenses based on their description, amount, category, or date. You can add an option to sort and filter records. Localize the app to support different languages and currency formats.
You could also extend the app with support for notifications. Let the user set up alerts to prevent them from exceeding budget limits or highlight any unusual spending.