From business reports to photography portfolios, you'll often come across a need to use images in PDFs. An image-to-PDF converter can help streamline the process. While there are many free tools available online, their need for you to upload images may be a privacy or security concern.
Instead, you can build an offline image-to-PDF converter using Python. Select multiple images in JPG or PNG format, get a preview, and convert them into a PDF while maintaining the original image size.
The Tkinter, Pillow, and ReportLab Module
Tkinter is the standard GUI library for Python. It offers a variety of widgets like buttons, labels, and text boxes that make it easy to develop apps like a music player or a weight conversion tool. To install Tkinter in your system, open a terminal, and type:
pip install tkinterThe Pillow module is a powerful Python imaging library that makes it easy to perform operations on images such as resizing, cropping, and filtering. Integrating this with OpenAI API and DALL·E 2, you can generate images using a text prompt.
To install Pillow, run this command:
pip install PillowReportLab is an open-source Python library for generating PDFs and graphics. It has various tools you can use to generate documents with images, text, and tables which makes it useful to generate reports via programming. With this, you can build business reports, invoices, and certificates while also adding a text watermark. To install ReportLab:
pip install reportlabDefine the Structure of the Image-to-PDF Converter
You can find the entire source code for building the image-to-PDF converter using Python in this GitHub repository.
Import the necessary modules and create a class named ImageToPDFConverter. Define a constructor method that initializes the class and takes Tkinter's root window object as an argument. Initialize an empty list to store the paths of the images the user selects. Set the title and dimensions of the application. Create two buttons named Select Images and Convert to PDF.
Pass the window you want to place the button in, the text they should display, the command that they should execute when clicked, and the font format they should apply. Organize the buttons using the pack() method and give them a padding of 10 in the vertical direction.
import tkinter as tk
from tkinter import filedialog, messagebox
from PIL import Image, ImageTk
from reportlab.lib.pagesizes import landscape
from reportlab.pdfgen import canvas
class ImageToPDFConverter:
 def __init__(self, root):
 self.root = root
 self.image_paths = []
 self.root.title("Image to PDF Converter")
 self.root.geometry("750x600")
 self.select_images_button = tk.Button(self.root, text="Select Images", command=self.select_images, font=("Helvetica", 12),)
 self.select_images_button.pack(pady=10)
 self.convert_to_pdf_button = tk.Button(self.root, text="Convert to PDF", command=self.convert_to_pdf,font=("Helvetica", 12),)
 self.convert_to_pdf_button.pack(pady=10)
Define a label by passing it the parent window to place it in, the text it should display, the font format it should use, and a vertical padding of 10 (pixels).
Similarly, define a frame to preview the selected image and set its parent window, width, and height. Organize it with a padding of 10.
 self.select_images_label = tk.Label(self.root, text="Select Images", font=("Helvetica", 14))
 self.select_images_label.pack(pady=10)
 self.preview_frame = tk.Frame(self.root, width=380, height=200)
 self.preview_frame.pack(pady=10)
Selecting the Image and Creating a Preview
Define a method, select_images(). Use Tkinter's filedialog class to open a dialog box to select multiple images and store them in the images_path list. Pass the initial directory the dialog box should open, the title it should display, and the file types it allows for selection.
Define a loop that iterates over all the paths of the images the user selected. Use Pillow's open() method to open the image file and pass the maximum dimension it should possess to the resize method. Convert this PIL image to PhotoImage that is compatible with Tkinter. Create a label that resides in the preview frame you created earlier and display the image. Use the grid manager to organize the images in a grid layout with three columns.
 def select_images(self):
 self.image_paths = filedialog.askopenfilenames(initialdir="/", title="Select Images", filetypes=(("Image Files", "*.jpg *.png"),))
 for i, image_path in enumerate(self.image_paths):
 image = Image.open(image_path)
 image = self.resize_image(image, width=150, height=150)
 photo = ImageTk.PhotoImage(image)
 label = tk.Label(self.preview_frame, image=photo)
 label.image = photo
 label.grid(row=i // 3, column=i % 3, padx=10, pady=10)
Define a method, resize_image() that resizes the image taking into account the image's dimension and the maximum dimension you defined earlier. Calculate the aspect ratio and use it to set the new width and height. Use PIL's resize method to resize the image keeping the aspect ratio intact. Use bilinear interpolation as resampling for a smoother result.
 def resize_image(self, image, width, height):
 aspect_ratio = min(width / float(image.size[0]), height / float(image.size[1]))
 new_width = int(aspect_ratio * image.size[0])
 new_height = int(aspect_ratio * image.size[1])
 resized_image = image.resize((new_width, new_height), resample=Image.Resampling.BILINEAR)
 return resized_image
Converting the Images Into PDF
Define a function, convert_to_pdf(). Use the filedialog to ask for the destination path for the PDF. Set the default extension and file type as .pdf. Use ReportLab's canvas module to draw a landscape page. Iterate over the path of the images, open them, set the dimensions of the PDF's page the same as that of the image, and draw the image from the top left corner with the specified dimensions.
The showPage() method allows the PDF to move to the next page. Once the program completes this process, save the PDF and show a message box along with the path.
 def convert_to_pdf(self):
 pdf_path = filedialog.asksaveasfilename(defaultextension=".pdf", filetypes=(("PDF Files", "*.pdf"),))
 c = canvas.Canvas(pdf_path, pagesize=landscape)
 for image_path in self.image_paths:
 image = Image.open(image_path)
 width, height = image.size
 c.setPageSize((width, height))
 c.drawImage(image_path, 0, 0, width=width, height=height)
 c.showPage()
 c.save()
 messagebox.showinfo("Conversion Successful", f"PDF saved at {pdf_path}")
Create the Tkinter root window and pass it to the class instance. The mainloop() function tells Python to run the Tkinter event loop and listen for events until you close the window.
if __name__ == "__main__":
 root = tk.Tk()
 app = ImageToPDFConverter(root)
 root.mainloop()
Put all the code together and the image-to-PDF Converter is ready to use.
Example Output of Converting Images Into PDF Using Python
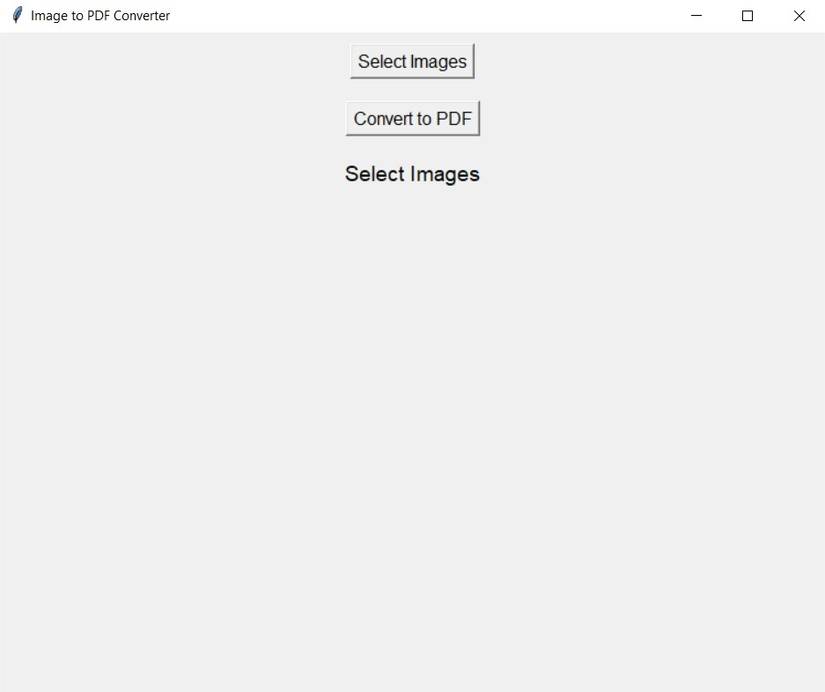
On running the app, you'll see a window with two buttons and a blank space instructing you to select the images.
On clicking the Select Images button, a window pops up asking you to choose the images. You can select any number of images in any combination.
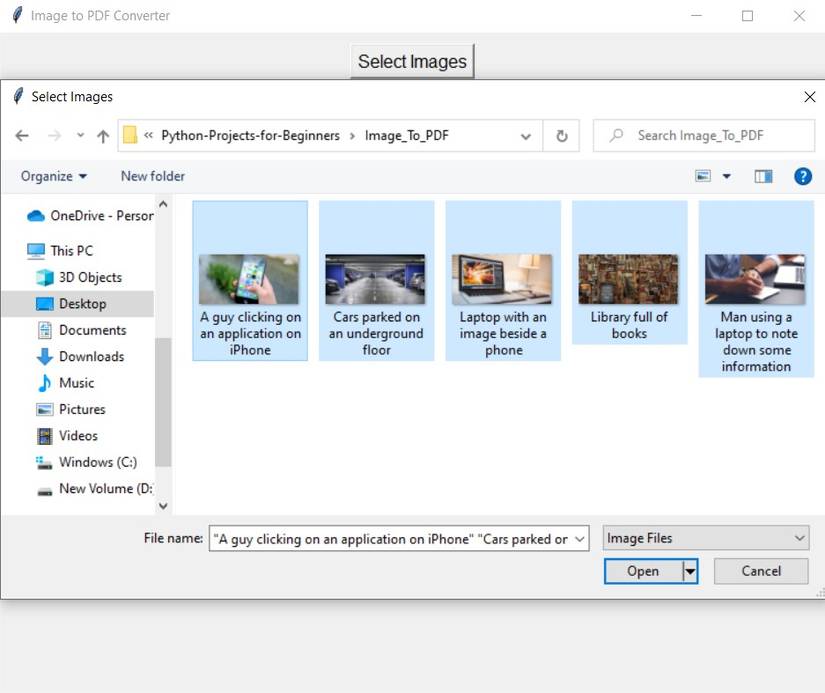
Once you have selected your desired images, you'll see a preview of them:

On clicking the Convert to PDF button, you can select the name and the path where you want to store the PDF file. Once the program finishes the conversion, it displays a message box saying it has saved the PDF followed by the path name. On opening the PDF you will find that the program has converted the images without changing their dimensions.

PDF Operations You Can Implement to Enhance Your Applications
You can build a full-fledged PDF application that performs operations such as merging, compressing, protecting, and unlocking PDFs. You can build a feature to split the PDF into multiple pages, rotate them, remove particular pages, sort it, and add page numbers.
You can experiment with other file formats as well for converting a document or a presentation into PDF. Several modules, like PyPDF2, PDFMiner, fpdf, and pdfrw, can help you achieve these more conveniently.