CLI (Command Line Interface) applications are simplistic text-based apps that run in the terminal to complete specific tasks. CLI applications play a crucial role in the workflow of almost every developer and IT professional.
They are mostly utility tools that interact with the operating system or applications that are either installed locally or available over the internet to perform a task according to the user’s input and directives.
Understanding CLI Applications
A command-line interface lets you interact with a program by typing lines of text. Many CLI programs run differently depending on the command you use to start them.
For example, the ls program displays file information and the contents of directories. You might run it like this:
ls -l /homeThis command includes:
- The name of the program: ls.
- An option (or flag). In this case, -l is an option that is short for "long" and produces more detailed information.
- An argument, /home. Here, the argument specifies a path to the directory to show information for.
While each program may define its own command-line interface, certain elements are common and in wide use. You should follow these standards so that someone who is familiar with a command-line interface will be able to use your programs easily.
What Is Commander.js?
Commander.js is a package that lets you build CLI apps in Node.js. It has a rich library of features that let you build a standard CLI application, carrying out much of the heavy work. You only have to define commands, options, and functionality for your CLI app.
Combining it with other packages such as Chalk.js for styling, you can quickly create a fully functional CLI app in Node.js.
Building a CLI Application in Node.js Using Commander.js
Consider an example CLI app, urbanary-cli, which looks up the meaning of words and social media abbreviations from the Urban Dictionary. You’ll learn how to create the CLI and publish it to the npm package registry so that others can install it.
Create a new folder and initialize a new Node.js project with the following commands:
mkdir urbanary-cli
cd urbanary-cli
npm init -y
This CLI will use Axios to send HTTP requests to the Urban Dictionary API. You can use Rapid API to check endpoints and view credentials.
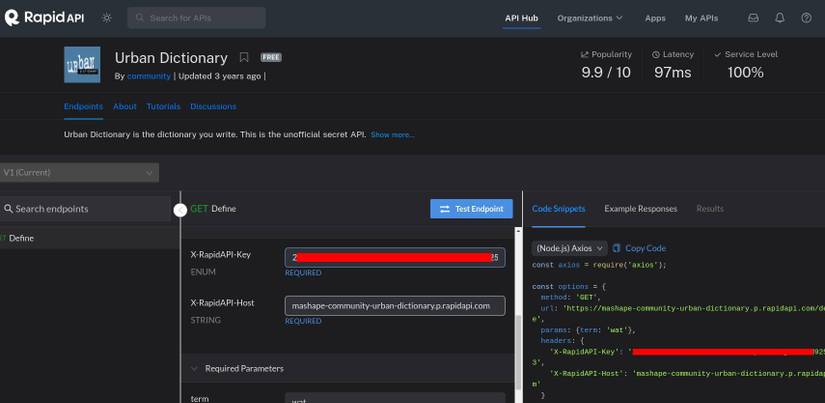
A Simple CLI With a Subcommand and Help
To start building your CLI, install Commander and Axios with the following command:
npm install commander axios
Create a new folder, bin, in your project directory and a new empty file, index.js:
mkdir bin
cd bin
touch index.js
The bin (short for "binary") folder is important because it holds the entry point file that Node calls when you run your CLI. The index.js file is this entry point file. Now, edit index.js file and start building your CLI with the Commander.js API.
First, import the program object from Commander:
const { program } = require('commander');
You’ll use the program object to define your program’s interface, including sub-commands, options, and arguments. The object has corresponding methods for each of these; for example, to define a sub-command, use the command method.
Define a find subcommand for the CLI to look up words from Urban Dictionary and add a description for it using the code below:
// index.js
program
 .command('find <word>')
 .description('find meaning of a word or abbreviation or slang')
This registers a find command, which expects a word after it, and a description for it. The use of angle brackets signifies that the word is a required argument; use square brackets instead ([]) to make it optional.
You should add a description because Commander.js uses it to generate help text. When you run the application with the help command, you’ll get a standard usage guide.
To test this, add the following:
program.parse()Then run the program and pass it the help command to get the output below:
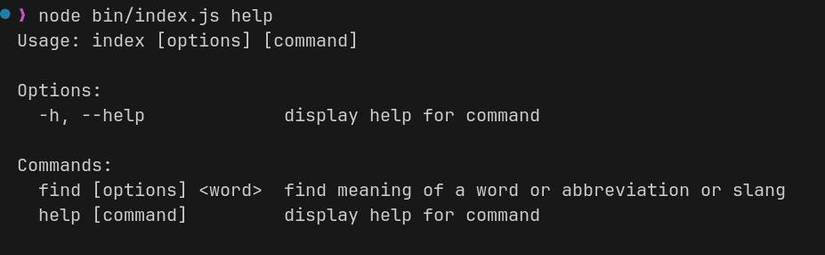
This is how any standard CLI application will display its help to users and, with Commander, you don’t have to worry about creating it yourself. The -h and --help options are useful for checking the usage guide for a command.
Defining Options and Preparing the Final Program
You also define an option by chaining the option method to the command definition.
Here’s how to define an option to include examples in the definitions of words:
program.option('-e, --example', "Display examples")
And here’s how to define an option specifying the number of definitions to return:
program.option(
 '-c, --count [amount]',
 'amount of definitions to display (max is 10)'
)
The option method accepts two string parameters, one for the option’s name (both short and long forms), and the other for its description. The extra [amount] argument in the count option is the value for the number of definitions to display.
Now, the last method to add is the action method. You will implement the find command’s functionality within this method. Add it to the chain so that your code now looks like this:
program
 .command('find <word>')
 .description('find meaning of a word or abbreviation or slang')
 .option('-e, --example', "Display examples")
 .option(
 '-c, --count [amount]',
 'amount of definitions to display (max is 10)'
 )
 .action(async (word, options) => {});
With this setup, here’s what a command to get three definitions of lol with examples will look like:
urbanary-cli find lol -e -c 3
Or, using the long form of each option:
urbanary-cli find lol --example --count 3
Check out Commander’s npm page to learn more about it and how to adapt its functions for your different use cases.
Implementing the Program’s Functionality
First, import Axios into your index.js file as follows:
const axios = require('axios');
Then, in the function body of action’s parameter, you can implement the logic to make requests to Urban Dictionary and display results according to your options.
Start by defining your request:
let requestOptions = {
 method: 'GET',
 URL: "https://mashape-community-urban-dictionary.p.rapidapi.com/define",
 params: { term: word },
 headers: {
 'X-RapidAPI-Key': YOUR_RAPID_API_KEY,
 'X-RapidAPI-Host': 'mashape-community-urban-dictionary.p.rapidapi.com'
 }
}
Then make the request to the API using Axios with the following code:
try {
 let resp = await axios.request(requestOptions);
 console.log(`Definitions for ${word} fetched`);
 wordData = resp.data.list;
} catch (err) {
 console.error(err.message)
}
The only property you need from the response data is the list property which holds definitions and examples.
Still in the try block, add this logic to handle options and display the results as follows:
if (options.example && options.count) {
 let cnt = 1;
 let definitions = wordData.slice(0, options.count);
 definitions.forEach((elem) => {
 console.log(`Definition ${cnt++}: ${elem.definition}`);
 console.log(`Example:\n${elem.example}\n`);
 });
} else if (options.count && !options.example) {
 let cnt = 1;
 let definitions = wordData.slice(0, options.count);
 definitions.forEach((elem) => {
 console.log(`Definition ${cnt++}: ${elem.definition}`);
 });
} else if (options.example) {
 console.log(`Definition: ${wordData[0].definition}`);
 console.log(`Example:\n${wordData[0].example}`);
} else {
 console.log(`Definition: ${wordData[0].definition}`);
}
This code evaluates the command arguments using if-else statements to determine how to display the output. If the example and count options are passed, it iterates through wordData and prints the specified number of definitions and examples with them.
If you pass only count, it displays that amount of definitions without examples. If you pass only example, it displays one definition with an example sentence. The else statement is the default behavior to print just the definition if you don’t pass any options.
The application is now ready, so the next step is to make it executable. Start by adding a shebang line to the beginning of your bin/index.js file so that you can run it as a standalone script:
#!/usr/bin/env nodeNext, open your package.json file, edit the value of the main property, and add a bin property after it like this:
"main": "./bin/index.js",
"bin": {
 "urbanary-cli": "./bin/index.js"
},
The key urbanary-cli, under bin is the command you'll enter in your terminal to run your application. So, be sure to use a befitting name there when building your command line applications.
Run npm install -g to install the application globally, and you will be able to execute the application as a command from your terminal.
The image below shows the installation process and a test command to find the meaning of lmk:

You can also publish it to the npm package registry by running npm publish in the terminal within the project directory. This makes it installable by anyone from anywhere using npm install.
It is easier to build and publish your application with Node.js, compared to when you build CLIs with technologies like Rust.
Build Functional CLI Applications With Node.js
Whether you’re working on a npm package and need a CLI utility to accompany it, or you just want to build a tool to improve your workflow as a developer. You have all you need to bring your idea to life with the Node.js Commander package.
You may also go further by using other libraries to create improved CLI experiences for your applications, Node.js is robust enough to serve your purposes without much hassle.