URL: https://linuxfr.org/news/developpement-web-fullstack-application-de-dessin-collaboratif
Title: Développement Web « fullstack », application de dessin collaboratif
Authors: nokomprendo
palm123, bubar🦥, Davy Defaud, ZeroHeure et Bruno Michel
Date: 2019年03月05日T11:10:15+01:00
License: CC By-SA
Tags:
Score: 43
Une application Web peut être implémentée selon différentes architectures mais comporte généralement une partie client et une partie serveur. De nombreux langages proposent des cadriciels pour implémenter la partie serveur. En revanche, pour la partie client, seuls les langages HTML, CSS et JavaScript sont gérés directement par les navigateurs. Certains outils permettent cependant d’écrire le code client dans un autre langage puis de « transpiler » vers du code JavaScript compréhensible par un navigateur. On peut alors coder toute une application (partie client et partie serveur) avec un seul langage, grâce à ce genre de cadriciel « _fullstack_ ».
---
_N. D. M. : Cette dépêche détaille le développement d’une application Web permettant de faire du dessin collaboratif. Les codes client et serveur sont en JavaScript dans la première partie, puis en Haskell « isomorphique » dans la seconde et, enfin, en C++ « basé widgets »._
----
[Comparaison de technologies Web pour implémenter une application de dessin basique](https://linuxfr.org/news/comparaison-de-technologies-web-pour-implementer-une-application-de-dessin-basique)
[Autres dépêches de l’auteur sur le Web en C++ et Haskell](https://linuxfr.org/users/nokomprendo-3)
----
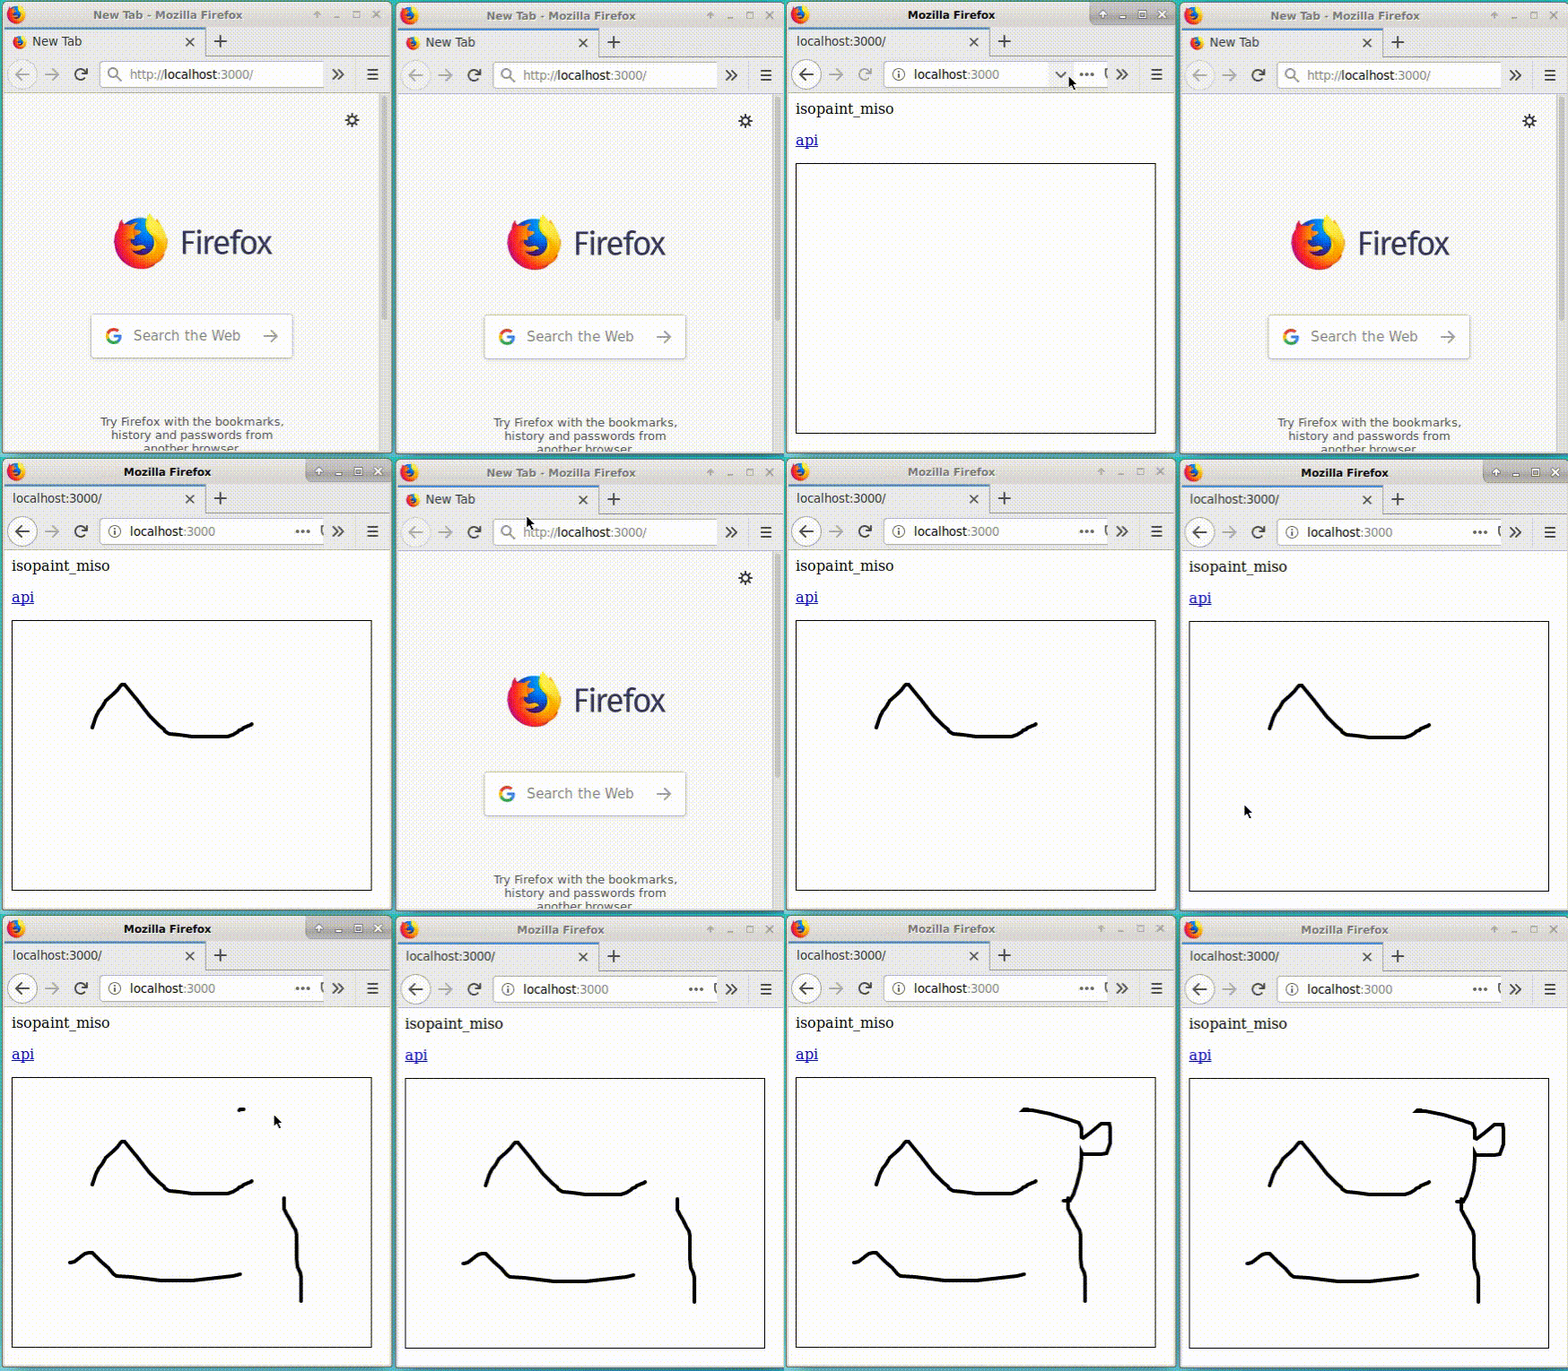
Dans cet article, on considère un cadriciel C++ « basé _widget_ » (Wt) et un cadriciel Haskell « isomorphique » (Miso/Servant). L’application réalisée permet de faire du dessin collaboratif : chaque utilisateur peut dessiner des chemins en cliquant et en déplaçant sa souris ; lorsqu’un chemin est terminé (le bouton de la souris est relâché), le chemin est envoyé au serveur qui le diffuse à tous les clients. Dans cette applications, la partie serveur gère les chemins et les connexions, et la partie client gère le dessin interactif.
[[code source](https://framagit.org/nokomprendo/tuto_fonctionnel/tree/master/posts/tuto_fonctionnel_33/isopaint)]
# En JavaScript
Avant de voir les cadriciels proposés, voyons comment implémenter l’application en JavaScript, de façon simple.
## Code serveur
Pour le serveur ([`src/app.js`](https://framagit.org/nokomprendo/tuto_fonctionnel/tree/master/posts/tuto_fonctionnel_33/isopaint/isopaint_js/src/app.js)), on dispose d’outils très classiques : Node.js, Express.js, Socket.IO. Node.js permet d’implémenter le serveur web de base, qui contient l’ensemble des chemins dessinés. Express.js permet d’implémenter le routage d’URL, c'est‐à‐dire ici la route racine « / », qui envoie au client les fichiers statiques (du dossier « static » de la machine serveur). Enfin, Socket.IO permet de diffuser des messages aux clients connectés :
- à la connection d’un client, le serveur envoie un message « _stoh all paths_ » contenant tous les chemins du dessin actuel ;
- lorsqu’un client est connecté, il peut envoyer un chemin au serveur, via un message « _htos new path_ » ;
- lorsqu’un client envoie un chemin, le serveur réagit en stockant le nouveau chemin et en le rediffusant à tous les clients, via un message « _stoh new path_ ».
```javascript
"use strict";
const port = 3000;
const express = require("express");
const app = express();
const http = require("http").Server(app);
const io = require("socket.io")(http);
let paths = [];
// serve static files
app.use("/", express.static("./static"));
// client connection
io.on("connection", function(socket){
// when a new connection is accepted, send all paths
socket.emit("stoh all paths", paths);
// when a client sends a new path
socket.on("htos new path", function(path){
// store the new path
paths.push(path);
// send the new path to all clients
io.emit("stoh new path", path);
});
});
http.listen(port, function () {
console.log(`Listening on port ${port}...`);
});
```
## Code client
Pour le client ([`static/index.html`](https://framagit.org/nokomprendo/tuto_fonctionnel/tree/master/posts/tuto_fonctionnel_33/isopaint/isopaint_js/static/index.html)), on définit un canevas de dessin et quelques fonctions auxiliaires pour récupérer la position de la souris, tracer un chemin, etc.
```javascript
```
On utilise également Socket.IO pour gérer les communications avec le serveur : récupérer les chemins initiaux, récupérer les nouveaux chemins successifs. Enfin, on gère les événements utilisateur de façon habituelle et on propage les données correspondantes au serveur : créer et mettre à jour un chemin courant lorsqu’on appuie et déplace la souris, envoyer le chemin lorsqu’on relâche :
```javascript
```
Le code JavaScript complet est plutôt clair et concis ; les fonctions pour dessiner dans un canevas et la bibliothèque Socket.IO sont particulièrement simples. On notera cependant que les données manipulées dans cette application, ainsi que les fonctionnalités implémentées, sont très limitées. Sur une application plus réaliste, on utiliserait plutôt une vraie architecture de code (par exemple MVC, Flux...) et des bibliothèques dédiées (React, Vue.js, etc.).
# En Haskell « isomorphique »
Une application Web isomorphique est une application dont le code s’exécute à la fois côté client et côté serveur. Il s’agit généralement d’une application mono‐page, c’est‐à‐dire avec un code client assez lourd, mais dont le premier rendu est réalisé par le serveur. Ceci permet de fournir une première vue à l’utilisateur avant que l’application soit complètement chargée dans le navigateur.
Le langage JavaScript est souvent utilisé pour implémenter ce genre d’application car il peut directement s’exécuter dans un navigateur. Cependant, il existe également des outils permettant d’écrire le code client dans d’autres langages et de le « transpiler » ensuite vers JavaScript.
En Haskell, les bibliothèques [Miso](https://haskell-miso.org/) et [Servant](https://www.servant.dev/) permettent d’implémenter des applications Web isomorphiques avec une architecture de type Flux. Pour cela, on définit le modèle des données, les actions possibles et les fonctions pour calculer une vue et pour gérer les actions. Ces éléments sont ensuite utilisés automatiquement et de façon asynchrone dans l’application du client. Ils peuvent également être utilisés pour la partie serveur.
## Code commun
Dans le code commun au client et au serveur ([`src/Common.hs`](https://framagit.org/nokomprendo/tuto_fonctionnel/tree/master/posts/tuto_fonctionnel_33/isopaint/isopaint_miso/src/Common.hs)), on définit le modèle (données manipulées par l’application), la fonction de rendu (qui calcule la vue d’un modèle) et les actions (que peut générer la vue).
```haskell
-- model
type Path = [(Double, Double)]
data Model = Model
{ allPaths_ :: [Path] -- all the paths, sent by the server
, currentPath_ :: Path -- current path (when the user is drawing)
, currentXy_ :: (Double, Double) -- last position of the mouse (when drawing)
, drawing_ :: Bool -- set whether the user is drawing or not
} deriving (Eq, Show)
initialModel :: Model
initialModel = Model [] [] (0,0) False
-- view
homeView :: Model -> View Action
homeView _ = div_
[]
[ p_ [] [ text "isopaint_miso" ]
, canvas_
[ id_ "canvas_draw" , width_ "400" , height_ "300"
, style_ (singleton "border" "1px solid black")
, onMouseDown MouseDown -- when mouse down, generate a MouseDown action
, onMouseUp MouseUp -- when mouse up, generate a MouseUp action
]
[]
]
-- actions
data Action
= NoOp
| RedrawCanvas
| MouseDown
| MouseUp
| MouseMove (Int, Int)
| SetXy (Double, Double)
| SetPaths [Path]
| SendXhr Path
| RecvSse (Maybe Path)
| InitAllPaths
deriving (Eq, Show)
```
## Code client
Dans le code spécifique au client ([`src/client.hs`](https://framagit.org/nokomprendo/tuto_fonctionnel/tree/master/posts/tuto_fonctionnel_33/isopaint/isopaint_miso/src/client.hs)), on définit la fonction de mise à jour du modèle en fonction des actions demandées (requêtes [AJAX](https://fr.wikipedia.org/wiki/Ajax_(informatique)) au serveur, dessin interactif, redessin complet, etc.).
```haskell
updateModel :: Action -> Model -> Effect Action Model
-- nothing to do
updateModel NoOp m = noEff m
-- mouse down: begin drawing a path
updateModel MouseDown m = noEff m { currentPath_ = [], drawing_ = True }
-- mouse move: get position and ask to update the model using a SetXy action
updateModel (MouseMove (x,y)) m = m <# if drawing_ m then do left <- jsRectLeft top <- jsRectTop let x' = fromIntegral $ x - left let y' = fromIntegral $ y - top pure $ SetXy (x', y') else pure NoOp -- update position and ask to redraw the canvas using a RedrawCanvas action updateModel (SetXy xy) m = m { currentPath_ = xy : currentPath_ m } <# pure RedrawCanvas -- mouse up: finish drawing the current path (send the path to the server) updateModel MouseUp (Model a c xy _) = Model a [] xy False <# pure (SendXhr c) -- send a path to the server updateModel (SendXhr path) m = m <# (xhrPath path>> pure NoOp)
-- register to Server-Sent Event, for receiving new paths from other clients
updateModel (RecvSse Nothing) m = noEff m
updateModel (RecvSse (Just path)) m =
m { allPaths_ = path : allPaths_ m } <# pure RedrawCanvas -- clear the canvas and redraw the paths updateModel RedrawCanvas m = m <# do w <- jsWidth h <- jsHeight ctx <- jsCtx clearRect 0 0 w h ctx lineCap LineCapRound ctx mapM_ (drawPath ctx) $ allPaths_ m drawPath ctx $ currentPath_ m pure NoOp -- initialize paths: ask all paths to the server then update using a SetPaths action updateModel InitAllPaths m = m <# do SetPaths <$> xhrAllPaths
-- update paths then ask to redraw the canvas
updateModel (SetPaths paths) m = m { allPaths_ = paths } <# pure RedrawCanvas ``` On définit également quelques fonctions auxiliaires pour implémenter les requêtes AJAX au serveur, et le dessin dans le canevas : ```haskell -- send a new path to the server ("/xhrPath" endpoint) xhrPath :: Path -> IO ()
xhrPath path = void $ xhrByteString $ Request POST "/xhrPath" Nothing hdr False dat
where hdr = [("Content-type", "application/json")]
dat = StringData $ toMisoString $ encode path
-- ask for the paths ("/xhrPath" endpoint)
xhrAllPaths :: IO [Path]
xhrAllPaths = fromMaybe [] . decodeStrict . fromJust . contents <$>
xhrByteString (Request GET "/api" Nothing [] False NoData)
-- handle a Server-Sent Event by generating a RecvSse action
ssePath :: SSE Path -> Action
ssePath (SSEMessage path) = RecvSse (Just path)
ssePath _ = RecvSse Nothing
drawPath :: Context -> Path -> IO ()
drawPath ctx points =
when (length points>= 2) $ do
let ((x0,y0):ps) = points
lineWidth 4 ctx
beginPath ctx
moveTo x0 y0 ctx
mapM_ (\(x,y) -> lineTo x y ctx) ps
stroke ctx
foreign import javascript unsafe "$r = canvas_draw.getContext('2d');"
jsCtx :: IO Context
foreign import javascript unsafe "$r = canvas_draw.clientWidth;"
jsWidth :: IO Double
foreign import javascript unsafe "$r = canvas_draw.clientHeight;"
jsHeight :: IO Double
foreign import javascript unsafe "$r = canvas_draw.getBoundingClientRect().left;"
jsRectLeft :: IO Int
foreign import javascript unsafe "$r = canvas_draw.getBoundingClientRect().top;"
jsRectTop :: IO Int
```
Enfin, la fonction principale de l’application client regroupe ces éléments selon l’architecture demandée par Miso :
```haskell
main :: IO ()
main = miso $ const App
{ initialAction = InitAllPaths
, model = initialModel
, update = updateModel
, view = homeView
, events = defaultEvents
, subs = [
sseSub "/ssePath" ssePath, -- register Server-Sent Events to the ssePath function
mouseSub MouseMove -- register mouseSub events to the MouseMove action
]
, mountPoint = Nothing
}
```
## Code serveur
Côté serveur ([`src/server.hs`](https://framagit.org/nokomprendo/tuto_fonctionnel/tree/master/posts/tuto_fonctionnel_33/isopaint/isopaint_miso/src/server.hs)), on implémente un serveur Web classique. Il contient la liste des chemins dessinés par les clients et fournit une API Web ainsi qu’un système de notifications des clients (_Server‐Sent Events_), pour diffuser les nouveaux chemins dessinés.
```haskell
main :: IO ()
main = do
pathsRef <- newIORef [] -- list of drawn paths chan <- newChan -- Server-Sent Event handler run 3000 $ logStdout (serverApp chan pathsRef) -- run serverApp on port 3000 -- define the API type type ServerApi = "static" :> Raw -- "/static" endpoint, for static files
:<|> "ssePath" :> Raw -- "/ssePath" endpoint, for registering SSE...
:<|> "xhrPath" :> ReqBody '[JSON] Path :> Post '[JSON] NoContent
:<|> "api" :> Get '[JSON] [Path]
:<|> ToServerRoutes (View Action) HtmlPage Action -- "/" endpoint
-- define a function for serving the API
serverApp :: Chan ServerEvent -> IORef [Path] -> Application
serverApp chan pathsRef = serve (Proxy @ServerApi)
( serveDirectoryFileServer "static" -- serve the "/static" endpoint (using the "static" folder)
:<|> Tagged (eventSourceAppChan chan) -- serve the "/ssePath" endpoint...
:<|> handleXhrPath chan pathsRef
:<|> handleApi pathsRef
:<|> handleClientRoute
)
-- when a path is sent to "/xhrPath", add the path in pathsRef and update clients using SSE
handleXhrPath :: Chan ServerEvent -> IORef [Path] -> Path -> Handler NoContent
handleXhrPath chan pathsRef path = do
liftIO $ do
modifyIORef' pathsRef (\ paths -> path:paths)
writeChan chan (ServerEvent Nothing Nothing [lazyByteString $ encode path])
pure NoContent
-- when a client requests "/api", send all paths
handleApi :: IORef [Path] -> Handler [Path]
handleApi pathsRef = liftIO (readIORef pathsRef)
-- when a client requests "/", render and send the home view
handleClientRoute :: Handler (HtmlPage (View Action))
handleClientRoute = pure $ HtmlPage $ homeView initialModel
```
On notera qu’on réutilise ici la fonction de rendu `homeView` pour générer la première vue de l’application. Cette vue est intégrée dans une page complète avec la fonction `toHtml` suivante :
```haskell
newtype HtmlPage a = HtmlPage a deriving (Show, Eq)
instance L.ToHtml a => L.ToHtml (HtmlPage a) where
toHtmlRaw = L.toHtml
-- main function, for rendering a view to a HTML page
toHtml (HtmlPage x) = L.doctypehtml_ $ do
L.head_ $ do
L.meta_ [L.charset_ "utf-8"]
L.with
(L.script_ mempty)
[L.src_ "static/all.js", L.async_ mempty, L.defer_ mempty]
L.body_ (L.toHtml x) -- render the view and include it in the HTML page
```
# En C++ « basé widgets »
D’un point de vue utilisateur, une application Web et une application native sont assez similaires. Il s’agit essentiellement d’une interface utilisateur graphique (dans un navigateur ou dans une fenêtre) qui interagit avec un programme principal (un programme serveur ou une autre partie du même programme). Ainsi, les cadriciels Web basés _widgets_, comme [Wt](https://www.webtoolkit.eu/wt), reprennent logiquement la même architecture que les cadriciels natifs, comme Qt ou GTK. Le développeur écrit un programme classique où l’interface graphique est définie via des _widgets_ ; le cadriciels se charge de construire l’interface dans le navigateur client et de gérer les connexions réseau. En pratique, cette architecture n’est pas complètement transparente et le développeur doit tout de même tenir compte de l’aspect réseau de l’application.
## Application principale
Pour implémenter l’application de dessin collaboratif avec Wt, on peut définir le programme principal suivant ([`src/isopaint.cpp`](https://framagit.org/nokomprendo/tuto_fonctionnel/tree/master/posts/tuto_fonctionnel_33/isopaint/isopaint_wt/src/isopaint.cpp)). Ici, on a choisi d’organiser le code selon une architecture de type [MVC](https://fr.wikipedia.org/wiki/Mod%C3%A8le-vue-contr%C3%B4leur "modèle‐vue‐contrôleur"). Le contrôleur fait le lien entre le modèle (les chemins dessinés par les clients) et les vues. Les vues correspondent aux clients qui se connectent, c’est pourquoi on les construit à la demande, via la fonction lambda `mkApp`.
```c++
int main(int argc, char ** argv) {
// controller: handle client connections and data (drawn paths)
Controller controller;
Wt::WServer server(argc, argv, WTHTTP_CONFIGURATION);
// endpoint "/": create a client app and register connection in the controller
auto mkApp = [&controller] (const Wt::WEnvironment & env) {
return std::make_unique(env, controller);
};
server.addEntryPoint(Wt::EntryPointType::Application, mkApp, "/");
server.run();
return 0;
}
```
## Contrôleur
Le contrôleur gère le modèle et les connexions client ([`src/Controller.hpp`](https://framagit.org/nokomprendo/tuto_fonctionnel/tree/master/posts/tuto_fonctionnel_33/isopaint/isopaint_wt/src/Controller.hpp)). Comme ici le modèle est très simple (un tableau de chemins), on l’implémente par un attribut du contrôleur. Quelques méthodes permettent d’implémenter le protocole de communication avec les clients : connexion, déconnexion, accès au tableau de chemins, ajout d’un nouveau chemin. Enfin, on utilise un [_mutex_](https://fr.wikipedia.org/wiki/Exclusion_mutuelle) pour que l’application puisse s’exécuter en multiple fils d’exécution (_multi‐thread_).
```c++
class Controller {
private:
mutable std::mutex _mutex;
std::vector _paths;
std::map _connections;
public:
// register client app
void addClient(AppDrawing * app) {
std::unique_lock lock(_mutex);
_connections[app] = app->instance()->sessionId();
}
// unregister client app
void removeClient(AppDrawing * app) {
std::unique_lock lock(_mutex);
_connections.erase(app);
}
// get all paths
std::vector getPaths() const {
std::unique_lock lock(_mutex);
return _paths;
}
// add a new path and update all client apps
void addPath(const Wt::WPainterPath & path) {
std::unique_lock lock(_mutex);
_paths.push_back(path);
for (auto & conn : _connections) {
auto updateFunc = std::bind(&AppDrawing::addPath, conn.first, path);
Wt::WServer::instance()->post(conn.second, updateFunc);
}
}
};
```
## Application de dessin
Pour implémenter l’application de dessin proprement dite ([`src/AppDrawing.hpp`](https://framagit.org/nokomprendo/tuto_fonctionnel/tree/master/posts/tuto_fonctionnel_33/isopaint/isopaint_wt/src/AppDrawing.hpp) et [`src/AppDrawing.cpp`](https://framagit.org/nokomprendo/tuto_fonctionnel/tree/master/posts/tuto_fonctionnel_33/isopaint/isopaint_wt/src/AppDrawing.cpp)), on utilise les _widgets_ fournis par Wt. Cette application va donner lieu à une interface graphique côté client, avec des communications réseau, mais ceci reste transparent pour le développeur, qui manipule du code orienté objet classique. Par exemple, l’application client expose une fonction `addPath` qui permet au serveur d’envoyer un nouveau chemin au client, via un appel de méthode classique.
```c++
// headers
class AppDrawing : public Wt::WApplication {
private:
Controller & _controller;
Painter * _painter;
public:
AppDrawing(const Wt::WEnvironment & env, Controller & controller);
~AppDrawing();
// add a path (sent by the server)
void addPath(const Wt::WPainterPath & path);
};
// implementation
AppDrawing::AppDrawing(const Wt::WEnvironment & env, Controller & controller) :
Wt::WApplication(env), _controller(controller)
{
// build the interface
root()->addWidget(std::make_unique("isopaint_wt "));
root()->addWidget(std::make_unique());
_painter = root()->addWidget(std::make_unique(controller, 400, 300));
// register the client in the controller
_controller.addClient(this);
// enable updates from the server
enableUpdates(true);
}
AppDrawing::~AppDrawing() {
// unregister the client
_controller.removeClient(this);
}
void AppDrawing::addPath(const Wt::WPainterPath & path) {
// add a path sent by the server
_painter->addPath(path);
// request updating the interface
triggerUpdate();
}
```
Enfin, pour implémenter la zone de dessin, on dérive notre propre _widget_, et on redéfinit son affichage, sa gestion d’événements...
```c++
// headers
class Painter : public Wt::WPaintedWidget {
protected:
Controller & _controller;
Wt::WPen _pen;
Wt::WPainterPath _currentPath; // local path (being drawn by the user)
std::vector _paths; // common paths (sent by the server)
public:
Painter(Controller & controller, int width, int height);
// add a path (sent by the server)
void addPath(const Wt::WPainterPath & path);
private:
// main display function
void paintEvent(Wt::WPaintDevice * paintDevice) override;
// callback functions for handling mouse events
void mouseDown(const Wt::WMouseEvent & e);
void mouseUp(const Wt::WMouseEvent &);
void mouseDrag(const Wt::WMouseEvent & e);
};
// implementation
Painter::Painter(Controller & controller, int width, int height) :
Wt::WPaintedWidget(),
_controller(controller),
_paths(controller.getPaths())
{
// initialize the widget
resize(width, height);
Wt::WCssDecorationStyle deco;
deco.setBorder(Wt::WBorder(Wt::BorderStyle::Solid));
setDecorationStyle(deco);
// initialize the pen
_pen.setCapStyle(Wt::PenCapStyle::Round);
_pen.setJoinStyle(Wt::PenJoinStyle::Round);
_pen.setWidth(4);
// connect callback functions (for handling mouse events)
mouseDragged().connect(this, &Painter::mouseDrag);
mouseWentDown().connect(this, &Painter::mouseDown);
mouseWentUp().connect(this, &Painter::mouseUp);
}
void Painter::addPath(const Wt::WPainterPath & path) {
// add a path (sent by the server)
_paths.push_back(path);
// update widget
update();
}
void Painter::paintEvent(Wt::WPaintDevice * paintDevice) {
Wt::WPainter painter(paintDevice);
painter.setPen(_pen);
// draw common paths (sent by the server)
for (const auto & p : _paths)
painter.drawPath(p);
// draw the local path (being drawn by the user)
painter.drawPath(_currentPath);
}
void Painter::mouseDown(const Wt::WMouseEvent & e) {
// begin drawing a path: remember the initial position
Wt::Coordinates c = e.widget();
_currentPath = Wt::WPainterPath(Wt::WPointF(c.x, c.y));
}
void Painter::mouseDrag(const Wt::WMouseEvent & e) {
// mouse move: add the new position into the current path
Wt::Coordinates c = e.widget();
_currentPath.lineTo(c.x, c.y);
// update widget
update();
}
void Painter::mouseUp(const Wt::WMouseEvent &) {
// send the path to the server, which will send it to the clients
_controller.addPath(_currentPath);
// reset current path
_currentPath = Wt::WPainterPath();
}
```
# Conclusion
À travers cette petite application de dessin collaboratif, nous avons vu qu’il est possible de développer des applications Web « _fullstack_ », où un même code peut s’exécuter à la fois côté client et côté serveur. Pour cela, il existe différents types de cadriciels, notamment « isomorphiques » et « basés _widgets_ ».
Les applications isomorphiques sont une évolution assez naturelle des applications clientes mono‐pages couplées à des serveurs d’API Web. Il s’agit principalement de réutiliser le code client côté serveur, pour générer la première vue de l’application avant le téléchargement complet de l’application client. Tout ceci repose sur des technologies Web classiques et est assez simple à mettre en place. De plus, les cadriciels proposent généralement une architecture de code classique (MVC, Flux...) qui permet de développer rapidement des applications.
Les cadriciels basés _widgets_ suivent une approche différente mais également intéressante : porter l’architecture des interfaces graphiques utilisateur au monde du Web. Ces architectures sont familières aux développeurs d’applications natives et sont très adaptées aux langages orientés objets. Sans être complètement masqué, l’aspect réseau est en grande partie géré par le cadriciel, ce qui facilite le développement.
Enfin, concernant les langages, si JavaScript a l’avantage d’être compréhensible directement par les navigateurs, d’autres langages sont également utilisables, via une étape de transpilation vers JavaScript. On notera que les langages compilés permettent de détecter certaines erreurs plus rapidement et que les langages fonctionnels (avec fonctions pures, données immutables...) réduisent les erreurs potentielles.