Showing posts with label clients. Show all posts
Showing posts with label clients. Show all posts
Friday, October 11, 2013
Laser engraved and painted signage instructable
I just put up an Instructable describing the production method for the Tchai Ovna sandwich boards here.
Tuesday, October 08, 2013
Tchai Ovna sandwich boards
I was commissioned to make new sandwich boards for the Tchai Ovna House of Tea, a business which I have been orbiting and landing at in various forms all the time I've been in Glasgow..
For these we went for a method of painting that would allow me to do a batch of 6 panels as easily and efficiently as possible, whilst providing a very high finish. Whilst I'd like to learn hand brushed calligraphy for signwriting, I've not done it yet! So here we have 6 panels of 18mm spruce ply, laser engraved by Flux Laser Studio to 2mm depth, back filled with acrylic paint in 3 different colours, and then sanded back to reveal the sharp edges of the engraving. This is a method I learnt from the students in Dundee, clever chaps. They were then finished with wood preserver and yacht varnish, plus galvanised and stainless steel fixings. Not shown here, I gave the feet of the panels some little inner tube rubber booties, to repel the puddles..
The lasering process means the layout is on file and the boards can be reproduced very easily when they inevitably reach the end of their life or are half inched by the west end student contingent, of which I am a proud alumni!
Wednesday, September 18, 2013
Upcoming workshops at MAKlab
Some new workshops we (Myself, Aziz and Delphine) are coordinating at MAKlab over the next few weeks, including Using the Terminal in OSX and linux, Have a Go at 3D Printing, Make Robot Bug and Toy Hacking workshops!
Check them out at http://www.maklab.bigcartel.com/
Check them out at http://www.maklab.bigcartel.com/
Monday, September 02, 2013
The Den
I was asked by theatre maker Jen Edgar to help her refresh the Sensory Room in Calderside Nursery, South Lanrakshire, where Jen was doing a residency in 2012-2013. It was a great experience, a very interesting project involving lots of den making, mocking up environments for the kids to try out, trying to understand what they made of it, and then wrestling with lots of fabric, an overactive heating system, and a little electronics to make the finished sensory room: The Den. The result is a much more welcoming and curiosity piqueing room, with a custom sound track by Scott Twynholm, and a big button that the babies can press to trigger sounds themselves on the immersive sound system. Lots of sewing and laser etched signs from me, as well as building some furniture and specifying electronics, on a very tight budget.
Here's the team, me failing to look at the camera.
Above photos by Neil Thomas Douglas
Tutoring Services: Arduino @ GSA
In January 2013 I consulted as an Arduino tutor at the Glasgow School of Art. I provided some refresher tuition and project guidance for 3rd year Product Designers there. The teaching materials are viewable here.
The project the students worked on was based around sound, and there were some great ideas being worked on. Most involved PIR sensors triggering sounds from a laptop (despite my attempts to discourage this for the absolute beginners). We mostly did this using the keyboard hack I described here. My favourite projects as ever were the mechanical ones however..
Ling's Meadow
Logo design for my sister in law's campsite, Ling's Meadow! I'm also making a stamp to go with this.
Yarla and the Winter Wood
Here are some production shots from Yarla and the Winter Wood, a touring theatre production for 0 - 3 year olds, for which I did the set design and build, and some prop making. You can read more about the production here, which was made by Jen Edgar for Starcatchers. Many thanks to Fergus Dunnet for his hard work, particularly in scenery painting.
We used a lot of found items for the props in this, and the trees themsleves are carpet tubes from Victoria Road carpets (thanks go to them). The brief was to design a flexible set that could be reconfigured as the venue allowed (venues ranged from libraries, to nurseries, to theatres), and be mountable and demountable in 2 hours. The entire set fitted in a transit van and was handleable by the touring company of 3. There are lots of great photos from the development on Jen's blog here.
Above photos by Neil Thomas Douglas
Totem plinths - design & build
In September 2012 I designed and built a plinth system for the I Am Seeing Things exhibition at the Talbot Rice gallery in Edinburgh. This was an exhibition linked to the ToTEM project I was previously involved in, and included a seminar marking the end of the project. The brief was to produce a 3D pixelated system, of modular construction (read voxels), including several interactive cubes, containing monitors and the same tech as the previous ToTEM readers.
Construction was done in expanded polysterene, and selected voxels in MDF, all clad in white or grey melamine, placed on plywood bases.
This was a collaboration with the Product Research Studio in Dundee DJCAD, with especially thanks to Sean Kingsley there. Laser cutting (circa 500 melamine panels!) was done by me at MAKlab. Here are some photos of the results from around Twitter:
Upon delivery, prior to construction - photo by @chrisspeed
photo by @ileddigital
5th dimensional camera by Superflux - photo by @digitalurban
photoBot by Tommy Dykes - photo by @digitalurban
Interactive reader cube, front of picture - photo by @ileddigital
Monday, January 07, 2013
Using a tilt switch to play an audio file
I am helping with an Arduino and Sound module at the Glasgow School of Art this month, so had a wee play with their kit of parts to create a quick demo. Here is a wee video:
[フレーム]
The tilt switch is inputting into the arduino. The arduino is running the sketch below. It is outputting to an optocoupler which is in turn controlling a PCB from an old keyboard. That PCB is sending a [space] keystroke to the computer, which has Winamp open and set to play a telephone ring .wav when spacebar is pressed.
The optocoupler is ideal as it physically separates the Arduino circuit from the keyboard PCB circuit, and acts as a switch, shorting out whichever contacts you choose on the keyboard PCB, which is how these things work in the original keyboard. The datasheet with pinouts for that sort of optocoupler is here.
It took a wee bit of trial and error to find the pins to short on the keyboard PCB to get a [space] keystroke. After I'd done it I discoverred these wee Windows programs that will show you on screen what keypresses the computer is receiving:
http://www.romeosa.com/osdHotkey/help.html
http://www.donationcoder.com/Software/Skrommel/index.html#ShowOff
On a Mac apparently you can do the same in System Preferences:
Universal Access > Keyboard "Enable sticky keys" > Display pressed
keys on screen.
Winamp is ideal because you can customise it in preferences extensively - you can set any key combination to play, or any other function in the program! The shortcut for play in iTunes is [space].
The sketch (copy and paste this into the arduino software):
/*
This sketch allows you to send a keystroke back to the computer
upon tilting a tilt switch. This keystroke can be used to control
any other program as a keyboard would, typically simulating a
SPACE keypress to play an audio file in an audio player.
Wiring setup:
Tilt sensor between +5v and pin2
10k resistor between pin2 and GND (for debouncing)
Optocoupler pins 1, 2 4 and 5 to Arduino pin7, GND, keyboard PCB
pinA and pinB respectively. You will have to identify the appropriate
two pins on your keyboard PCB to simulate the desired
keystroke - plug into your computer and short them out to test.
Keyboard PCB connected to computer.
LED long leg to Arduino pin8 and short leg to GND.
*/
int tiltPin = 2; // variable for setting the tilt sensor pin
int optPin = 7; // variable for setting the optocoupler pin
int ledPin = 8; // variable for setting the led pin
int buttonState = 0; // variable for reading the pushbutton status
void setup() {
// put your setup code here, to run once:
pinMode(tiltPin, INPUT); // sets up tiltPin as an Input
pinMode(optPin, OUTPUT); // sets up optPin as an Output
pinMode(ledPin, OUTPUT); // sets up ledPin as an Output
// Serial.begin(9600); // begins a Serial communication
}
void loop() {
// put your main code here, to run repeatedly:
buttonState = digitalRead(tiltPin); // sets buttonState to value of the tilt sensor
if (buttonState == HIGH) {
digitalWrite(optPin, HIGH); // turn on optocoupler
digitalWrite(ledPin, HIGH); // turn on LED
delay(100); // wait 0.1ms
digitalWrite(optPin, LOW); // turn off optocoupler
delay(1000); // wait 1s
}
else {
digitalWrite(optPin, LOW); // turn off optocoupler
digitalWrite(ledPin, LOW); // turn off LED
}
// Serial.println(tiltPin); // print the stated variable
}
Tuesday, October 30, 2012
Inhabitat on The Glad Cafe
Inhabitat have put up a coimplimentary wee article on the Glad Cafe job, check it out here.
Thursday, September 13, 2012
Glad Cafe in The List
The Glad Cafe gets a good review in The List last month, with this mention for the interior:
That's pretty much what we were going for..
"the interior is stripped-back minimalism mixed with something approaching playground chic: exposed brickwork and bare concrete floors contrast with huge murals in bold primary and secondary colours, and with an eclectic customer base, there is a real community atmosphere."
That's pretty much what we were going for..
Tuesday, August 28, 2012
Alloy EP Packaging
Packaging design for my band dBass' EP released in April this year.
Photography by Corey Smith of the band, all printed on FSC card digifile, meaning no plastics involved whatsoever, except for the CD!
You can buy the Alloy EP here for £5.
[埋込みオブジェクト:http://www.flickr.com/apps/slideshow/show.swf?v=109615]Photography by Corey Smith of the band, all printed on FSC card digifile, meaning no plastics involved whatsoever, except for the CD!
You can buy the Alloy EP here for £5.
Plex: Sound responsive LED matrix
This is a prototype built for Carlo Viscione for the 'Plex' element of his degree project, an interior for an public sound studio named CEM (Centre for Electronic Music) in East London. This sample foam tile is proposed to be installed en masse above a bar and respond to the PA system sound or ambient sound with pre programmed visualisations over the whole array. Achieved with an Arduino and a LOLshield. And lots of desoldering and soldering.
The LOLshield was a great headstart for building an array of this sort of size without getting into doing ones own multiplexing, and I feel like a really just scratched the surface of what it can do. Here are the Arduino sketches we ended up with.
There is talk of embiggening this to do on a larger scale, do get in touch if you are interested in providing a space and or funds for this!
Campbell Chair
A custom chair build derived from Open Chair by James Tooze.
[埋込みオブジェクト:http://www.flickr.com/apps/slideshow/show.swf?v=109615]
The client provided specific dimensions and design constraints for a home office chair, which I then constructed based on the construction method described for Open Chair. This provided a good basis for design, however the design soon developed quite far from the origin in that weight reduction was of utmost importance. This meant slimming down all the cross sections and building out of pine offcuts rather than ply. We also added some armrests. A significant challenge was achieving torsional rigidity between the front legs while leaving the opening entirely free for the user's legs to swing under, as requested by the client. This was eventually done by beefing up and tapering the cross member directly beneath the seat.
Octomitter
Some photos from a while back documenting the building of the Octomitter for Jonnie Common, an 8 channel Niftymitter unit.
More Glad Cafe photos
Patrick Jamieson has uploaded some great photos of the Glad to Facebook here:
https://www.facebook.com/media/set/?set=a.10151055888523347.450221.351164933346&type=1
cheers Pat!
https://www.facebook.com/media/set/?set=a.10151055888523347.450221.351164933346&type=1
cheers Pat!
Labels:
clients,
digital manufacturing,
gladcafe,
sustainability
Monday, August 27, 2012
Glad Cafe all done
It's been too long. I have been mainly working on the Glad Cafe, which is now truly up and running and it is GREAT to have a nice, friendly evening venue in the south side that isn't a restaurant.
Best Boy Jamie from Conquering Animal Sound (played the first public launch night) took this splendid Instagram:
STV also have some good photos here.
A team of us worked on the interior design, and built two bars, three large pieces of shelving, a whole lot of ballustrading, one chandelier, a bunch of signage and a couple of murals. Main protagonists are Silo, and Gerry of Eggmachine (he once did this, also with Si), with some help from Staci Rowlison on the mural and Bevan Quinn of Modern Standard on sign duties.
The job was supported in no small way by Maklab, who donated some perfect offcuts for the balustrade. A zero-waste job for them!
Well chuffed.
Best Boy Jamie from Conquering Animal Sound (played the first public launch night) took this splendid Instagram:
A team of us worked on the interior design, and built two bars, three large pieces of shelving, a whole lot of ballustrading, one chandelier, a bunch of signage and a couple of murals. Main protagonists are Silo, and Gerry of Eggmachine (he once did this, also with Si), with some help from Staci Rowlison on the mural and Bevan Quinn of Modern Standard on sign duties.
The job was supported in no small way by Maklab, who donated some perfect offcuts for the balustrade. A zero-waste job for them!
Well chuffed.
Labels:
clients,
digital manufacturing,
eggmachine,
gladcafe,
silo,
sustainability
Monday, March 12, 2012
Mass Making
Last Wedenesday I talked to Glasgow School of Art first years about the maker movement as part of the Forum fro Critical Enquiry (formerly H&C, something i knew nothing of, having been in mech eng lectures, or not at uni at all depending on your point of view).
ANYWAY.
Here are the edited presentation visuals (two I admittedly didn't have the right to publish). It won't make any sense if you weren't there, but I rattled through stuff at an increasingly frantic pace, so this might be useful if you couldn't note down the names of things/links.
I have to thank my friend Stephen Coleman of magical animators Mifundo for invaluable criticism and comments the night before giving this talk!
embed below ->
Mass Making[フレーム]
Labels:
clients,
design thoughts,
digital manufacturing,
massmaking,
ospd,
sustainability
Tuesday, November 22, 2011
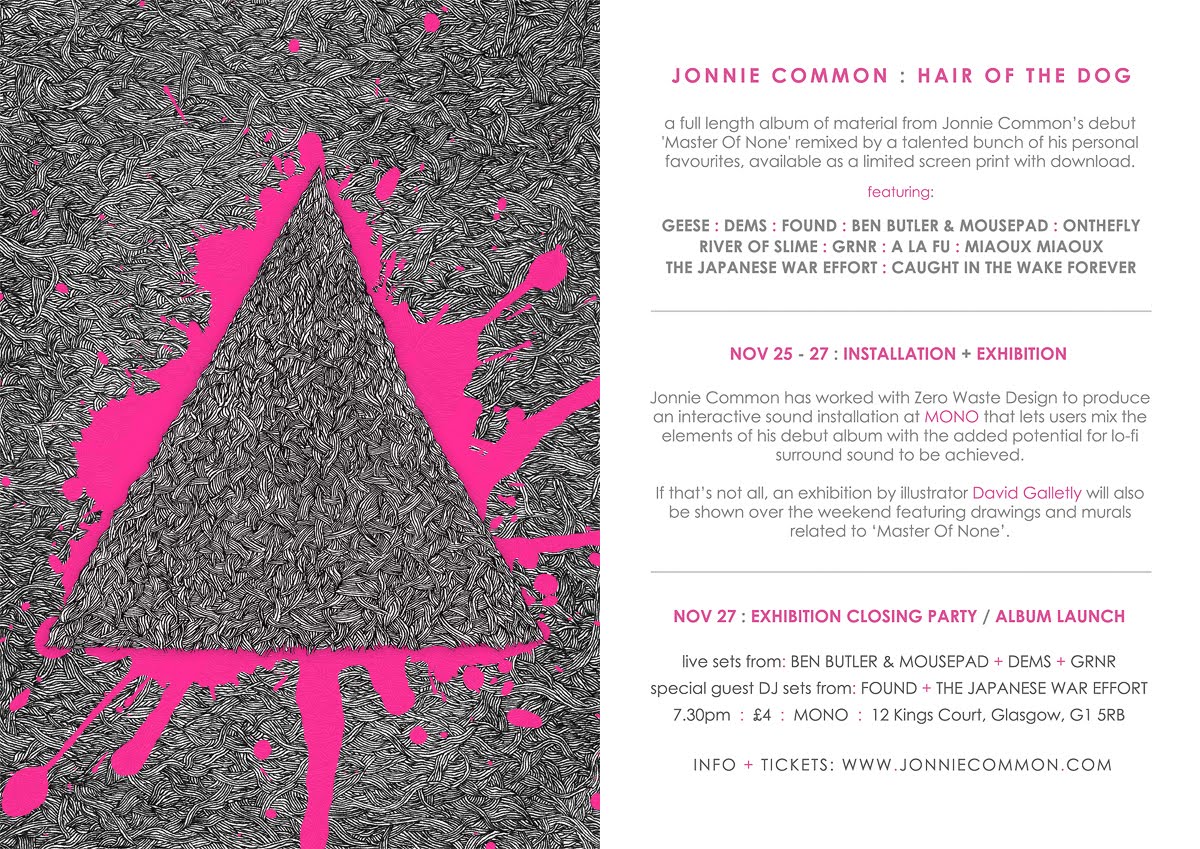
Hair Of The Dog this weekend
I've been helping Jonnie with his installation coming up this weekend, involving 8 Niftymitters.. Do come along, it is going to have to be good.
A full length album of material from Jonnie Common’s debut 'Master Of None' remixed by a talented bunch of his personal favourites. Available as a limited screen print with download. Featuring:
GEESE : DEMS : FOUND : BEN BUTLER & MOUSEPAD : ONTHEFLY : RIVER OF SLIME : GRNR : A LA FU : MIAOUX MIAOUX : THE JAPANESE WAR EFFORT : CAUGHT IN THE WAKE FOREVER
Nov 25 - 27 : Jonnie Common Sound Installation
Jonnie Common has worked with Zero Waste Design to produce an interactive sound installation at MONO that lets users mix the elements of his debut album with the added potential for lo-fi surround sound to be achieved.
If that’s not all, an exhibition by illustrator David Galletly will also be shown over the weekend featuring drawings and murals related to ‘Master Of None’.
Nov 27 : Exhibition Closing Party
live sets from: BEN BUTLER & MOUSEPAD + DEMS + GRNR
special guest DJ sets from: FOUND + THE JAPANESE WAR EFFORT
7.30pm : £4 : MONO : 12 Kings Court, Glasgow, G1 5RB
INFO + TICKETS: WWW.JONNIECOMMON.COM
Subscribe to:
Comments (Atom)